A powerful eLearning module in Odoo 18 enables companies, trainers, and content creators to introduce online courses effectively. It offers a single platform for designing, publishing, and tracking educational content from creating courses to managing certifications. Users can include downloaded documents, quizzes, and video lectures to maintain student interest and monitor progress. Gamifications and integrated forums make the learning process engaging and dynamic. This module is perfect for both internal training and online courses because it supports a variety of languages and user roles. This blog offers a step-by-step guide to setting up an online course using the eLearning module.
From the Odoo 18 dashboard, select the eLearning module.

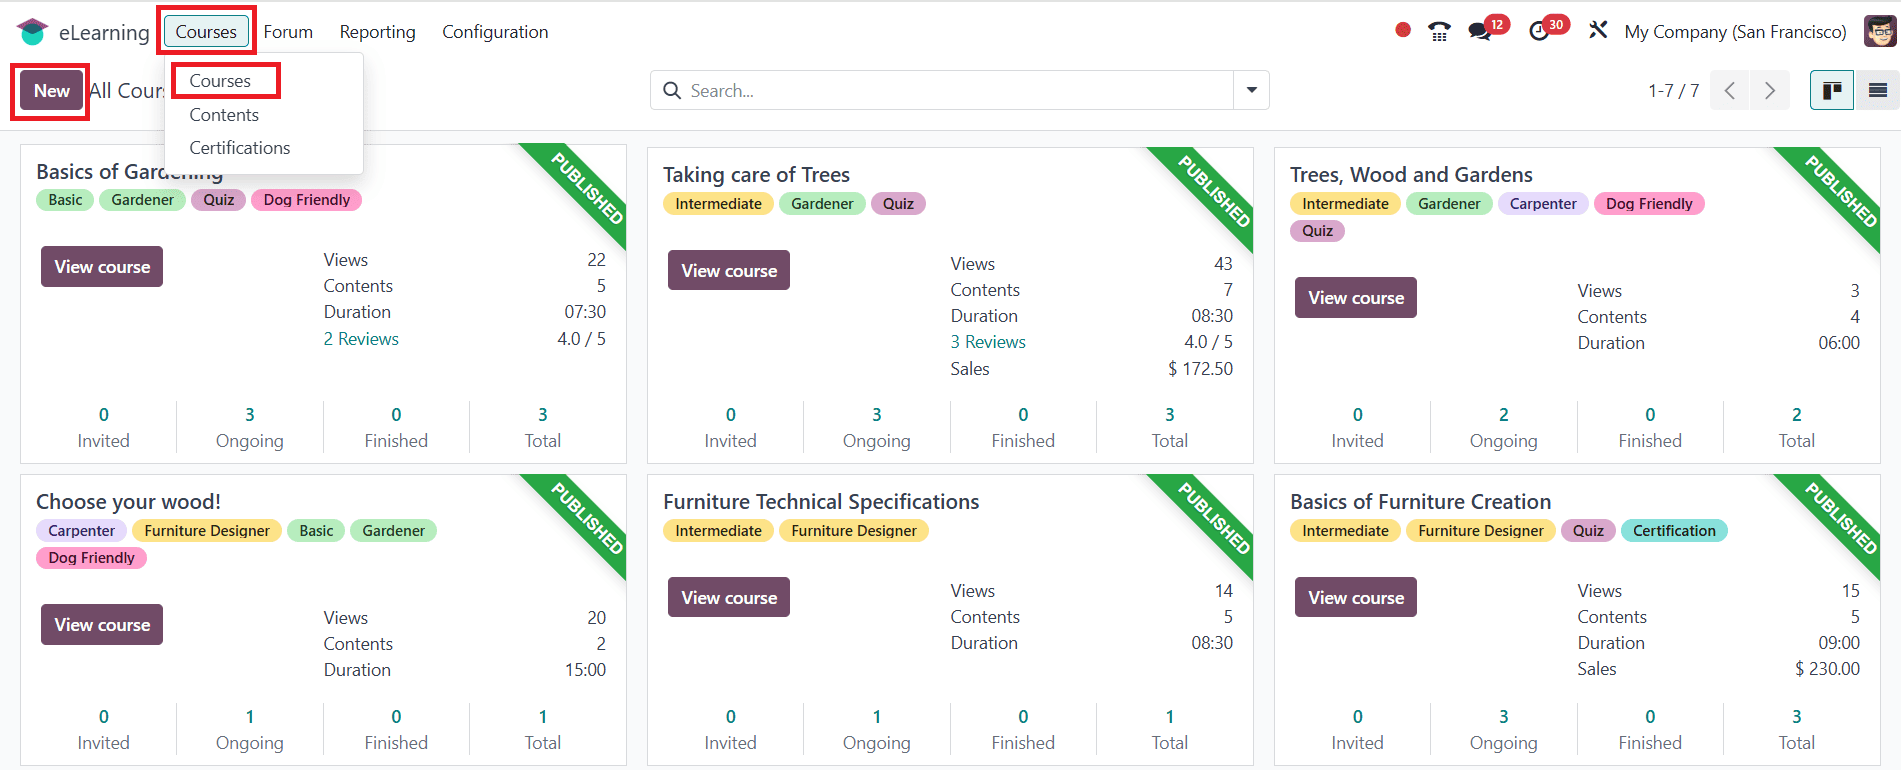
To create a new course, navigate to the Courses > Courses, and click on the New button as shown below:
In the form that appears, you can enter the course under the Course Title field. You can set different tags from the list given, such as Basic or any other. Under the Content tab, you have options such as Add Section, Add Content, and Add Certification.

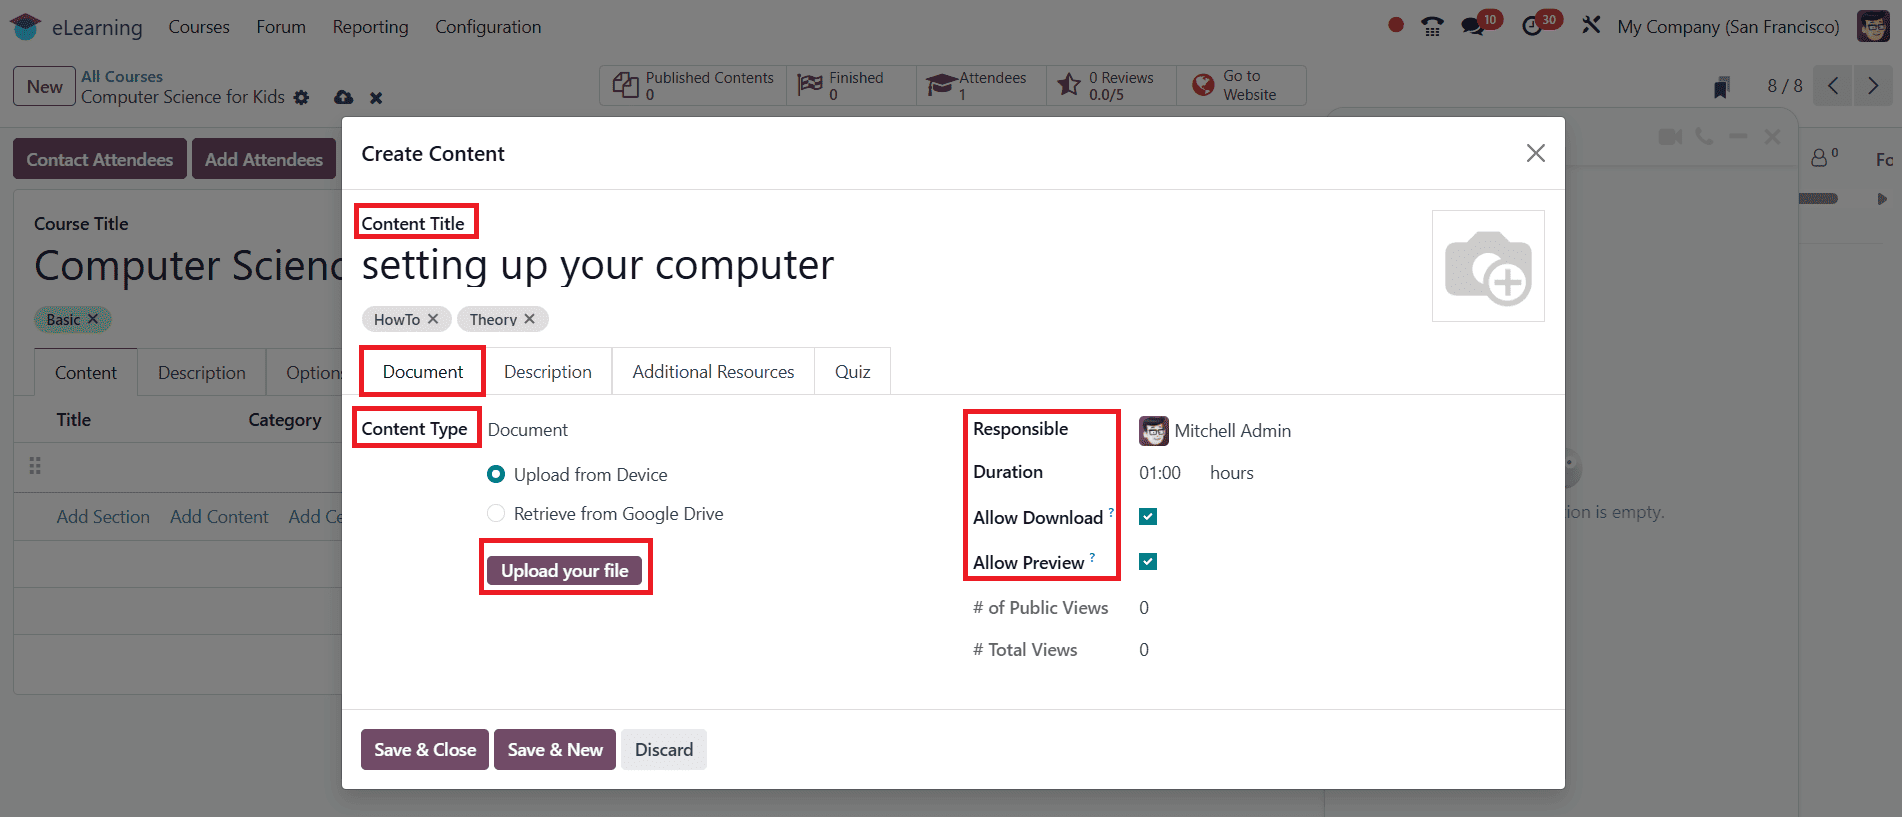
When you click on the Add Content option, a pop-up screen will be displayed. There, you can add a Content Title and Tags for your content. Under the Document tab, you can select Content Type as Document, Image, Article, Video, Quiz, and Certification. Then click on the Upload your file button to upload the selected content type. You can also add a Responsible and the Duration of the content. Also, enable options such as Allow Download (allowing anyone to download the file) and Allow Preview (allowing anyone to access the content without joining the channel).
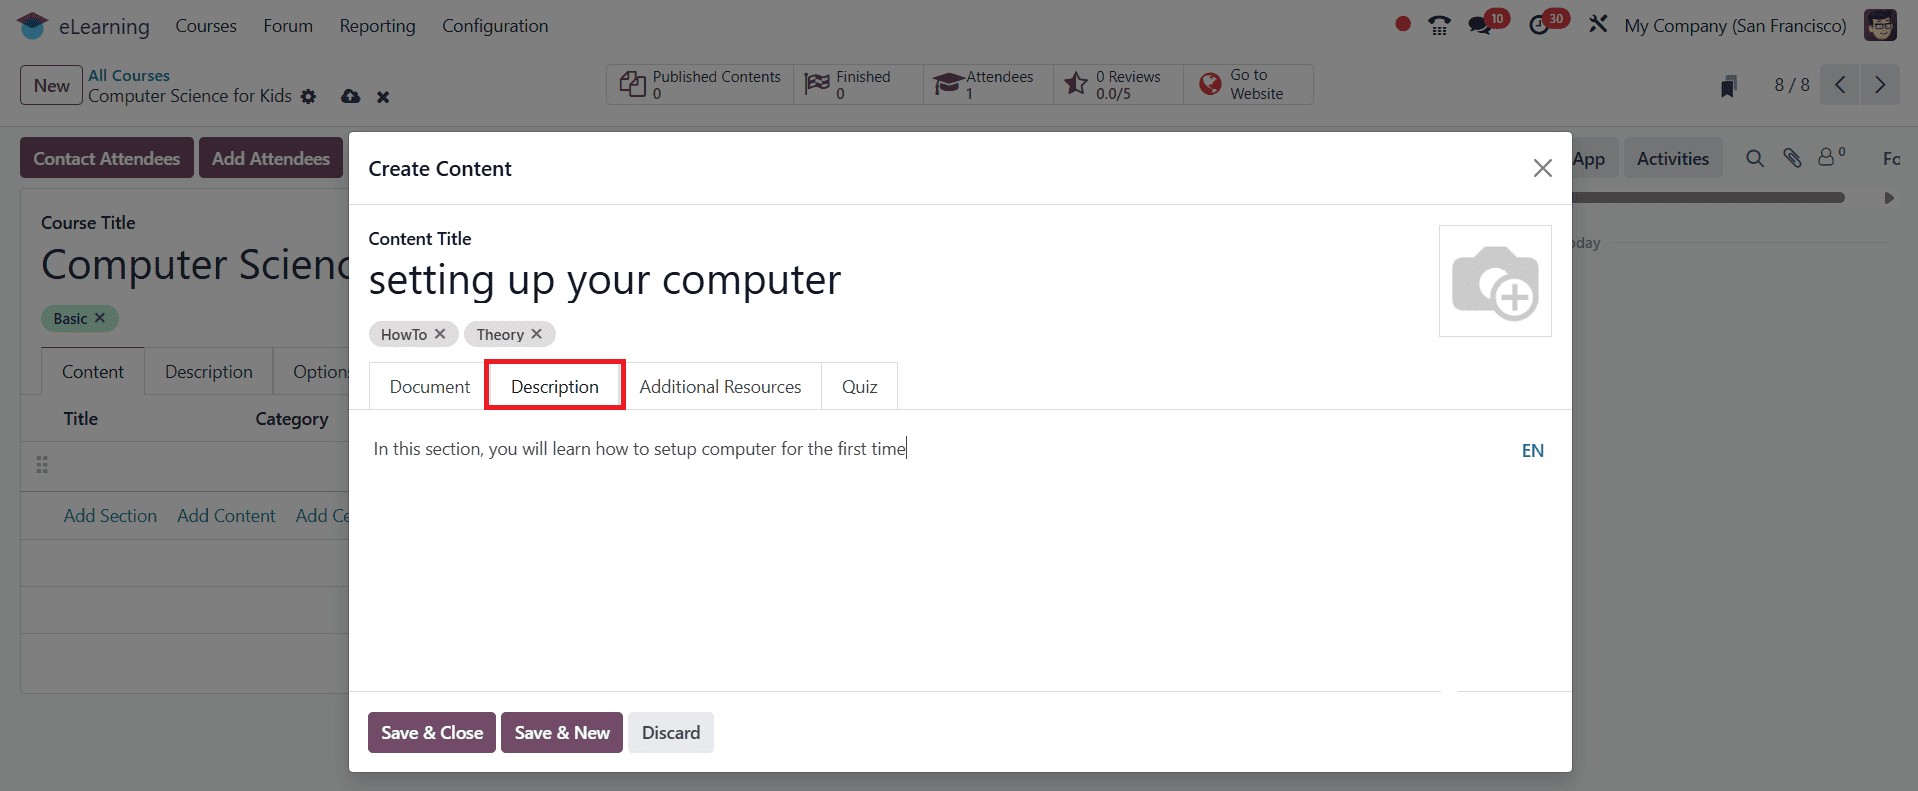
In the Description tab, you can add short information about the content.
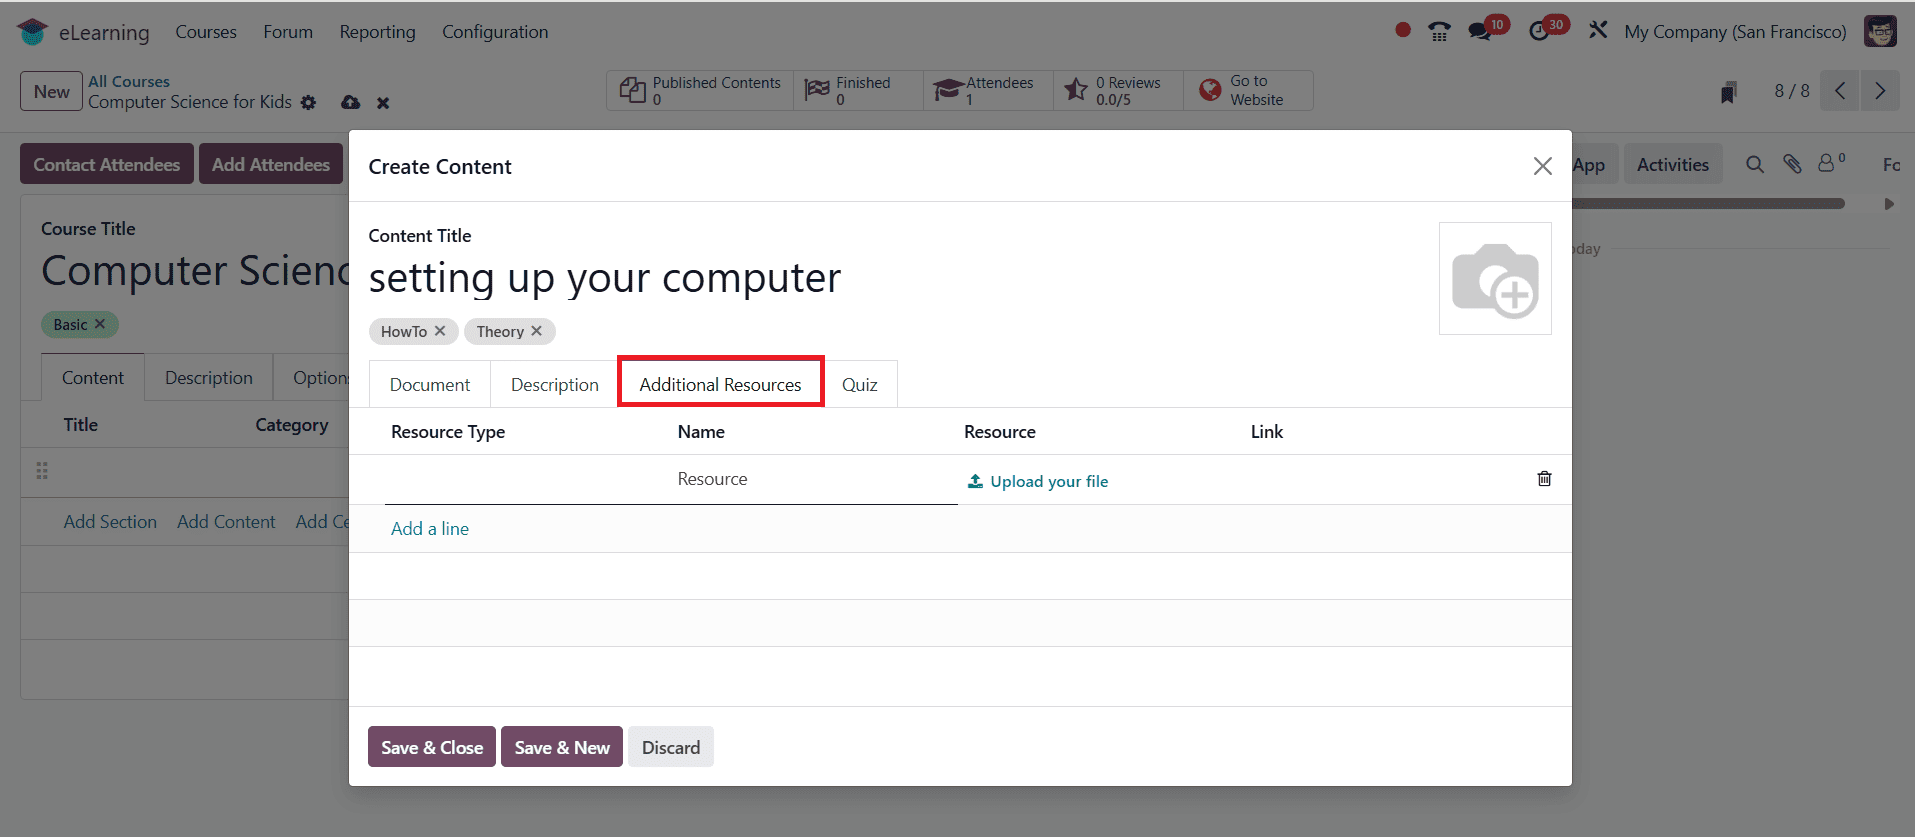
Under the Additional Resources tab, you can add any extra resource in the form of a link or a file. Then, upload either a link or a file.
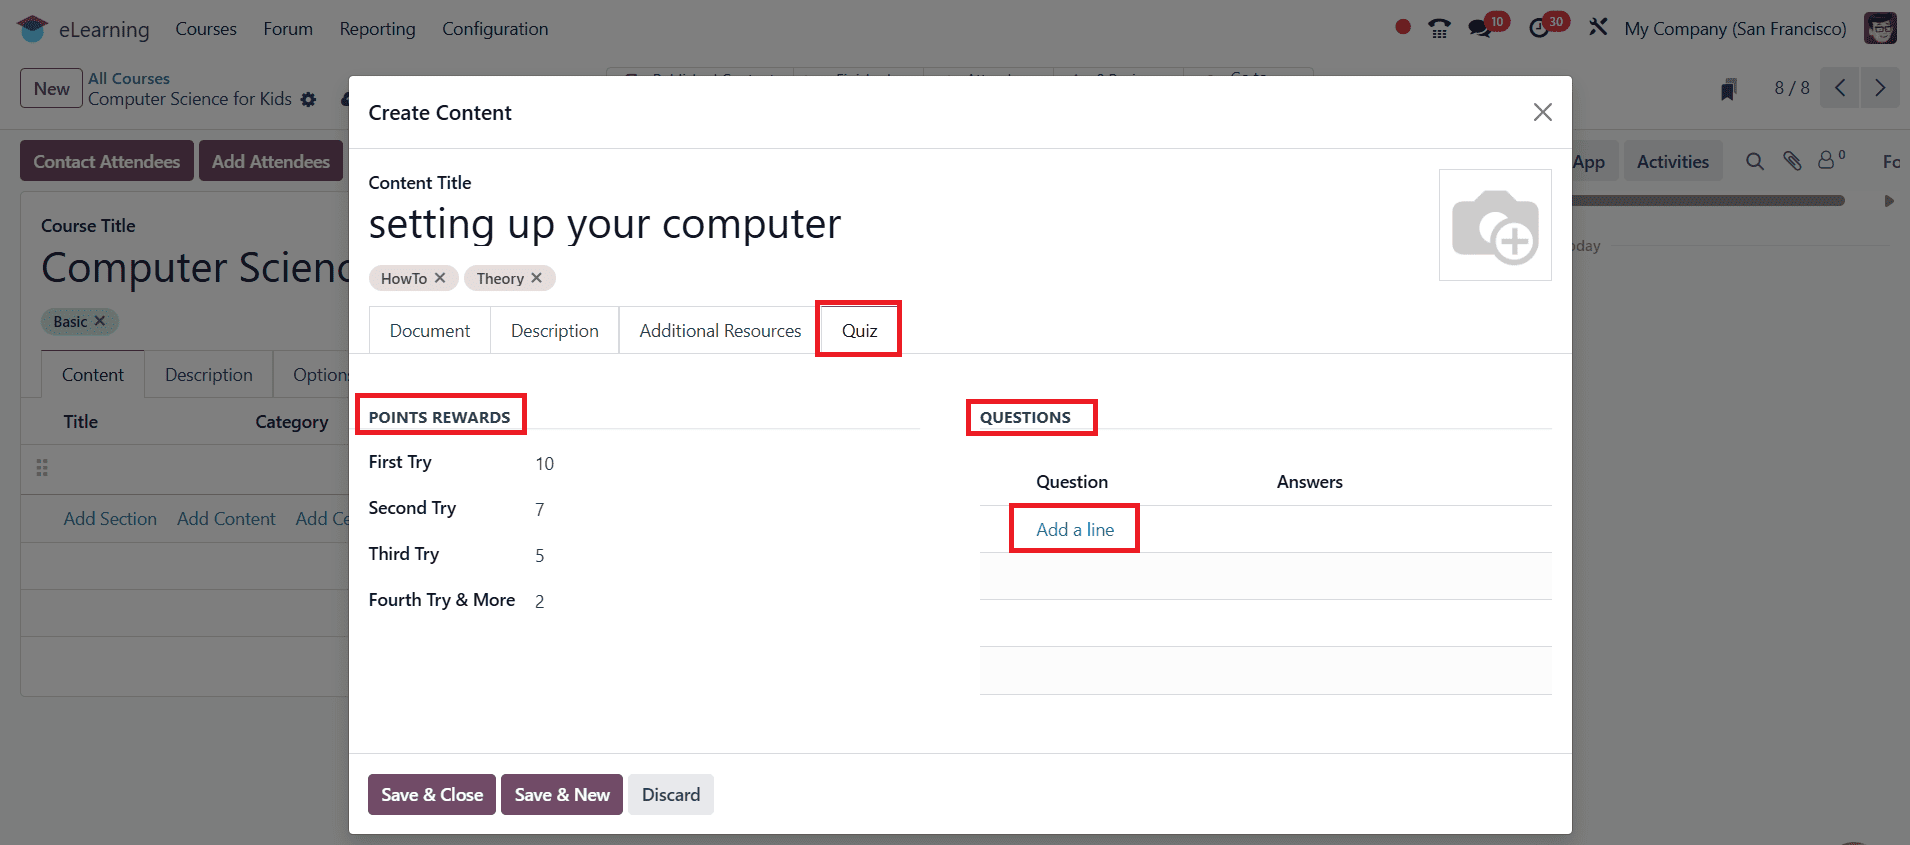
Go to the Quiz tab to view the points or rewards assigned for each attempt under the Points Rewards option. In the Question option, click Add a line to create a new question.
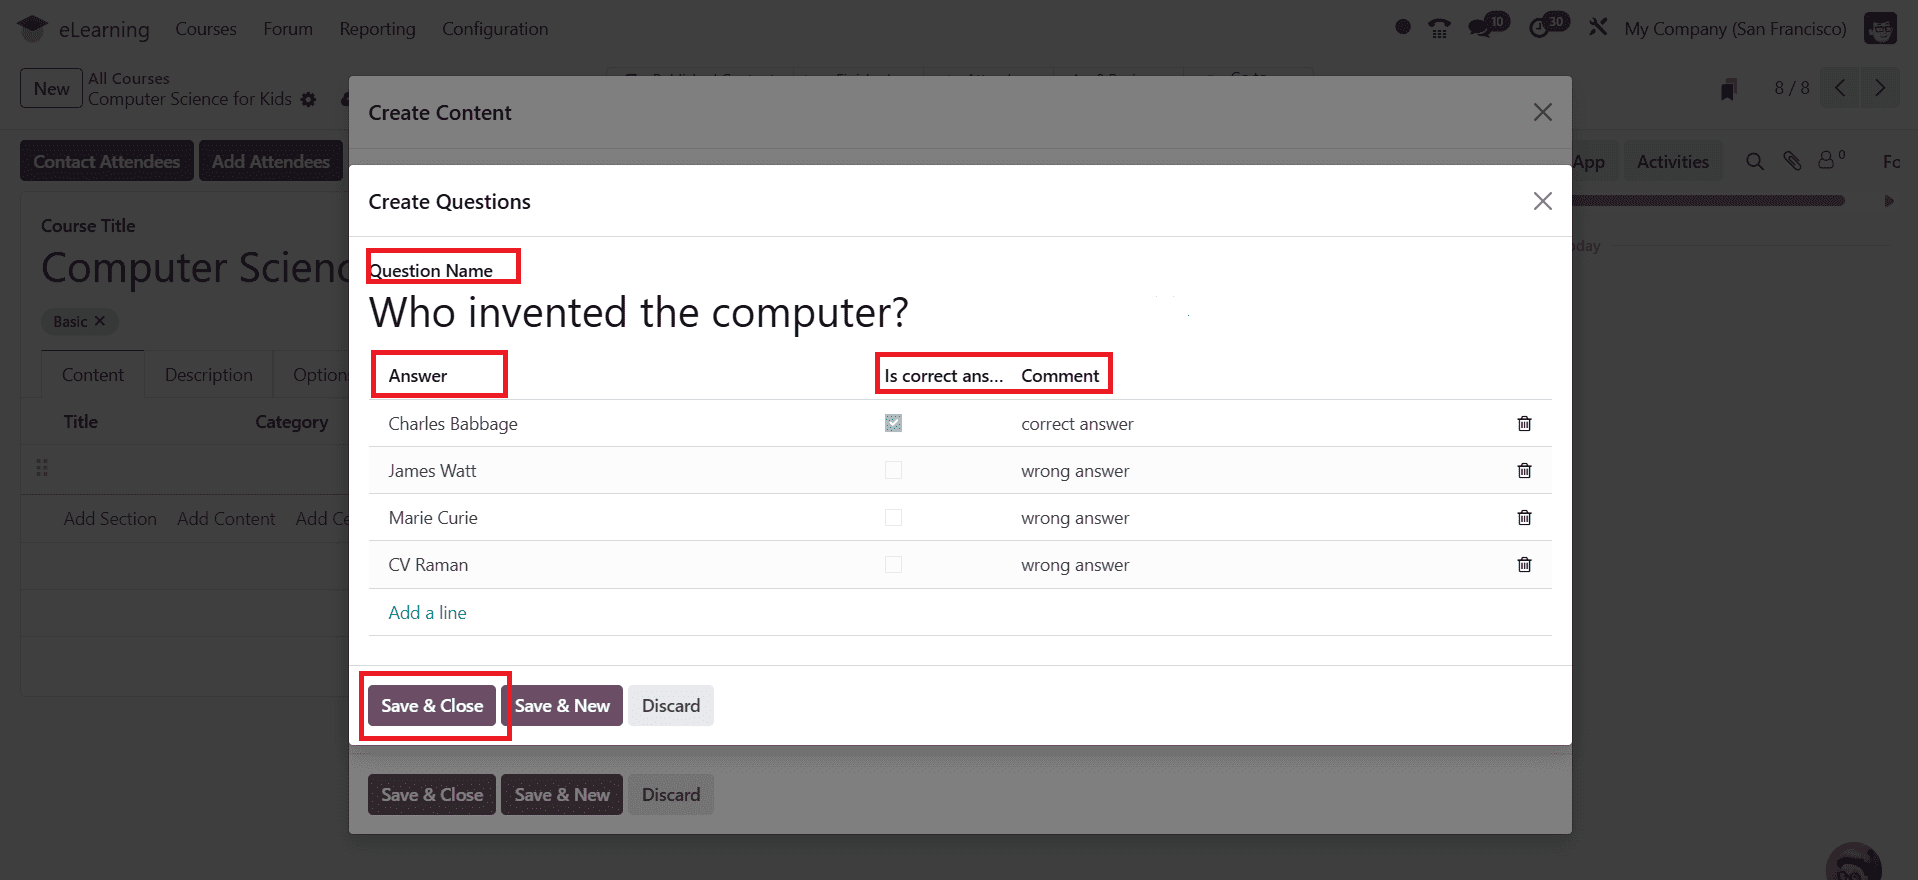
A pop-up window will appear, where you can enter your question in the Question Name field. Under the Answers option, you can add several answers and mark the correct answer in the Is Correct Answer checkbox. Then click on the Save & Close button. If you want to add another question, click on the Save & New button.
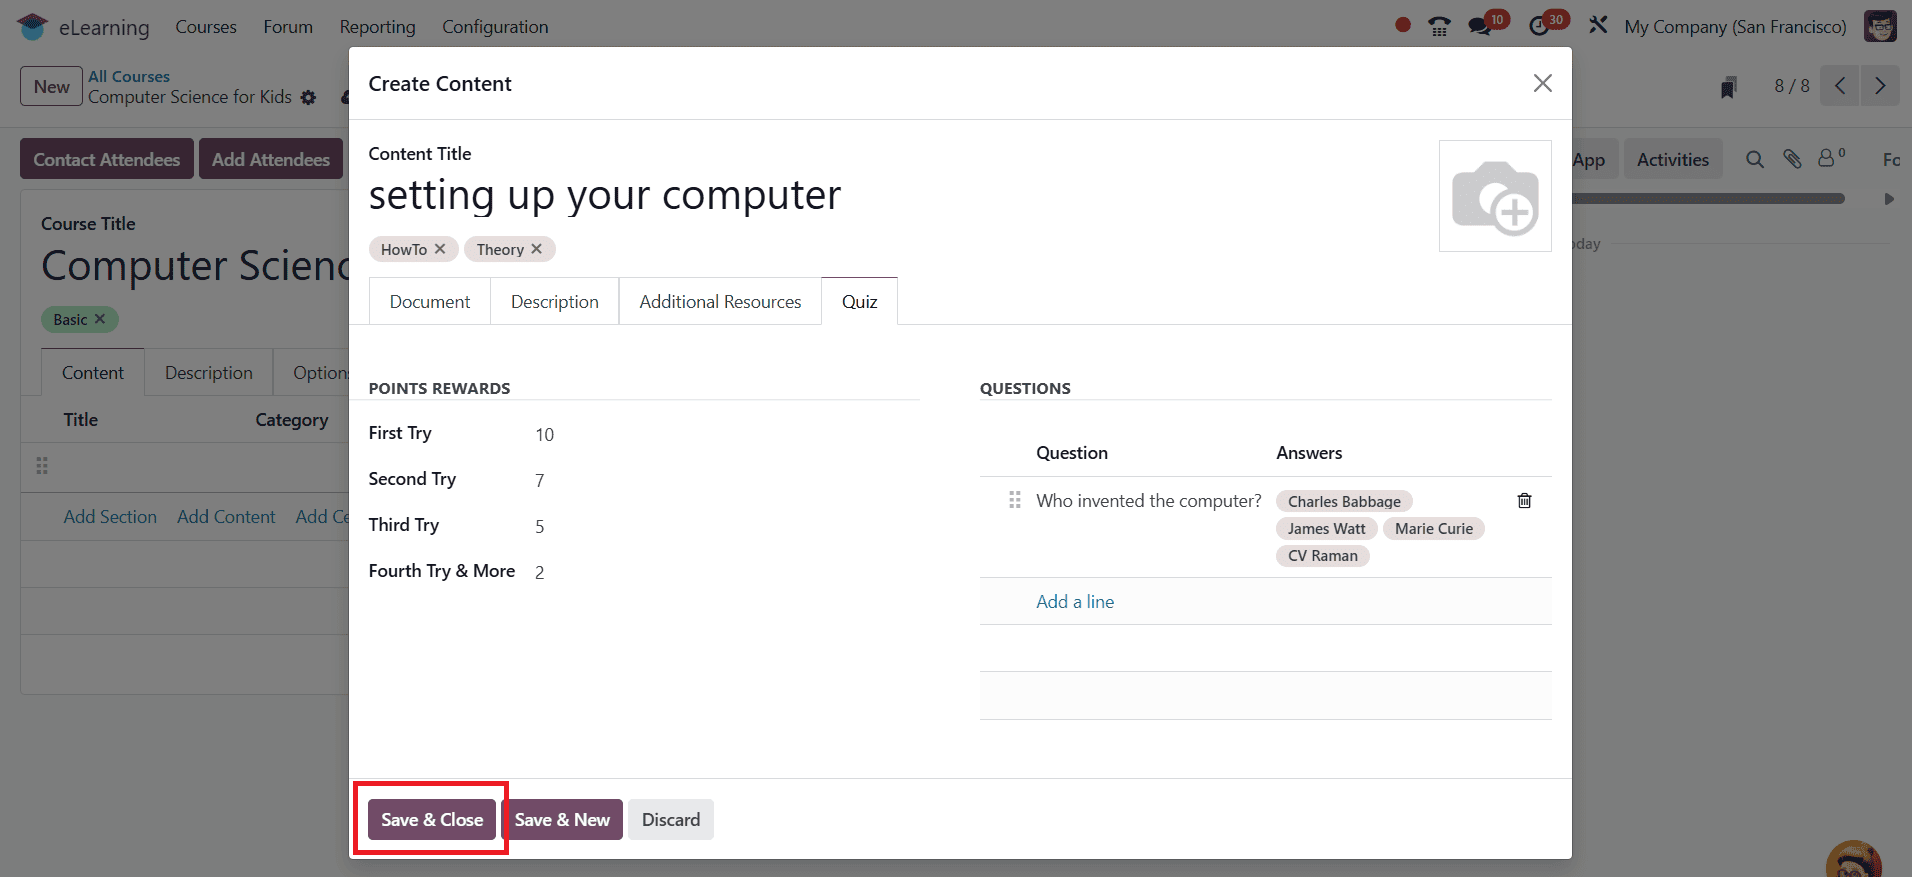
Here, you can see the created question under the Questions tab. Then click on the Save & Close button to save the question as shown below:
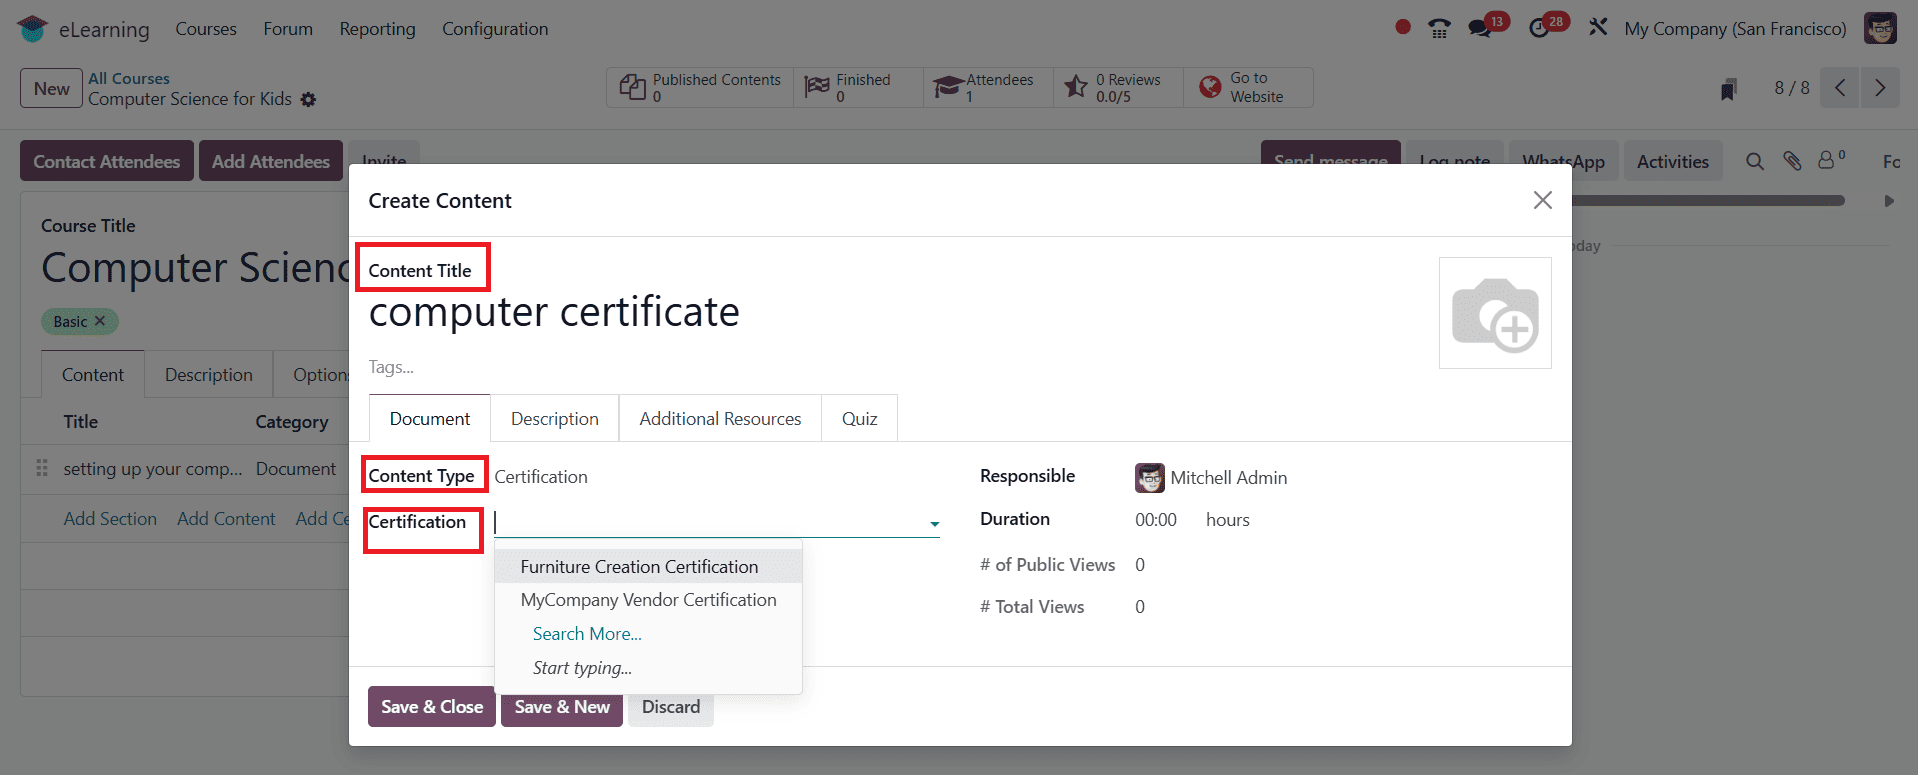
Select Add Certification to include a course certification.

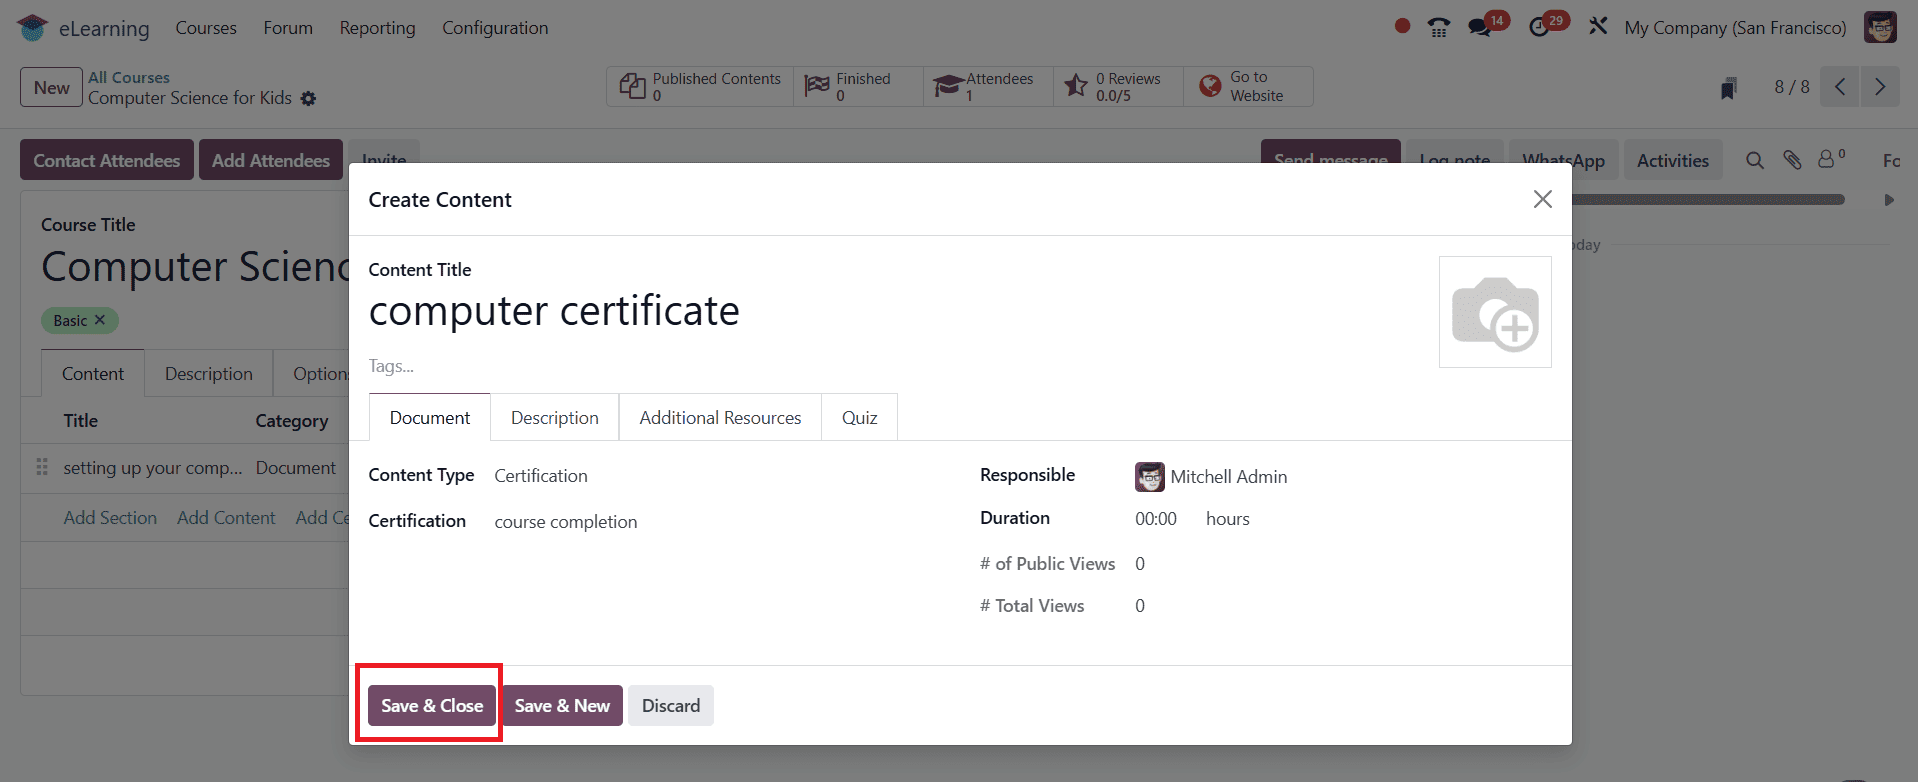
In the pop-up window, enter the certificate title under the Content Title option. Select the Content Type as Certification. Under the Certification option, you add an existing certification or create a new one by clicking on the New button.
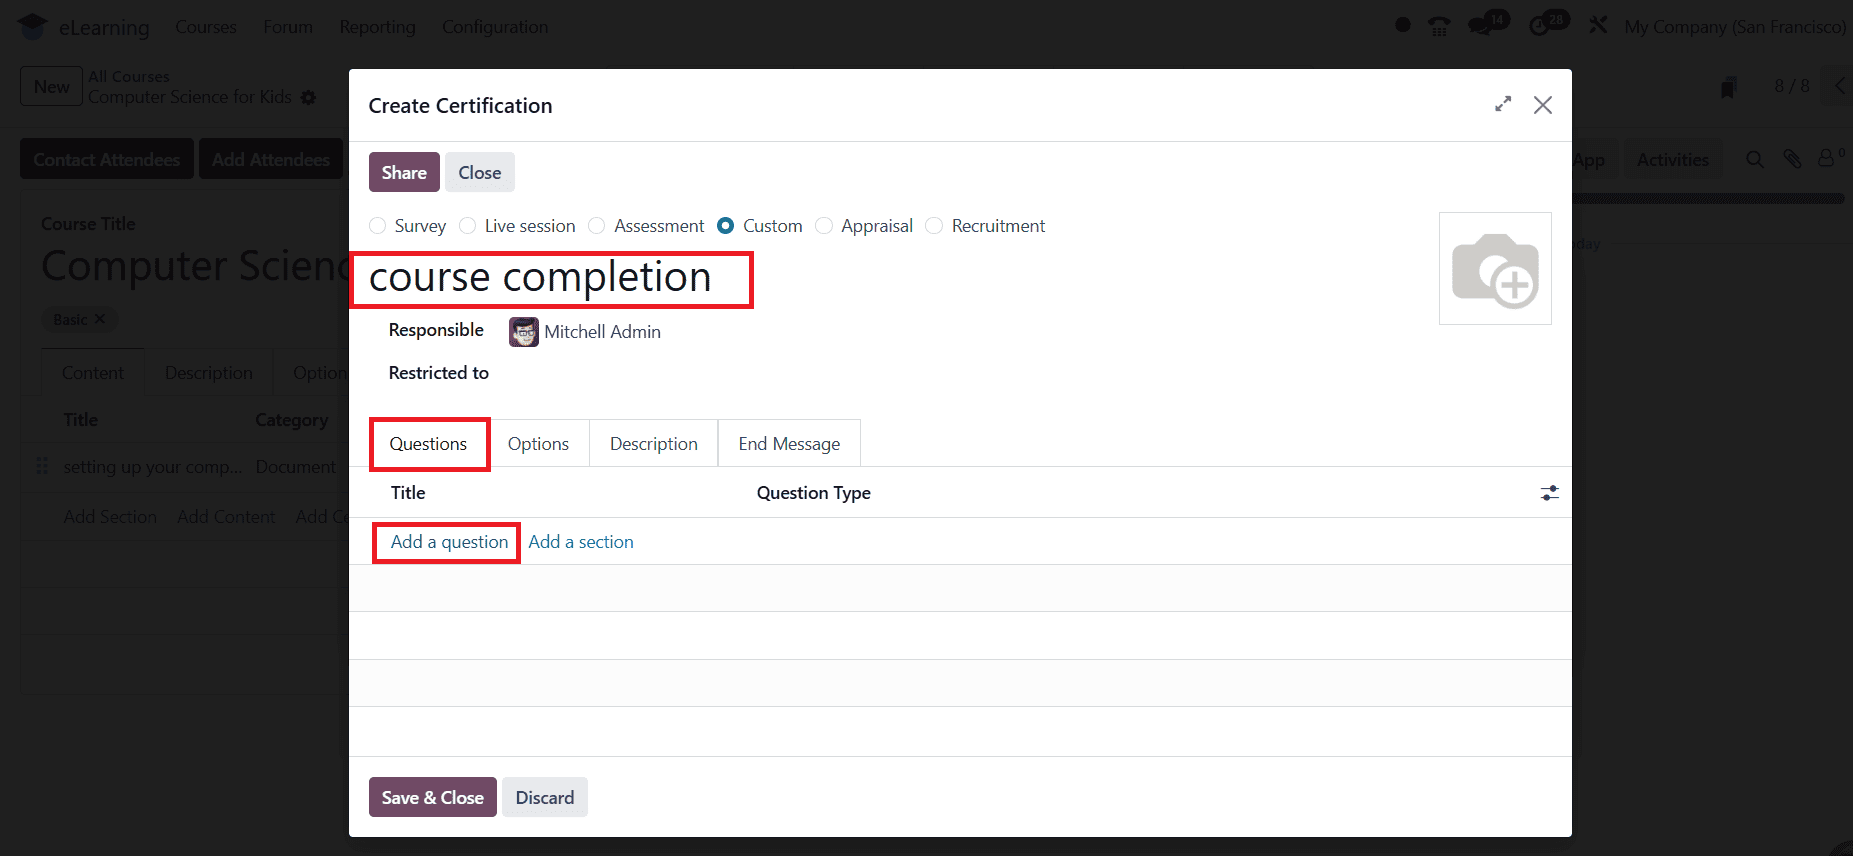
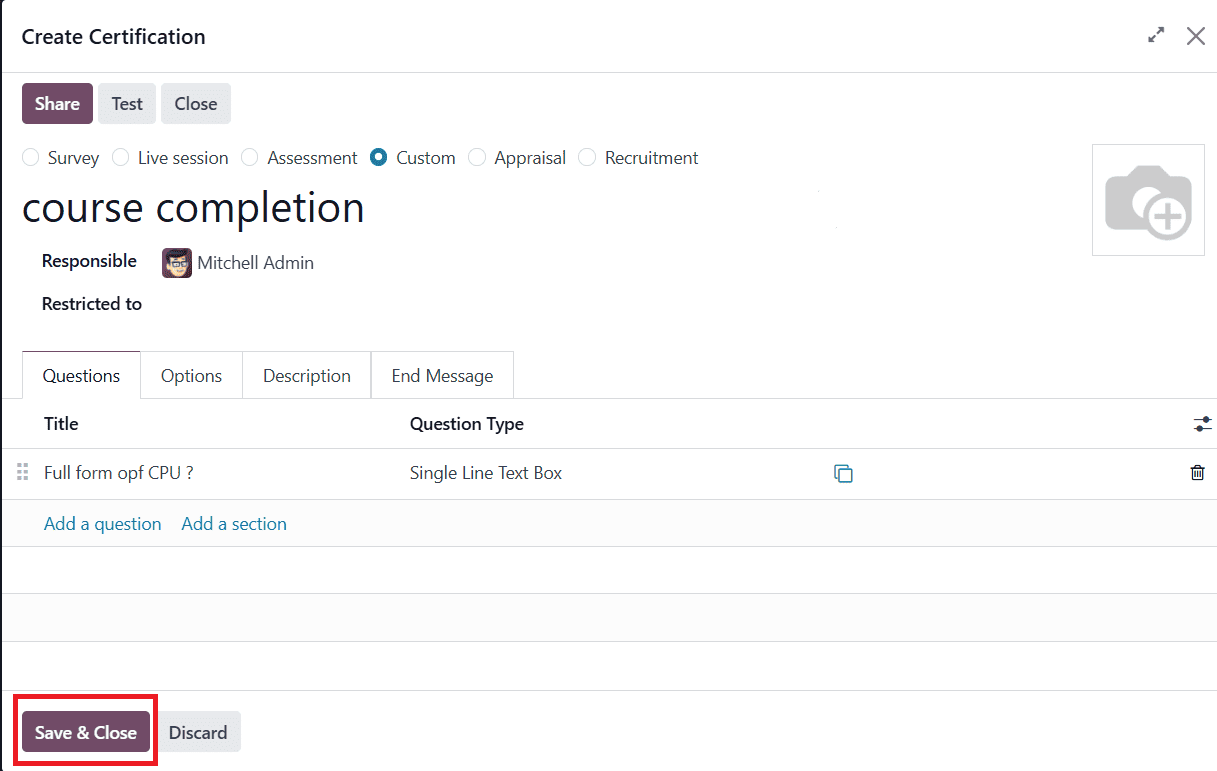
Add a name for your new certification. Under the Question tab, click on the Add a question to create a question as shown below:
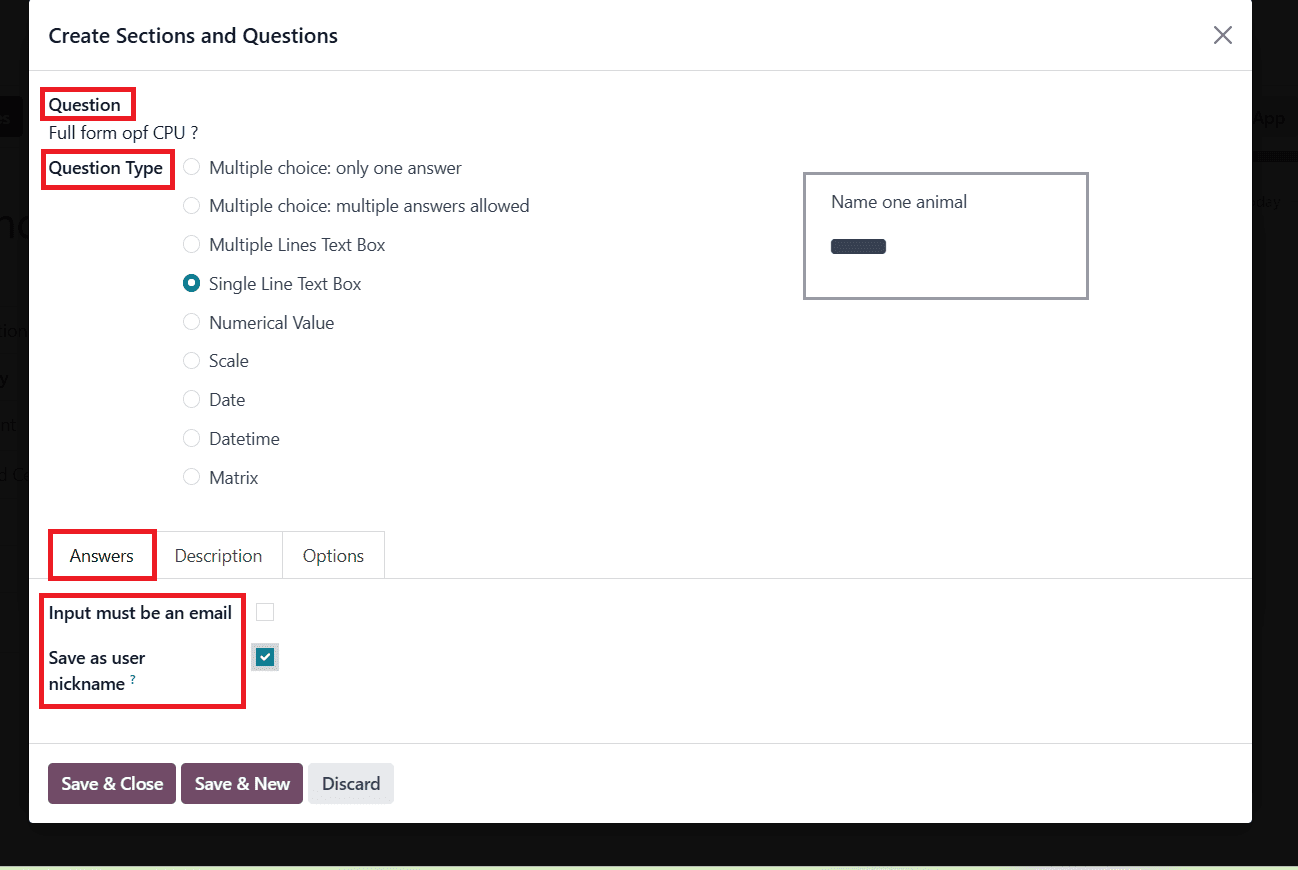
Under the Question option, you can add a question for your certification and select a Question Type. When you choose the question type as Single Line Text Box, you can see two checkbox options under the Answers tab. When you enable the "Input must be an email" option, an extra checkbox appears named "Save as user email." When you allow these two options, the answer to the question will be saved as the email address of the participant. When you enable Save as user nickname, the participant’s answer will save as their nickname in Odoo. You can also select the question type as multiple choice, where you can add various answers in the Choices option under the Answers tab. You can also mark the correct answer and provide a score for it. When you select the question type as Matrix, you can see Rows and Choices, where the participant needs to fill in a table as answer, under the Answers tab.
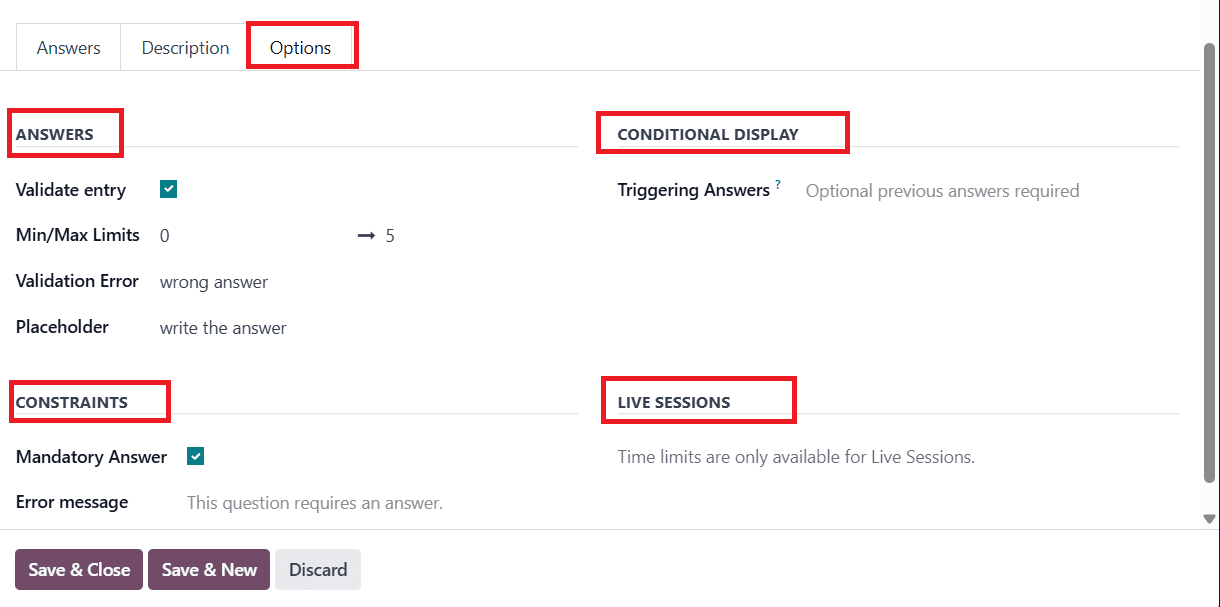
The Description tab allows you to add information about your questions. Under the Options section, you can see four sections: Answers, Constraints, Conditional Display, and Live Sessions. You can set the question type as Single Line Text Box, Numerical Value, Date, or Datetime. You can see two options under the Answers section: Validate entry and Placeholder (help the participants know what to write). When you enable Validate entry, two additional options appear: Min/Max Limits (minimum and maximum limits to the specific question) and Validation Error ( a message will appear when the answer is invalid). Enable the Mandatory Answer option to make answering the question mandatory for participants. In the Error Message option, you can add a custom message to the participant to provide an answer to the question. Under the Triggering Answers option, you can add answers from the previous questions that trigger this one. Under the Live Sessions section, you can add time limits, which are available only for Live sessions.
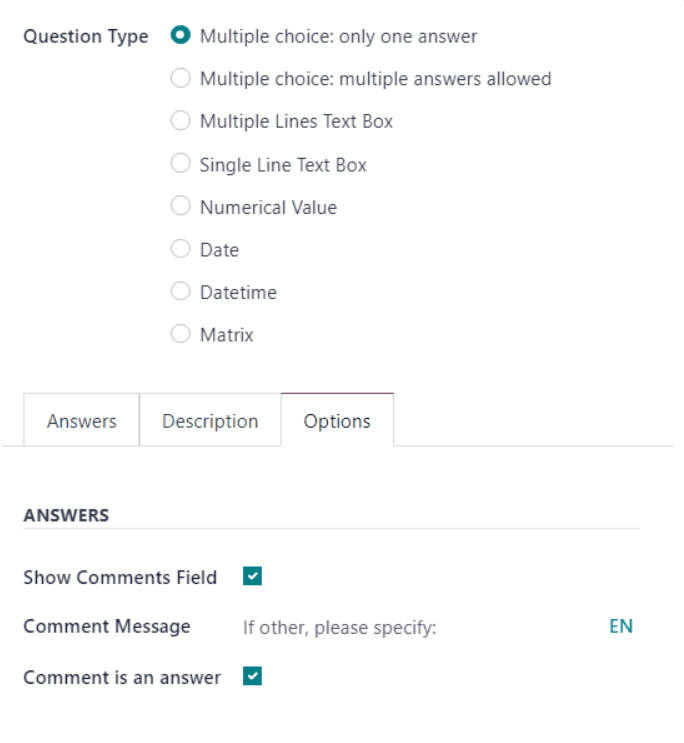
When you select the question type as multiple choice, you can enable Show Comment Field, then two extra options will appear: Comment Message ( add a message to guide the participants and Comment is an answer (participants' comments turned into an answer).
Here, you can see the created certification. Then save the certification by clicking on the Save & Close button as shown below:
Here, you can see the newly created certification under the Certification option. Then click on the Save & Close button as shown below:
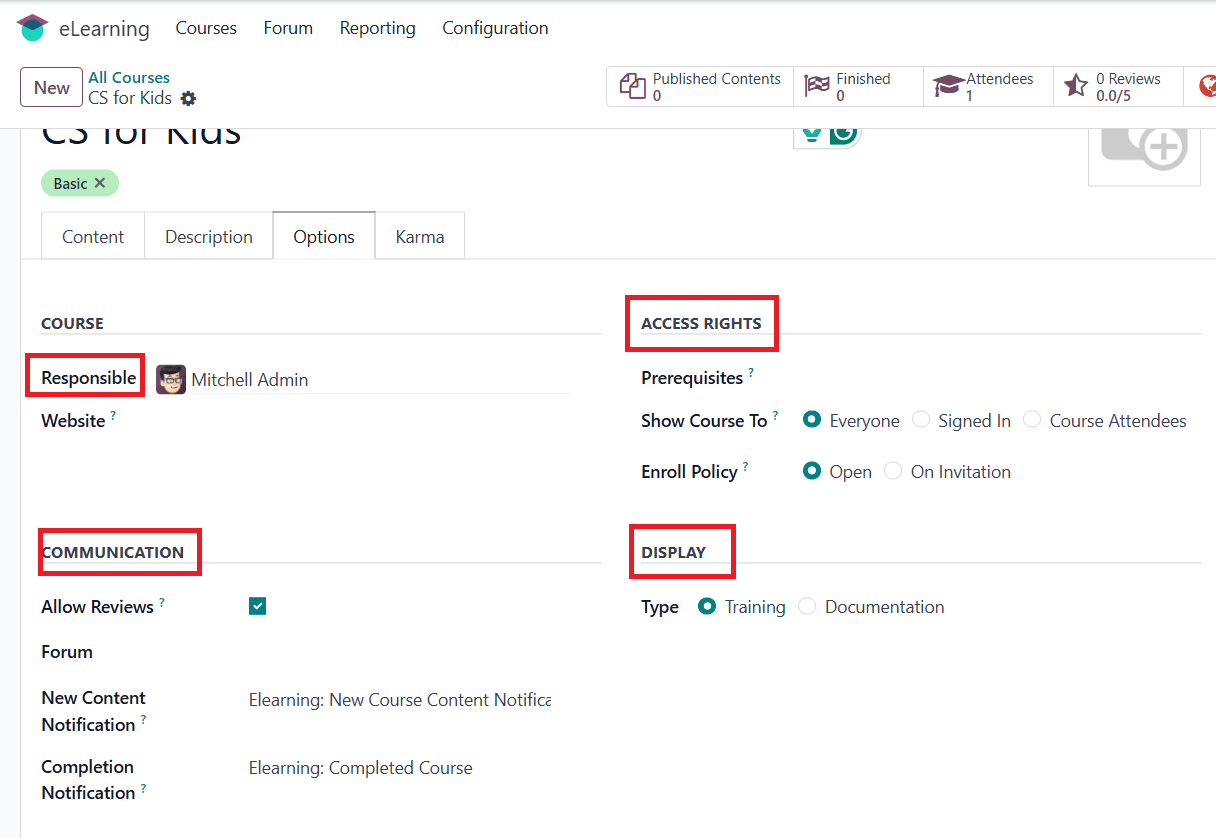
Go to the Description option to add course details. In the Options tab, choose the Responsible person and the Website for the Course. Under the Access Rights option, you can add Prerequisites, Show Course To as Everyone, Signed In, or Course Attendees, and Enroll Policy as Open or On Invitation. Under the Communication option, you can enable Allow Reviews. Additionally, you can include a Forum, New Content Notification, and Completion Notification. Under the Display option, you can select Type as Training or Documentation.
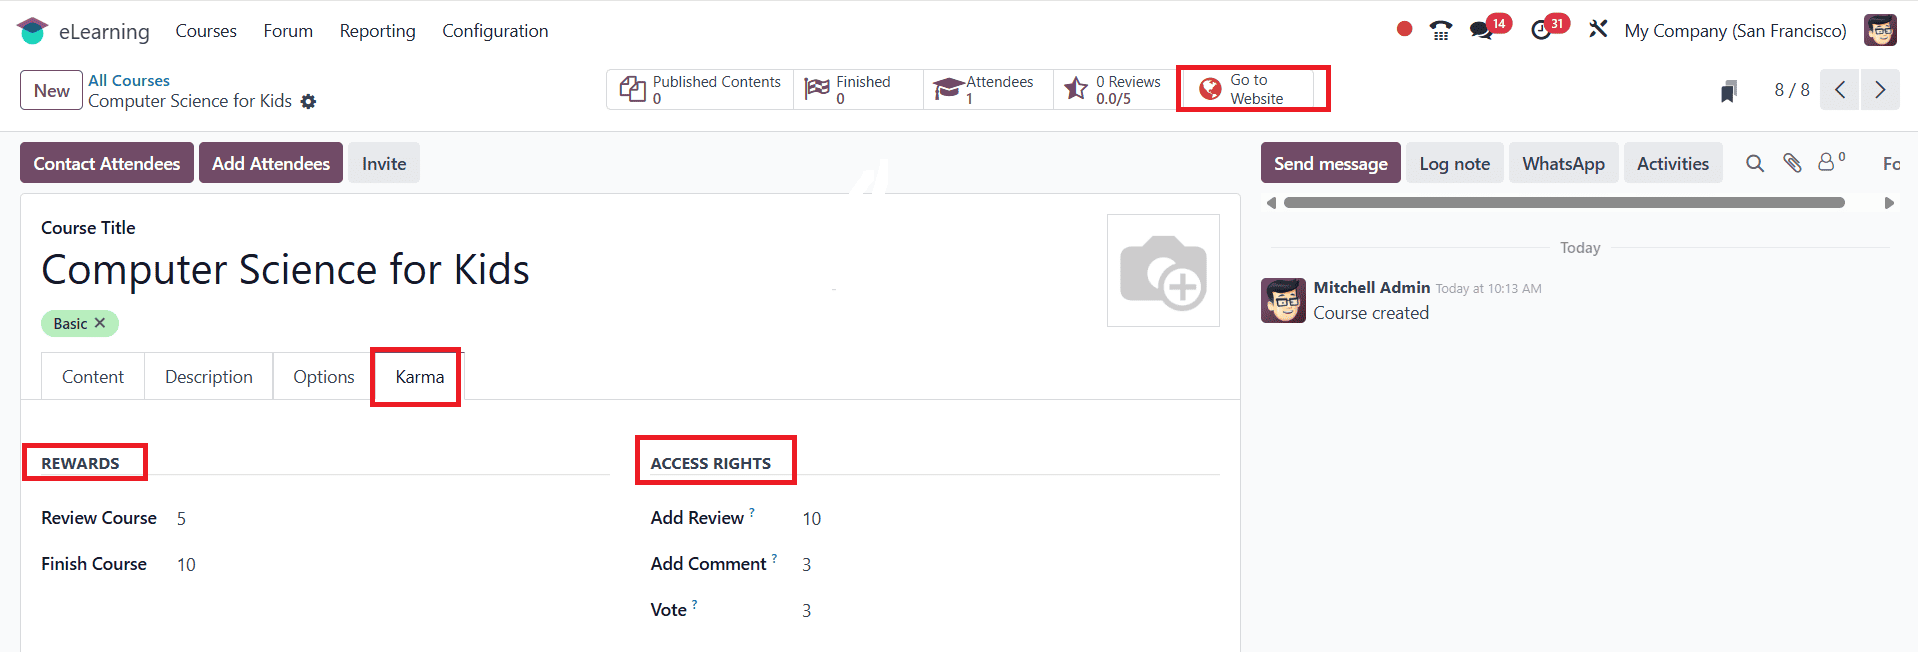
Under the Karma tab, you can view the details of Rewards and Access Rights. Click on the Go to Website button as shown below:
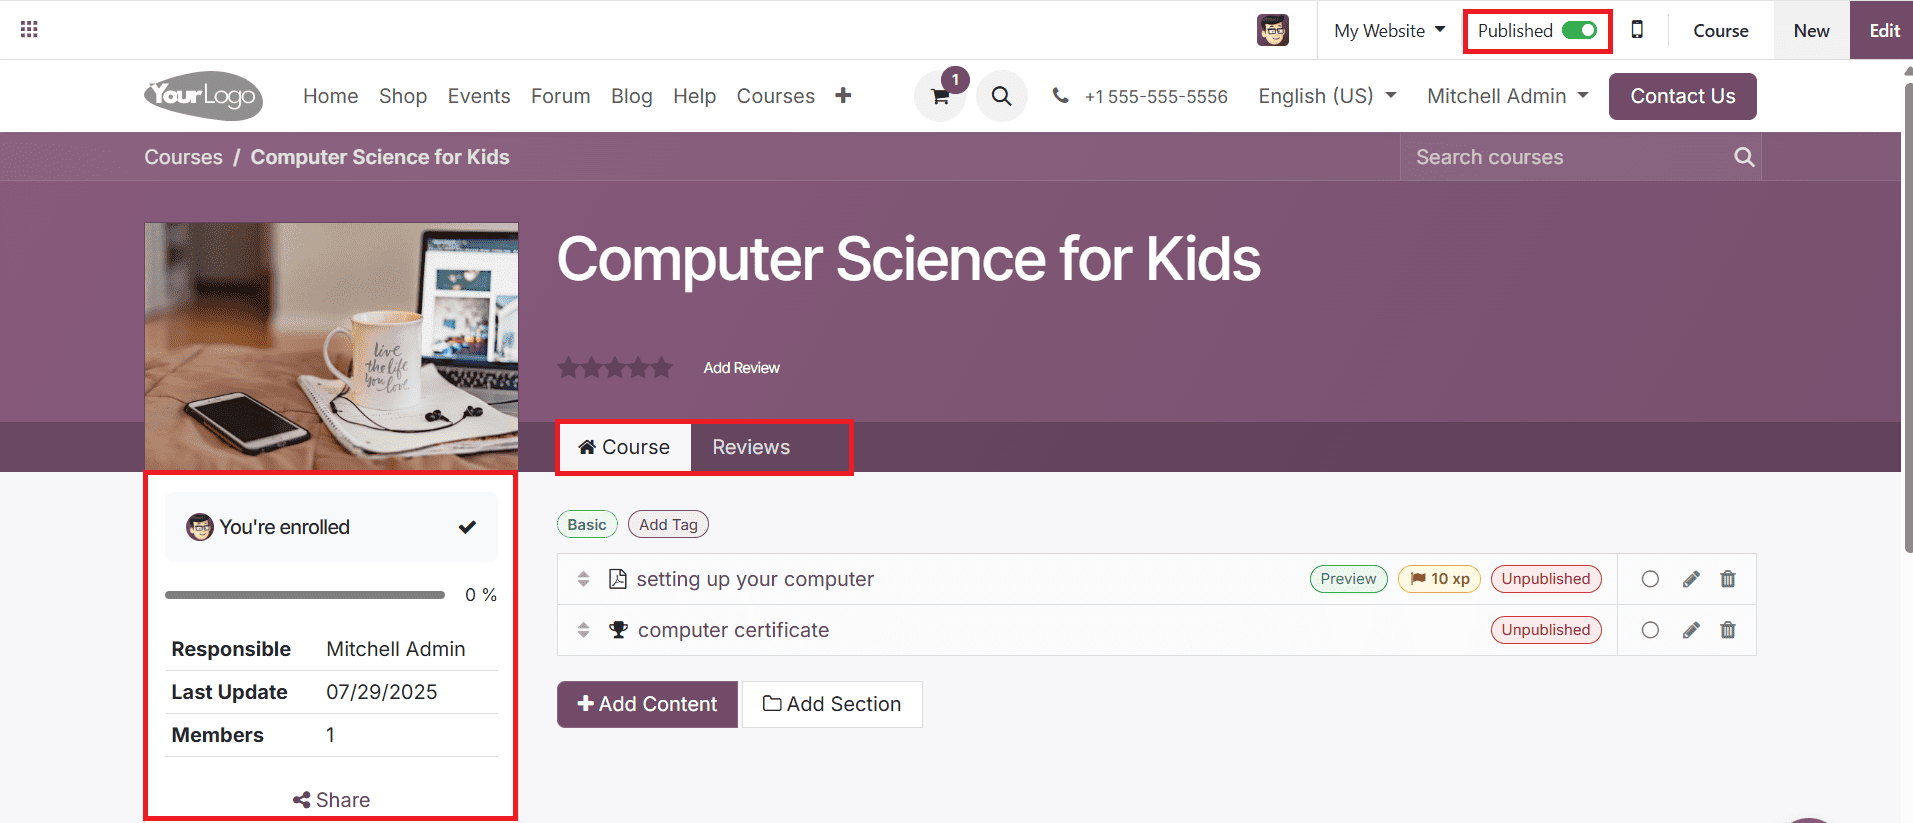
On the Website, you can view the course, course content, and certification. You can also view the enrollment details on the left side of the screen. If needed, you can also add reviews about the course. Then enable Published as shown below:
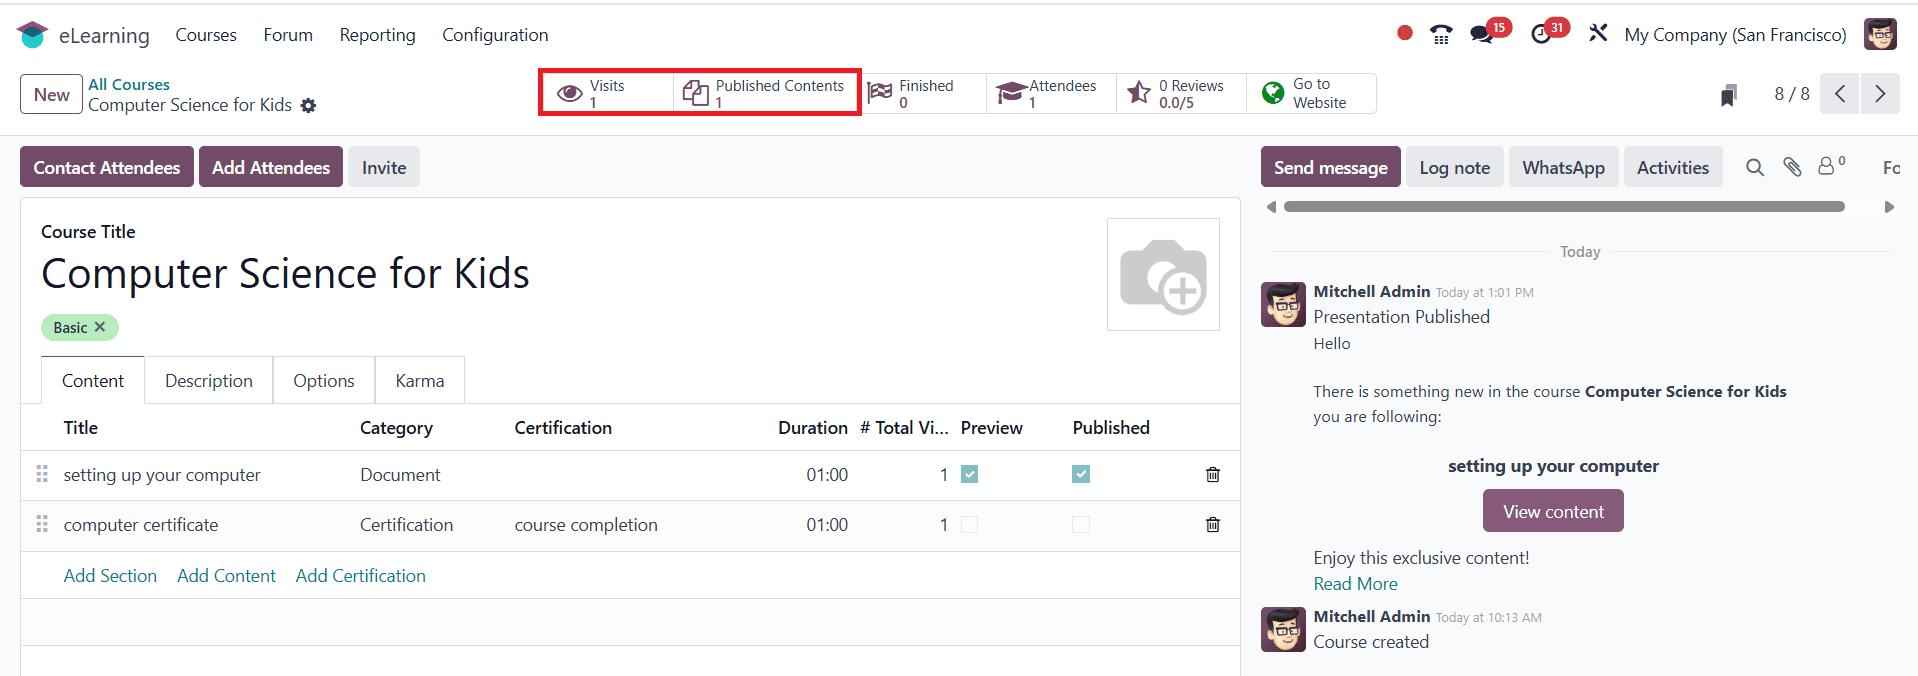
Then go back to the Courses > Courses. Here, you will notice that the content is not yet published. To publish the contents, click on the Published Contents as shown below:

Here, you can see the already created content of your course.

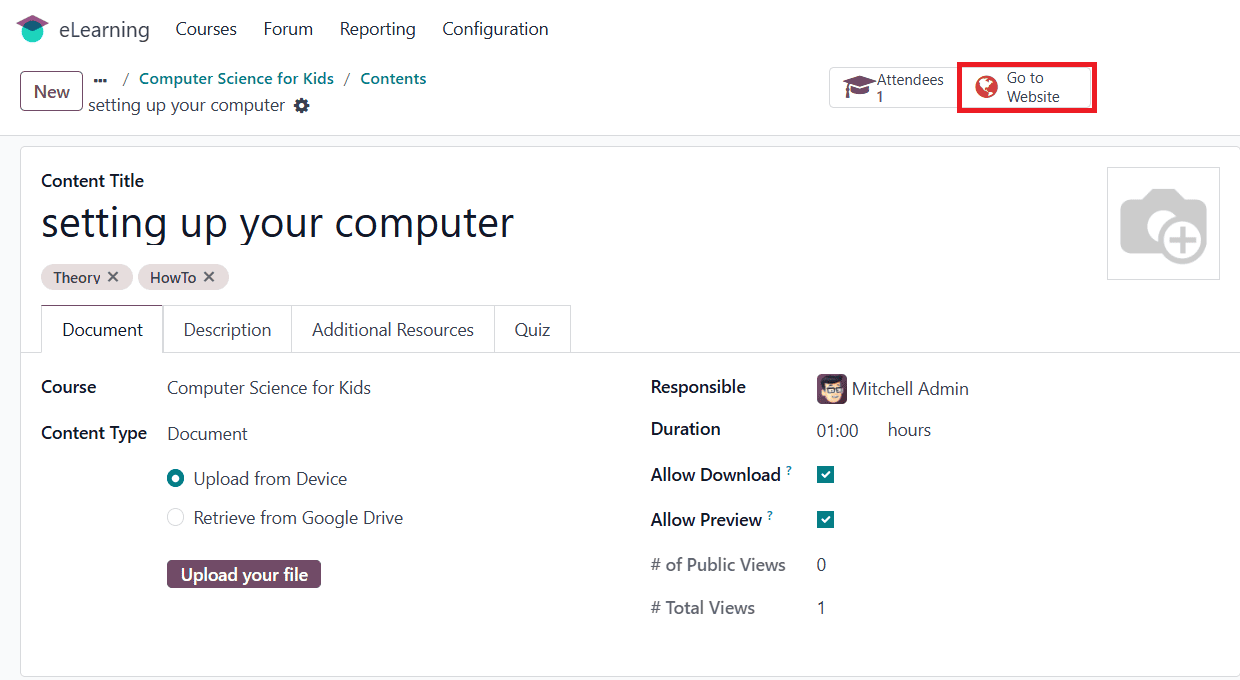
Select any one of the content from the list and click on the Go to Website as shown below:
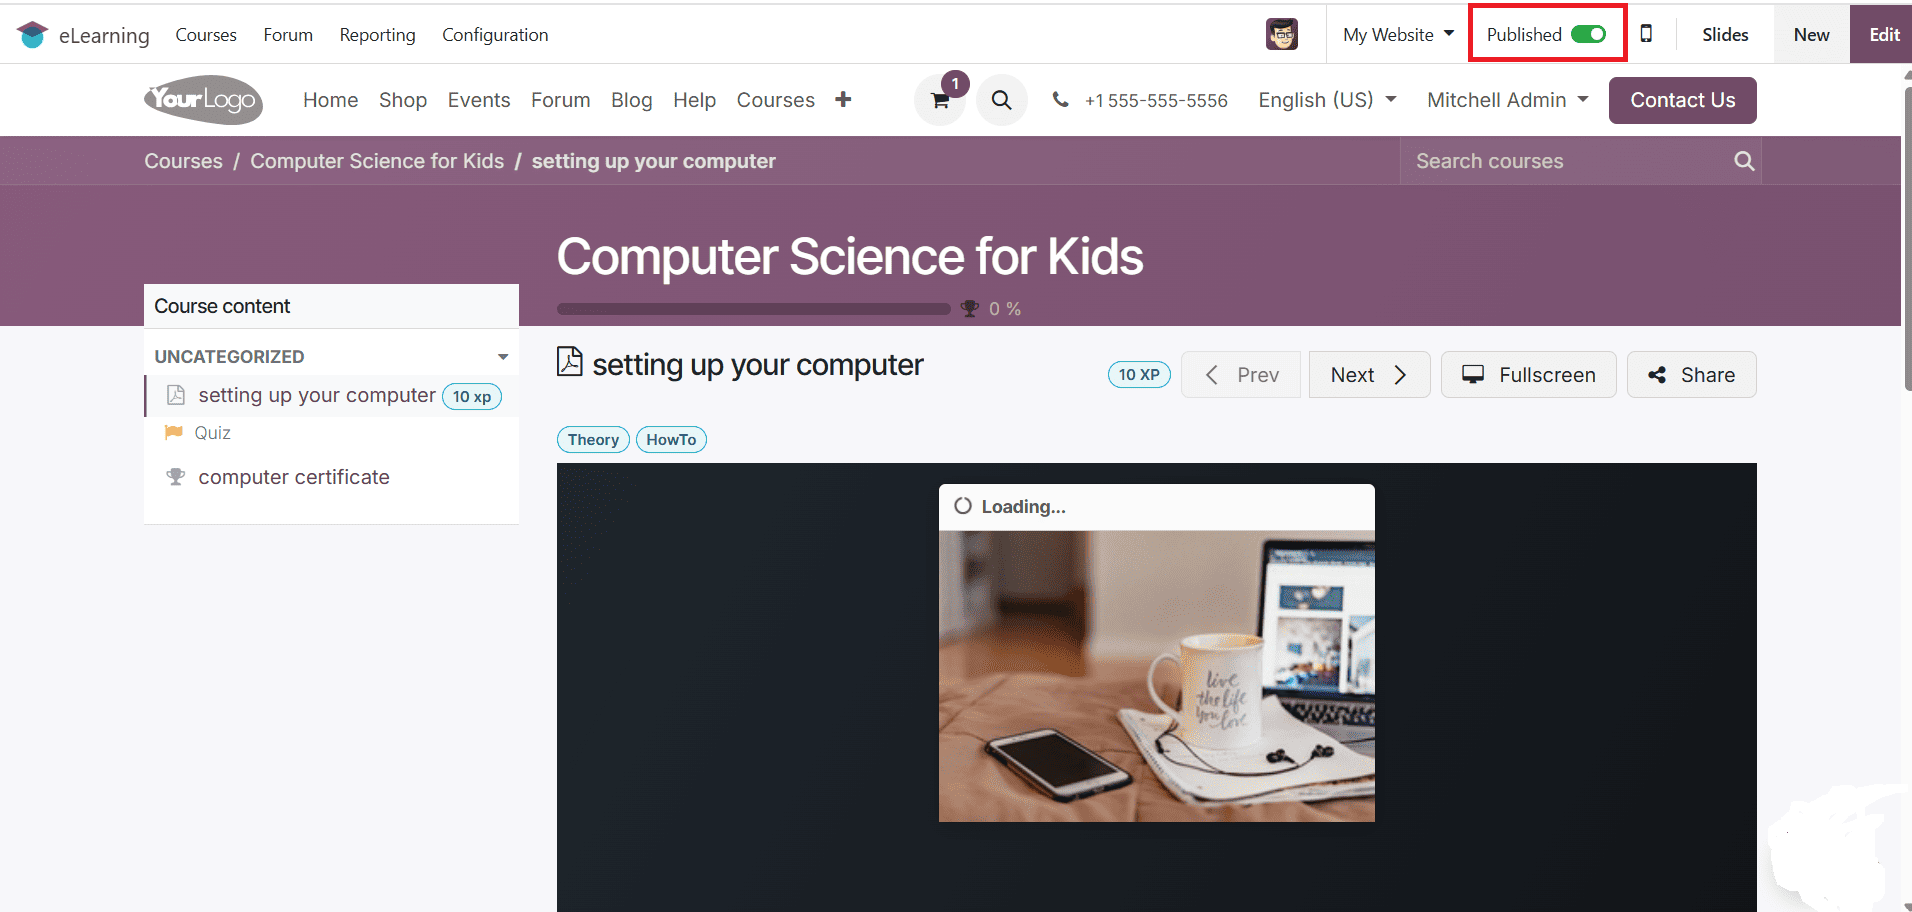
To publish the content, enable Published as shown below:
Here, you can see the Visits as one and the Published Contents as one.
Likewise, select the remaining contents and click on the Go to Website tab and enable Published as shown below:

As you published two contents, you can see the Visits as two and the Published Contents as two.
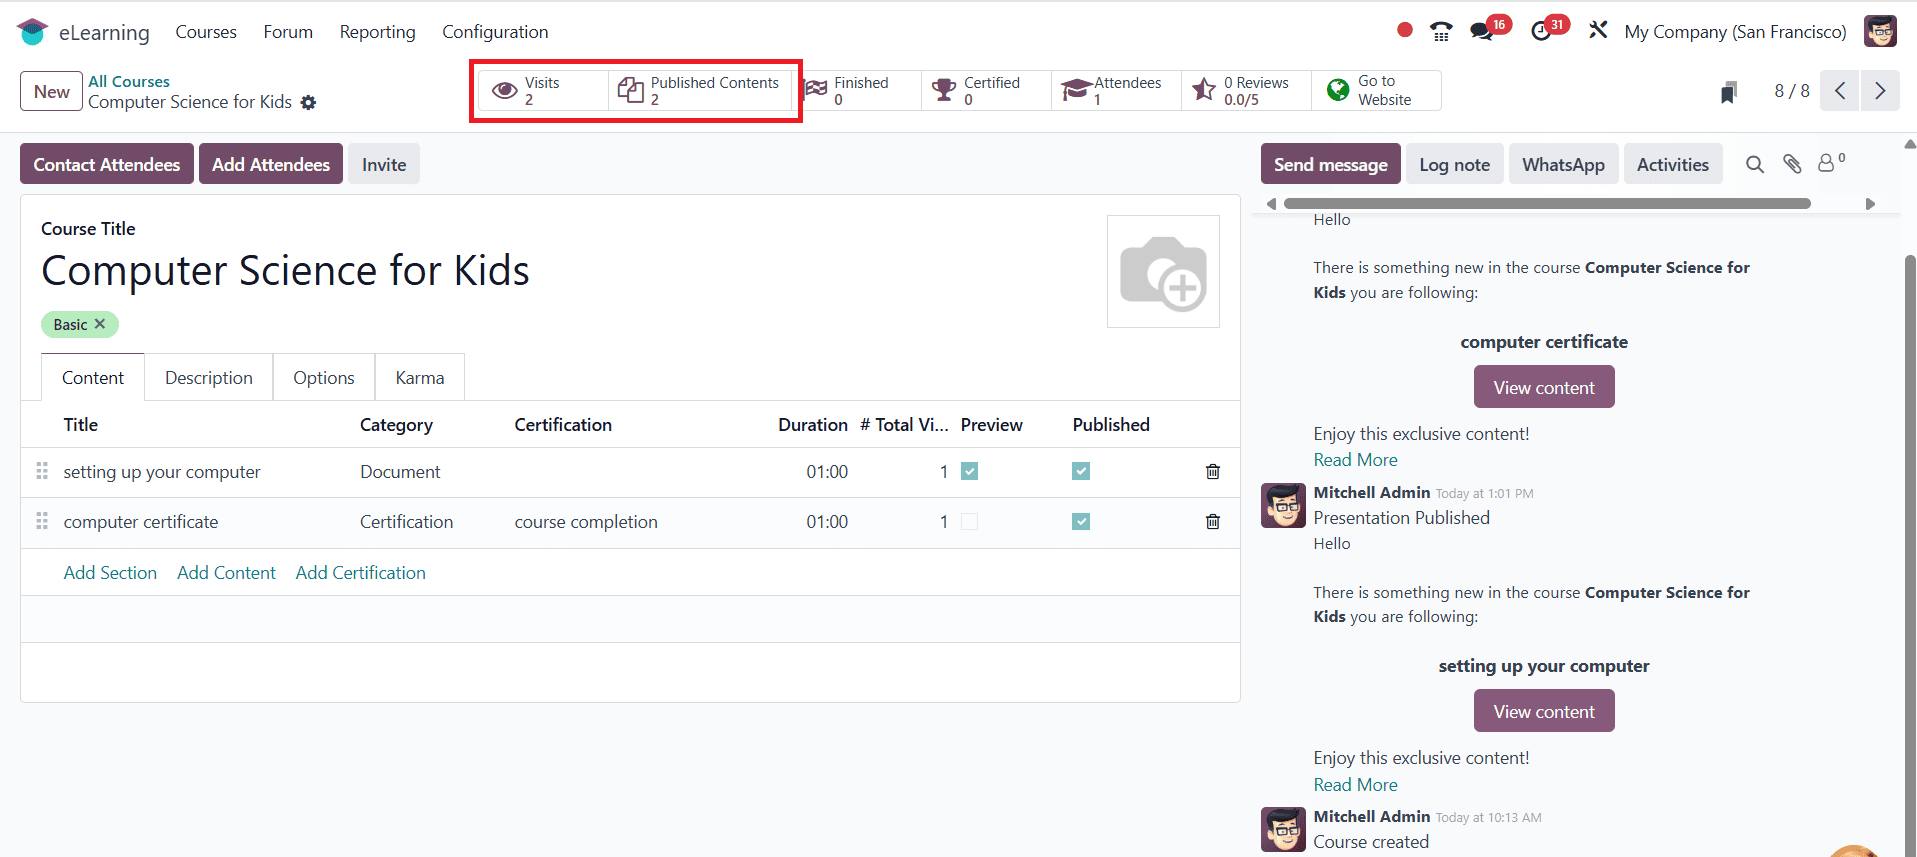
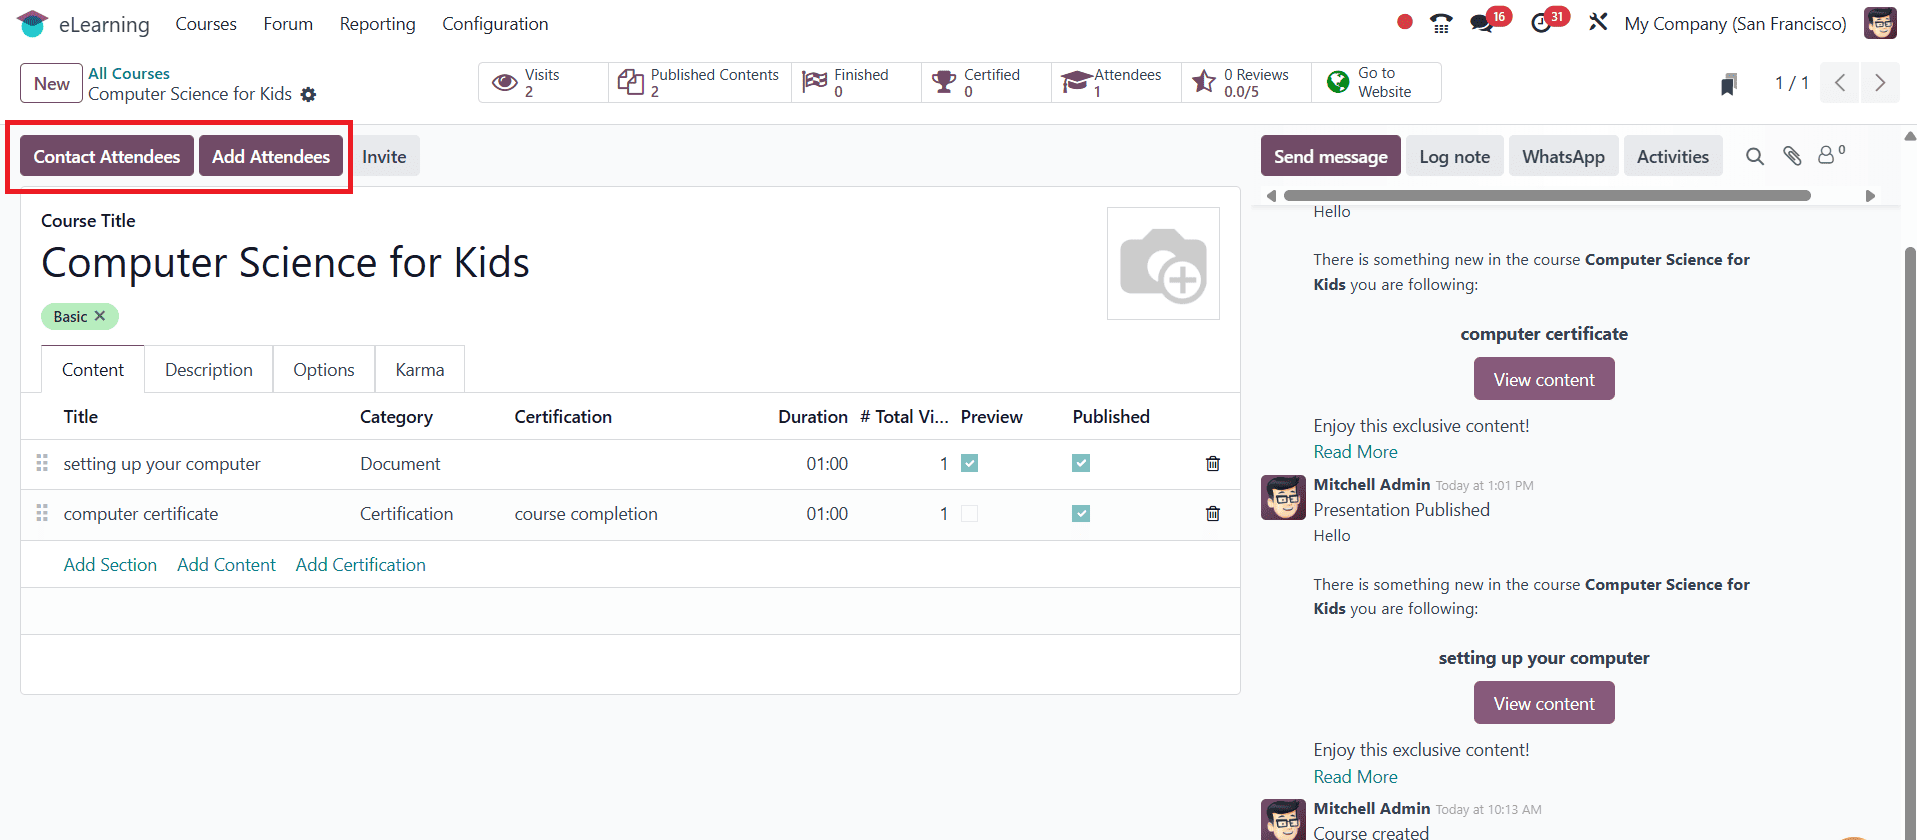
Here, you can also add and contact attendees by clicking on the Contact Attendees and Add Attendees options.
To configure course contents directly, navigate to the Courses > Contents. Here, you can see the already created content of your course, or click on the New button to create new content, as shown below:

To configure certifications directly, navigate to the Courses > Certifications.
Here, you can see the already created certification of your course, or click on the New button to create a new certification, as shown below:

The eLearning module of Odoo 18 provides a strong and adaptable way to create and deliver online courses. It enables self-paced as well as structured programs, offering easy-to-use features for building courses, managing content, and monitoring learner performance. The integration of gamification, forums, certifications, and quizzes guarantees users an engaging experience. Odoo offers all the necessary functionality in one location, whether you’re training employees or addressing a larger audience. You may increase your course offerings with confidence and control, and optimize your educational operations from a single, centralized platform by setting up an eLearning module in Odoo 18.
To read more about How to Configure an e-Learning Course in Odoo 18, refer to our blog How to Configure an e-Learning Course in Odoo 18