Email is an important tool in modern business communication. In Odoo, email is extensively used to communicate with customers, vendors, and internal users. It helps in sending notifications, documents, and automated updates related to business processes. One of the key advantages of email communication in Odoo is that it maintains a proper record of messages linked to specific business documents. Overall, email plays a vital role in automating and streamlining communication within the Odoo system.
Now, let us see how to send an email in Odoo 19 by creating an email template through code.
Creating an Email Template Through Code in Odoo 19
In Odoo 19, email templates are defined using the mail.template model. Email templates are usually created in XML files within a custom module. These templates define the email subject, sender, recipient, and body content, and they can include dynamic values using template expressions.
An email template includes:
- The model it is linked to (such as Sales Order or Invoice)
- The subject of the email
- The sender and recipient email addresses
- The body of the email, often written in HTML
- Dynamic placeholders to display record-specific data
First, we need to create an email template for sending emails. Below is a sample email template definition:
<?xml version="1.0" encoding="UTF-8"?>
<odoo>
    <data>
        <record id="email_template_name" model="mail.template">
            <field name="name">EMAIL TEMPLATE NAME</field>
       <field name="model_id" ref="education_exam_update.model_education_exam"/>
            <field name="subject">Subject {{ object.name }}</field>
            <field name="email_from">
                {{ user.email_formatted or user.company_id.email_formatted }}
            </field>
            <field name="partner_to">{{ object.partner_id.id }}</field>
            <field name="body_html" type="html">
                <div>
                    <p>
                        Hello,
                        <br/>
                        <br/>
                        This is our first email template!
                        <br/>
                        <br/>
                        Mitchell Admin
                    </p>
                </div>
            </field>
        </record>
    </data>
</odoo>
In the <record id="email_template_name" model="mail.template"> tag, we specify the unique identifier and name of the email template.
The model_idfield is used to define the model associated with the email template. It references the external ID of the model. If the template is used within the same module, it is not mandatory to prefix the model name with the module name. However, if the model belongs to a different module, the module name must be included.
Example:
<field name="model_id" ref="module_name.model_sample_name"/>
Next, we need to specify the subject of the email using the subject field. You can use dynamic values from the related record by referencing the object, as shown below:
<field name="subject">Subject {{ object.name }}</field>In an email template, the email_from and partner_to fields define who sends the email and who receives it. These fields are mandatory and must be included in the email template to ensure that the email is delivered correctly.
- The email_from field specifies the sender’s email address. In this case, the email is sent from the email address of the user associated with the record. The expression object.user_id.email dynamically fetches the user’s email address.
- The partner_to field specifies the recipient of the email. Here, object.partner_id.id refers to the related partner (customer or contact) linked to the record. Odoo uses this partner ID to determine the recipient’s email address.
By using these dynamic values, the email template automatically selects the correct sender and recipient based on the record from which the email is sent.
<field name="email_from">
      {{ user.email_formatted or user.company_id.email_formatted }}
</field>
<field name="partner_to">{{ object.partner_id.id }}</field>
The subject field is used to define the subject line of the email. Dynamic values can be used so that the subject changes based on the record.
<field name="subject">Exam status - {{ object.name }}</field>This allows the email subject to be generated dynamically based on the record data.
Now, we have completed setting the basic information required for sending the email. Next, we define the body of the email, where the actual email content is written.
<field name="body_html" type="html">
	<p> Email Body</p></field>
After creating the email template, the next step is to create a button action to send the email using the created template.
<record id="education_exam_view_form" model="ir.ui.view">
        <field name="name">education.exam.view.form</field>
        <field name="model">education.exam</field>
        <field name="arch" type="xml">
            <form>
                <header>
                    <button name="action_send_mail" type="object"
                       string="Send Email" class="oe_highlight"/>
                </header>
                <sheet>
                    <group>
                        <group>
                            <field name="partner_id"/>

                        </group>
                        <group>
                            <field name="start_date"
                                   readonly="state != 'draft'"/>
                            <field name="end_date" readonly="state != 'draft'"/>
                        </group>
                    </group>
                </sheet>
                <chatter/>
            </form>
        </field>
    </record>
First, define an XML view for the action_send_mail action.
<button name="action_send_mail" type="object"
                       string="Send Email" class="oe_highlight"/>
The next step is to create a function to define the action_send_mail action. In this function, we fetch the email template using module_name.template_name. After retrieving the template, the send_mail() method is used to send the email.
def action_send_mail(self):
   template = self.env.ref(“module_name.email_template_name”)
   email_values = {'email_from': self.env.user.email}
   template.send_mail(self.id, force_send=True, email_values=email_values)
Here, we pass the current user’s email address as the email_from value.
email_values = {'email_from': self.env.user.email}The send_mail() method sends the email using the selected template. It accepts the following parameters:
- self.id > the ID of the current record for which the email is sent
- force_send=True > sends the email immediately instead of placing it in the mail queue
- email_values > overrides default email fields such as email_from.
template.send_mail(self.id, force_send=True, email_values=email_values)
Now, let us see an example of creating and sending an email template in Odoo.
Email Template (XML)
<?xml version="1.0" encoding="UTF-8"?>
<odoo>
    <data>
        <record id="email_template_name" model="mail.template">
            <field name="name">Email Template Name</field>
            <field name="model_id" ref="education_exam_update.model_education_exam"/>
            <field name="subject">Project status - {{ object.name }}</field>
            <field name="email_from">
                {{ user.email_formatted or user.company_id.email_formatted }}
            </field>
            <field name="partner_to">{{ object.partner_id.id }}</field>
            <field name="body_html" type="html">
                <div>
                    <p>
                        Hello,<br/><br/>
                        This is our first email template!<br/><br/>
                        Mitchell Admin
                    </p>
                </div>
            </field>
        </record>
    </data>
</odoo>
Python function
def action_send_mail(self):
        template = self.env.ref('education_exam_update.email_template_name')
        template.send_mail(self.id, force_send=True)
XML Form View (Button)
<?xml version="1.0" encoding="UTF-8"?>
<odoo>
    <record id="education_exam_view_form" model="ir.ui.view">
        <field name="name">education.exam.view.form</field>
        <field name="model">education.exam</field>
        <field name="arch" type="xml">
            <form>
                <header>
                    <button name="action_send_mail"
                            type="object"
                            string="Send Email"
                            class="oe_highlight"/>
                </header>
                <sheet>
                    <group>
                        <group>
                            <field name="partner_id"/>
                        </group>
                        <group>
                            <field name="start_date" readonly="state != 'draft'"/>
                            <field name="end_date" readonly="state != 'draft'"/>
                        </group>
                    </group>
                </sheet>
                <chatter/>
            </form>
        </field>
    </record>
</odoo>
Here, we can see the Send Mail button. When the user clicks this button, the system sends an email using the configured email template.
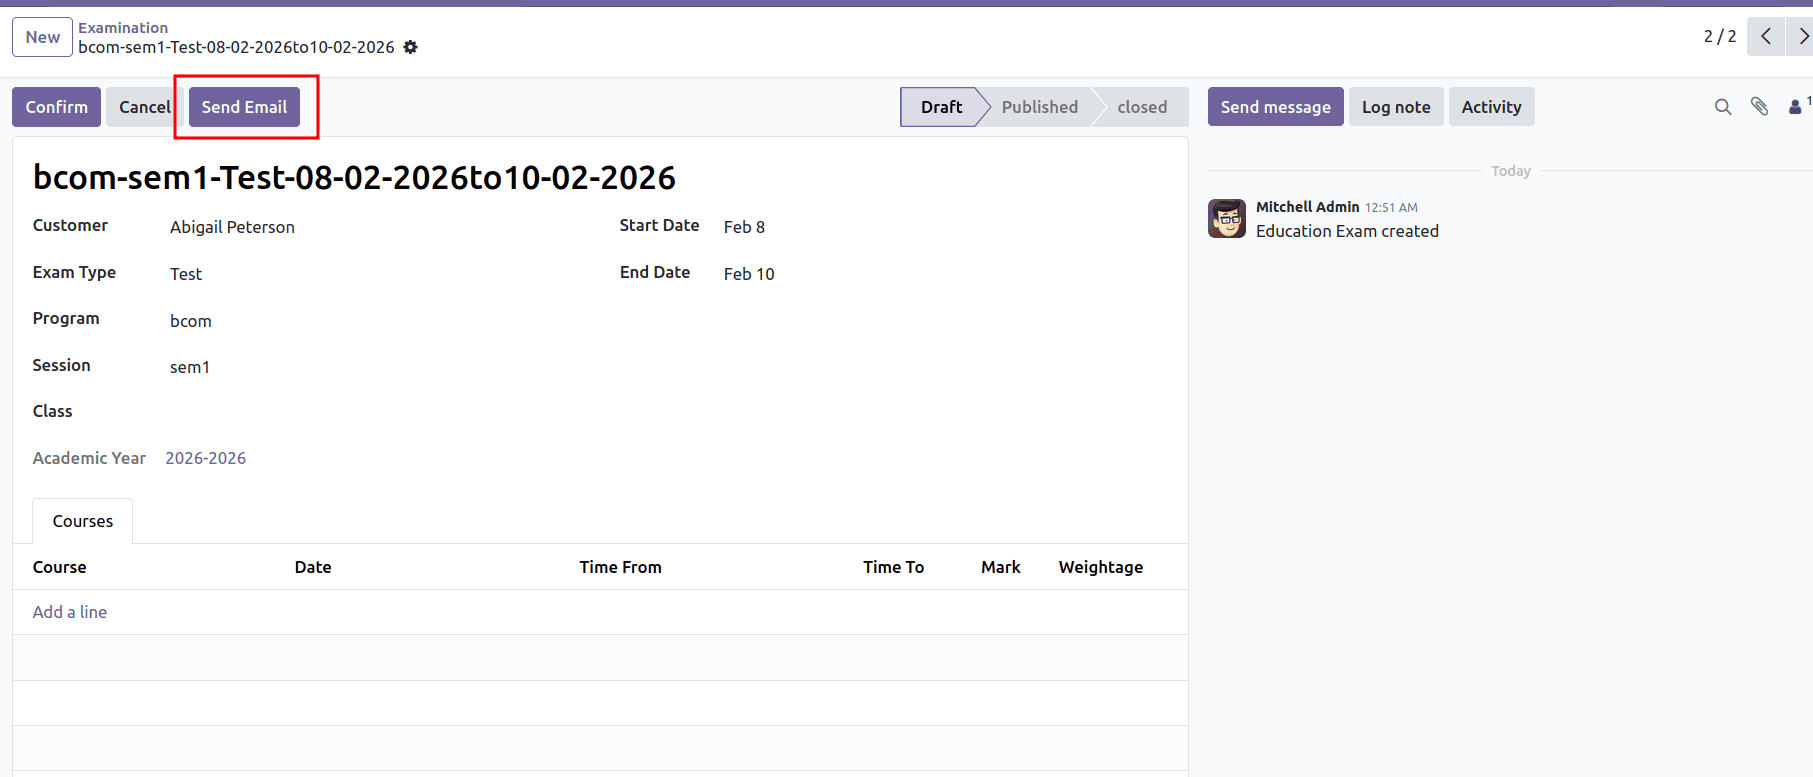
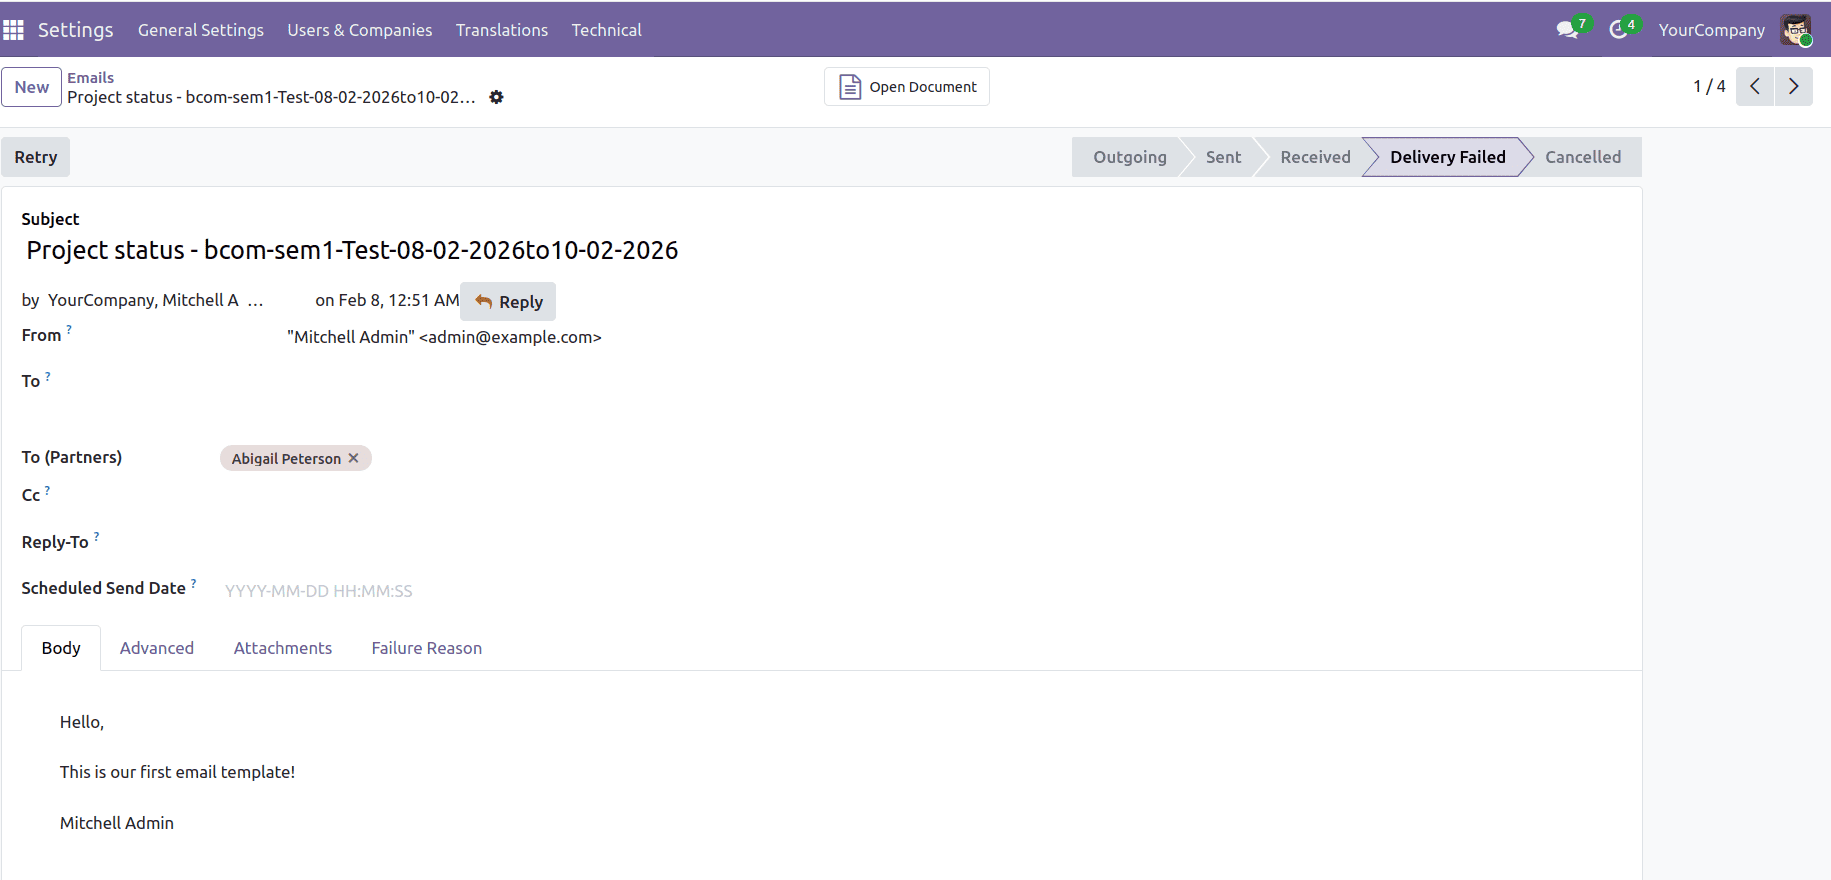
We can view the sent email by navigating to Settings > Technical > Emails, where all outgoing emails are listed.
In this way, we can easily create and send an email template in Odoo 19.
To read more about How to Send Email From Code in Odoo 18, refer to our blog How to Send Email From Code in Odoo 18.