Field service management involves dispatching employees or outside technicians to perform installations, maintenance, or repairs of equipment, systems, or other assets at off-premise locations. The managers within this field are responsible for overseeing these professionals, tracking their activities, and making sure that specialized services are delivered effectively to customers.
Field service management tools combine data from mobile devices, IoT sensors, asset management platforms, and other remote sources. Such systems support an increase in the first-visit resolution rate, workforce motivation, decreased operational costs, and generally higher customer satisfaction. They also allow organizations to utilize their resources more efficiently. With the help of features related to remote assistance and mobile-friendly tools, technicians can ensure safe working conditions, follow compliance policies, provide quicker diagnostics of problems, and perform required tasks with higher accuracy. Companies can optimize costs with real-time insights and be proactive in tackling all sorts of concerns or unexpected delays.
Odoo's Field Service Management module covers everything from planning and controlling activities concerning on-site operations, like repairs, installations, construction tasks, and the delivery of products. Among others, the provided functionality includes the creation and organization of service requests, assignment, time tracking, generation of customized worksheets, inventory management, quotation generation, the creation of service invoices, and capturing electronic signatures. The module simplifies the scheduling and execution, allowing teams to cope with all kinds of field activities with greater ease and higher productivity.
Field Service within Odoo 18 provides a set of tools that assist in task management, planning, and balancing workloads of production or service operations by efficient scheduling. It simplifies workflows by organizing activities, assigning resources, marshaling personnel, and managing material requirements. In Odoo 18, the scheduling of Field Services encompasses creating, distributing, managing, and adjusting tasks or service requests raised by customers for installations, maintenance work, or any other service requirements. These actions occur once a new task is created and shows up under "My Tasks".
In this section of the blog, we'll be looking at how to create a new project task and manage it in the Field Service application.
Project Configuration
To begin, you’ll need to create a new project that will serve as the basis for generating Field Service tasks. Odoo allows you to set up projects tailored to your company’s specific needs. You can create these customized projects through the Projects option found under the Configuration menu in the Odoo 18 Field Service module.

Selecting the Project option takes you to the Projects Dashboard, where you can view details such as the project name, worksheet template, start and end dates, allocated time, project manager, and customer. To create a new project, simply click the NEW button.
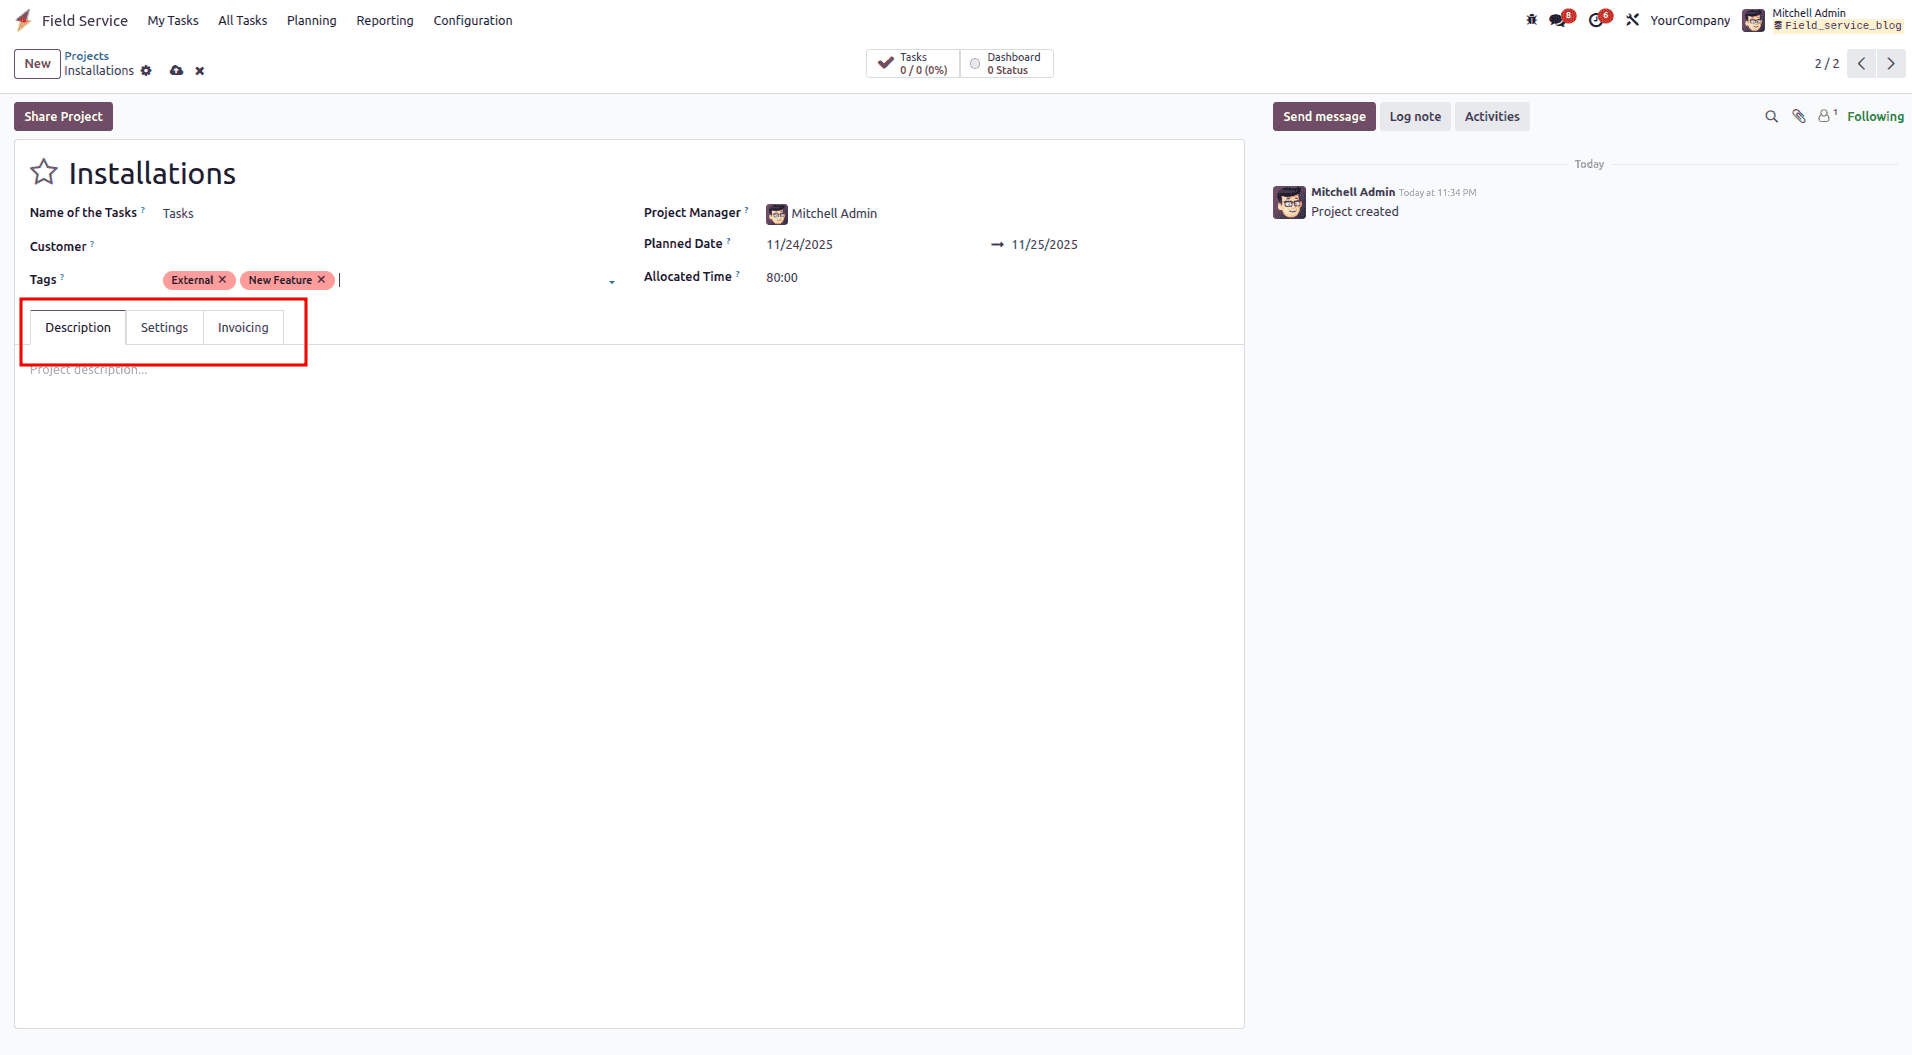
You can enter the project type in the empty field; for example, here it is set as “Installations.” Fill in the Customer, Tags, and Company fields based on your information. Specify the Project Manager in the designated field. Select the Planned Date using the calendar dropdown, and provide the Allocated Hours according to the needs of the task.
You can enter any project-related details or notes inside the Description tab.
Settings:
You can link tasks and timesheets to the project by assigning an Analytic Account from the Settings tab. This helps you track both costs and revenue associated with the project. In the same section, you can control who can access the project by adjusting the Visibility options—whether it should be limited to invited internal users, available to all internal users, or accessible to selected portal users.
If you want to break larger work items into smaller steps, enable Sub-tasks under the Task Management features. You can also activate Recurring Tasks to automatically generate tasks at scheduled intervals.
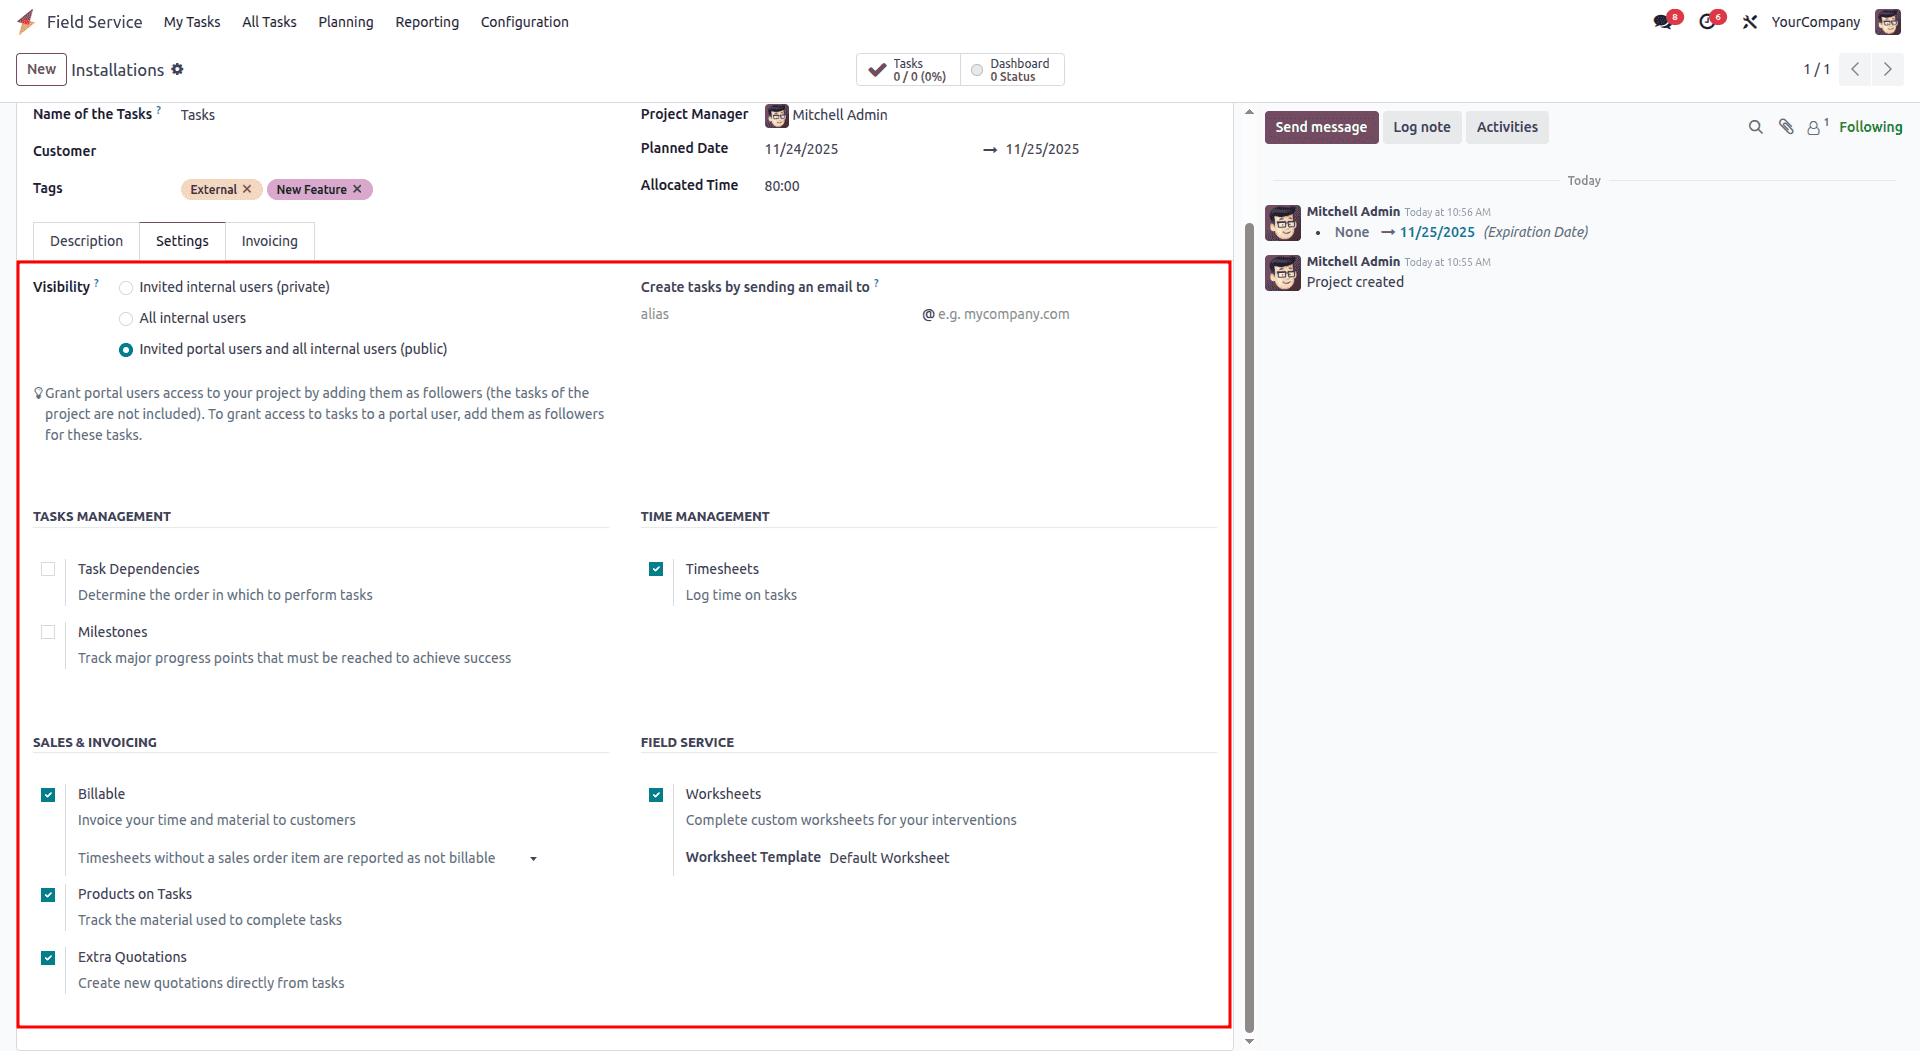
You can control the order in which tasks should be carried out by enabling Task Dependencies. The Milestones feature lets you track key progress points that must be reached throughout the project. To record the time spent on each task, activate Timesheets, which allows every entry to be logged and monitored. If you need to organize and allocate resources for the project, switch on the Planning feature.
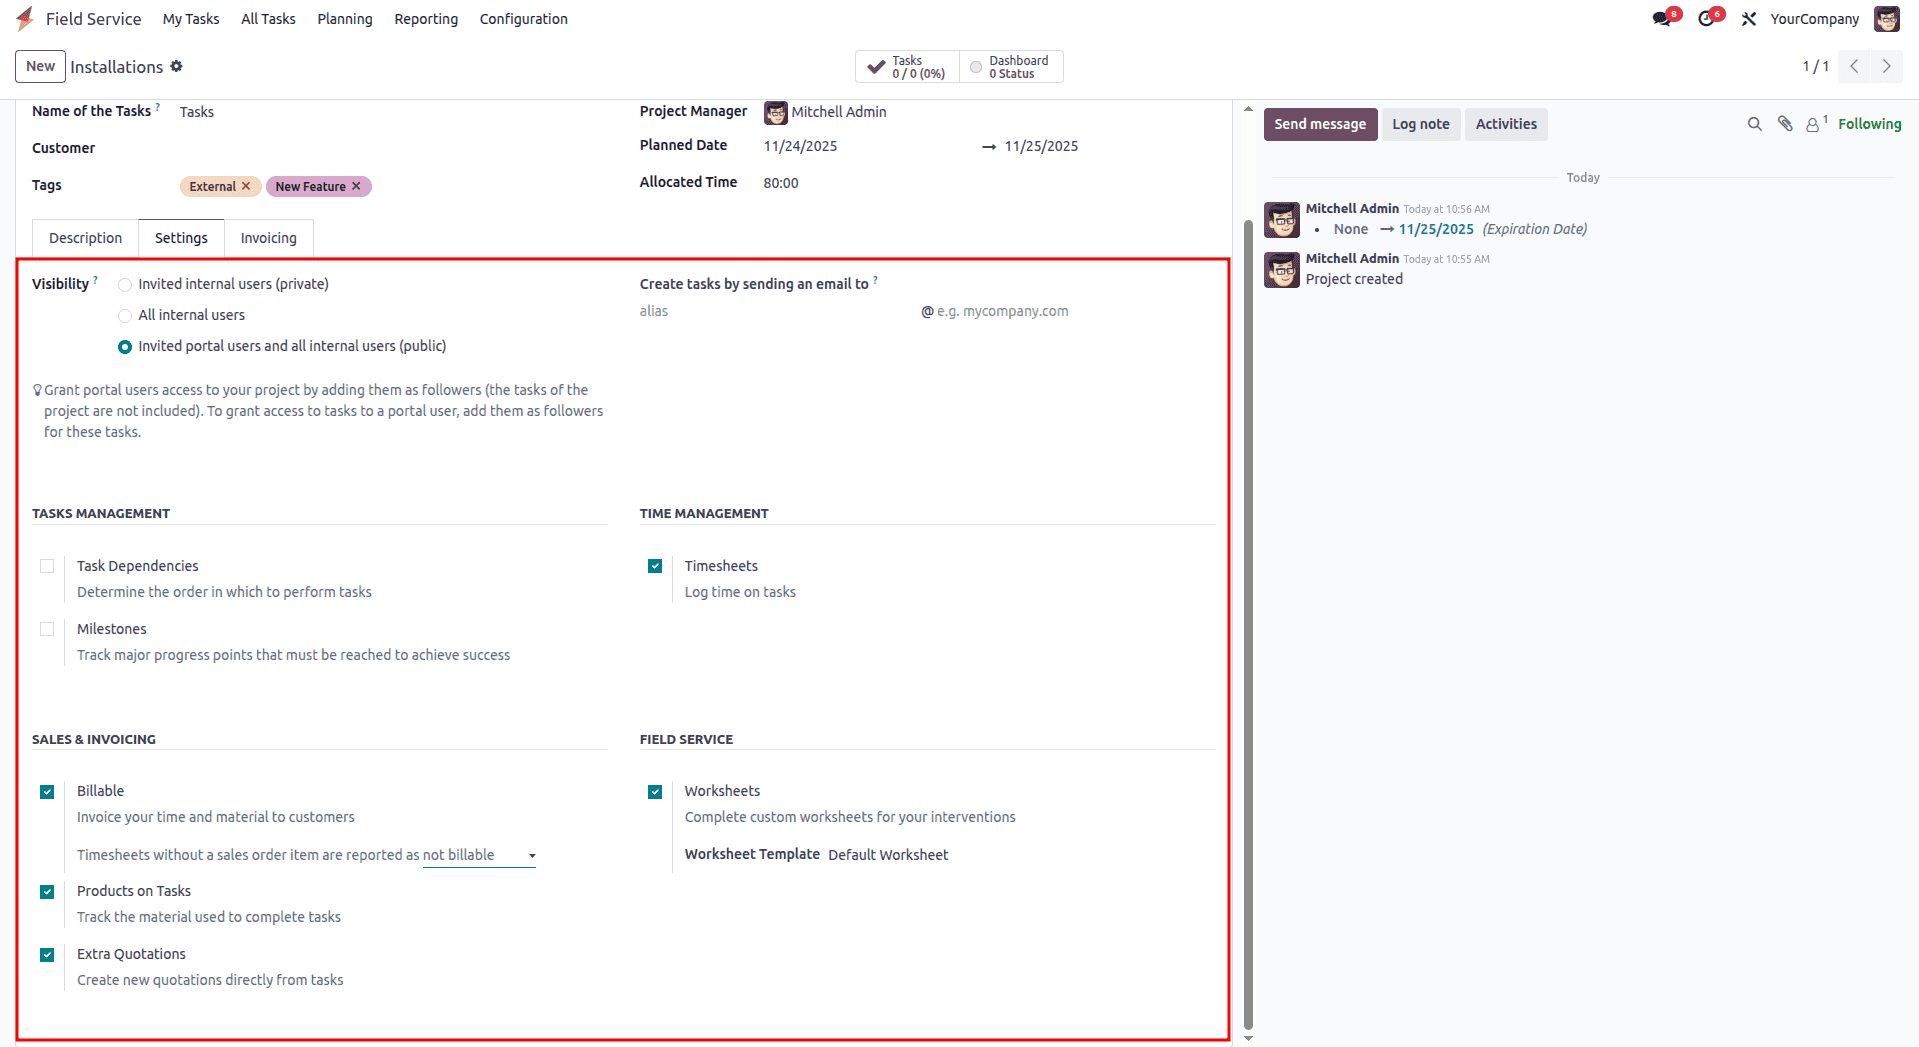
You can bill the relevant client for your time and materials if you enable the “Billable” option. After selecting the “Products on Tasks” option, it is feasible to keep track of the supplies required to complete the activities. Using the “Documents” option will allow you to organize and share your documents with the relevant customer. To produce worksheet reports of the tasks that need to be approved by the relevant client, activate the “Worksheets” option under the “FIELD SERVICE” session.
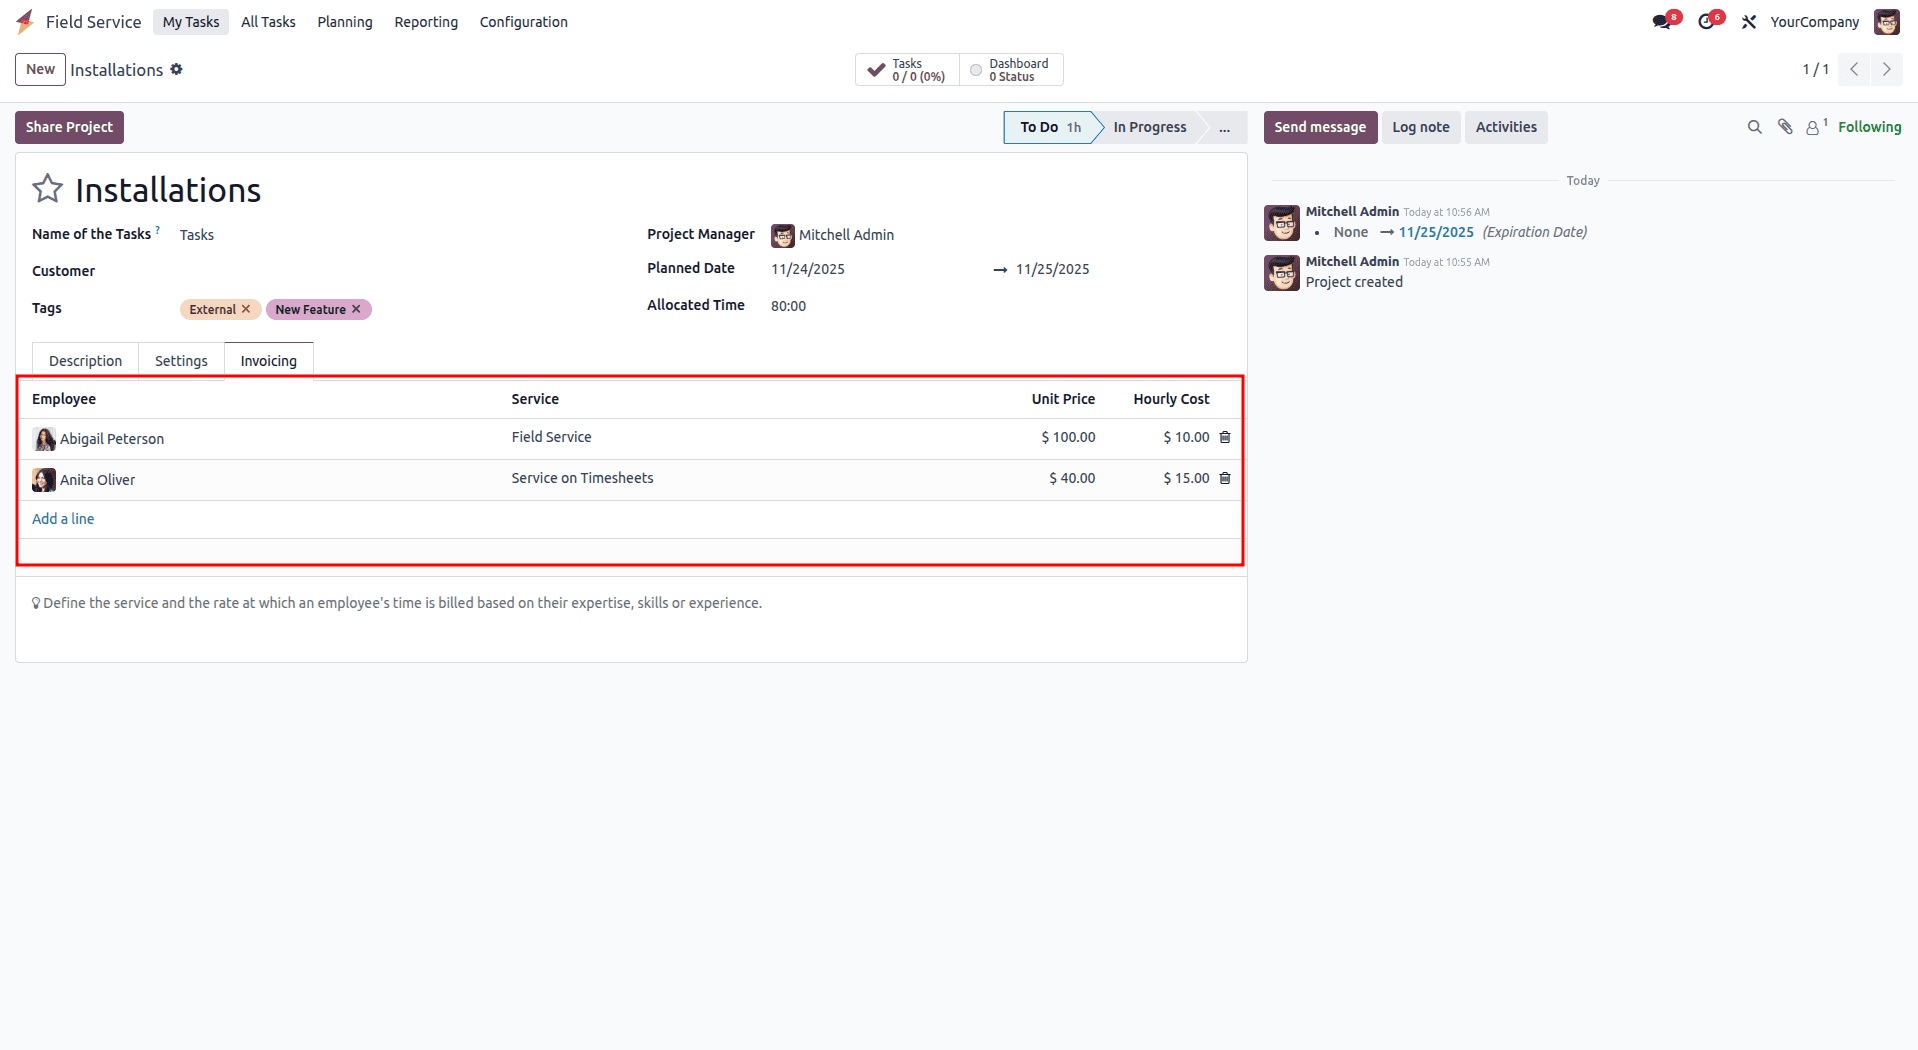
Invoicing:
You can configure the Default Service for billing within the Invoicing tab. This sets the service that will be applied automatically when charging for time worked on a task. If a different sales order item is required, it can be selected individually on each task. By clicking Add a Line, you can include details such as the employee, the service provided, the unit price, and the hourly cost.
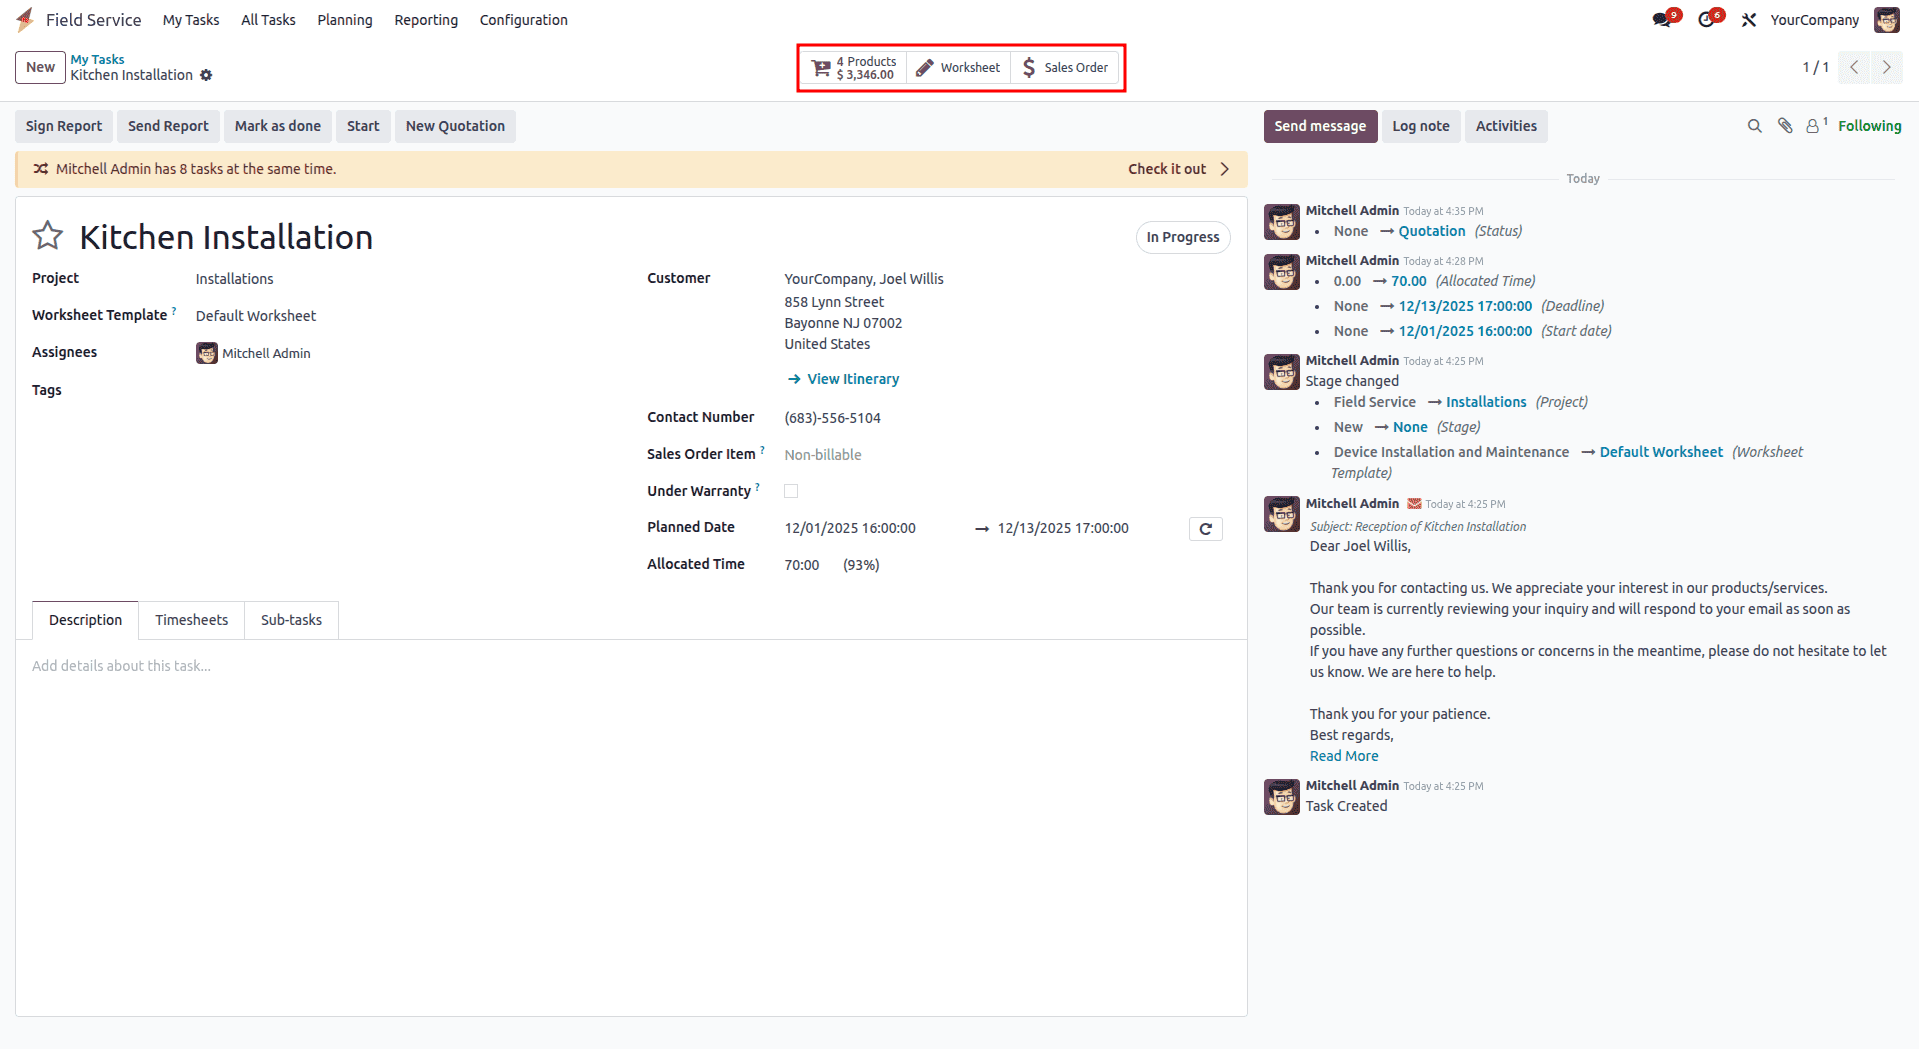
After finishing the setup, save the project and return to the project dashboard. The project will now appear in the Field Service module’s list of projects. From there, you can create a new Field Service task by opening the My Tasks menu.
As shown in the image, you’ll be redirected to the main page of the Field Service application and the My Tasks view within Odoo 18.
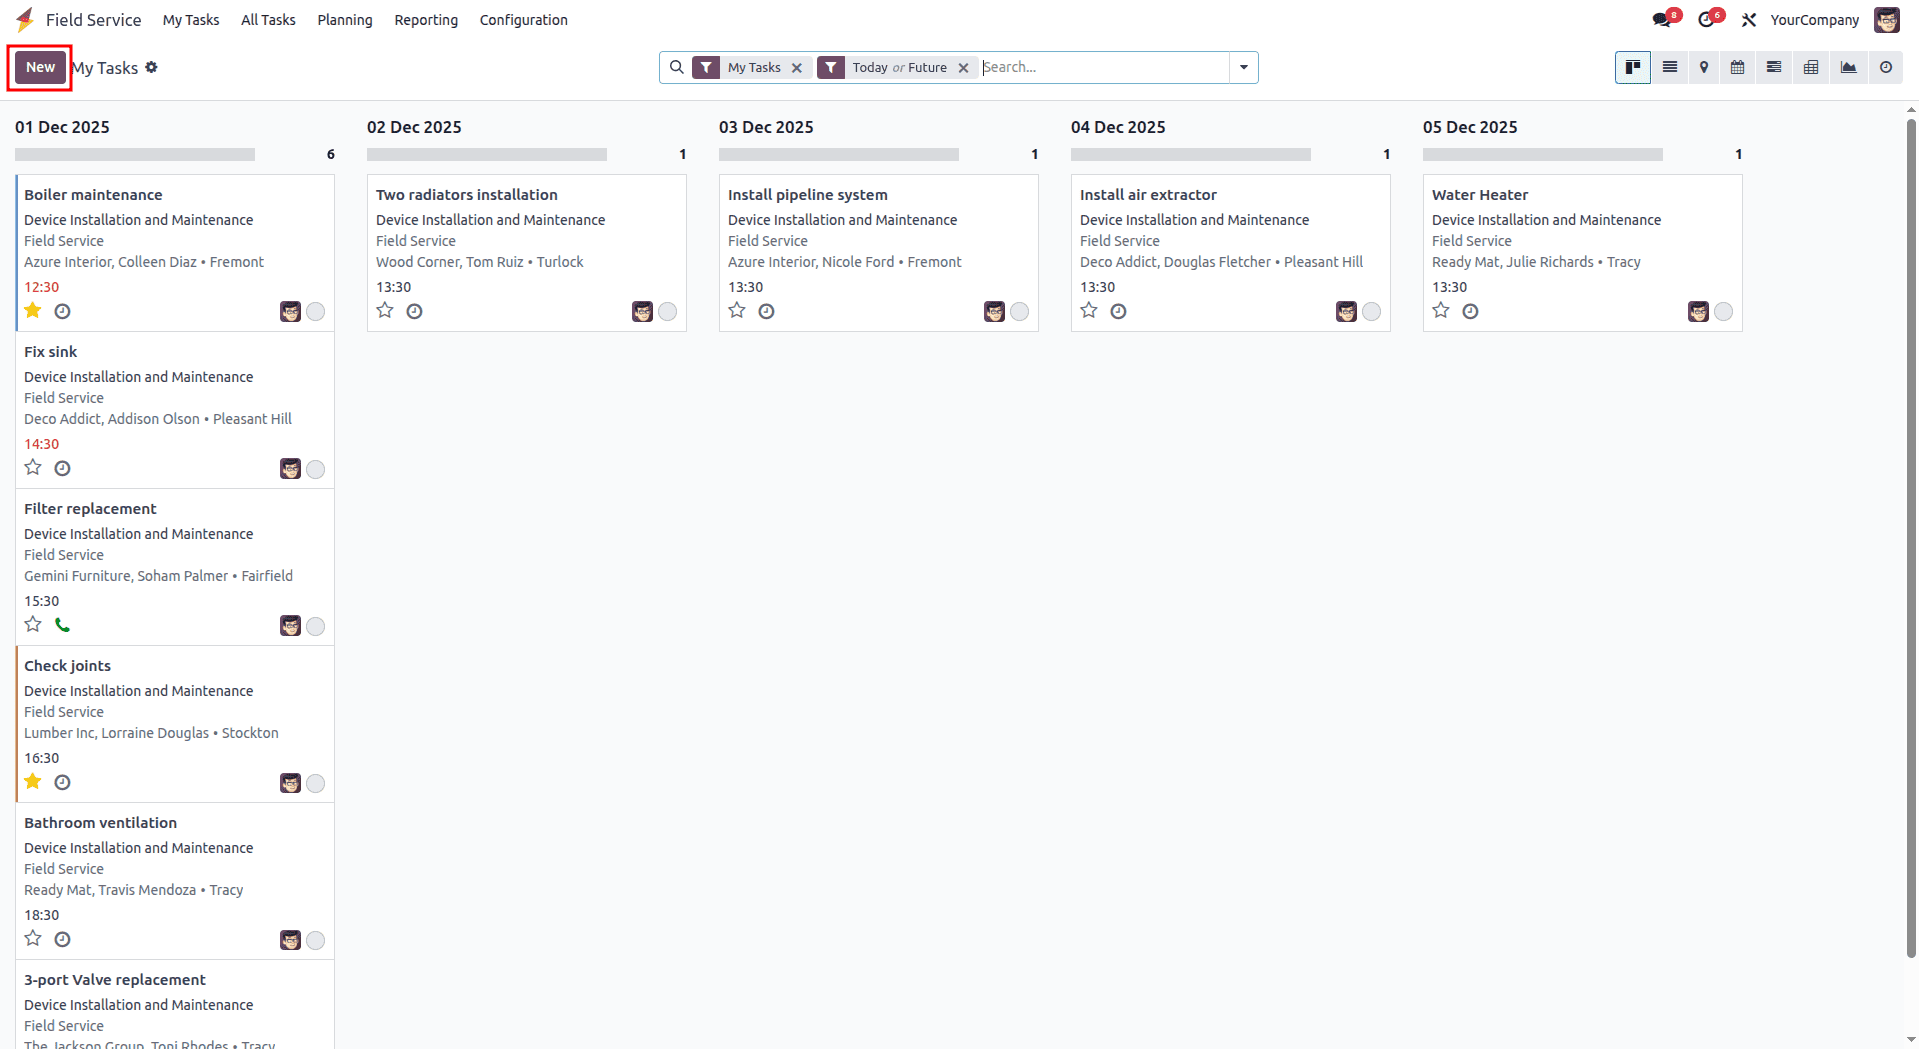
The Kanban view presents tasks and services by date, giving a quick snapshot of scheduled activities, customer details, and deadlines. Selecting a task opens its detailed form. If you want to add a new task, you can use the New button located at the top left.
When you click New, a blank form opens, as shown in the image. From there, you can review each field, understand what it’s meant for, and enter the required information accordingly.
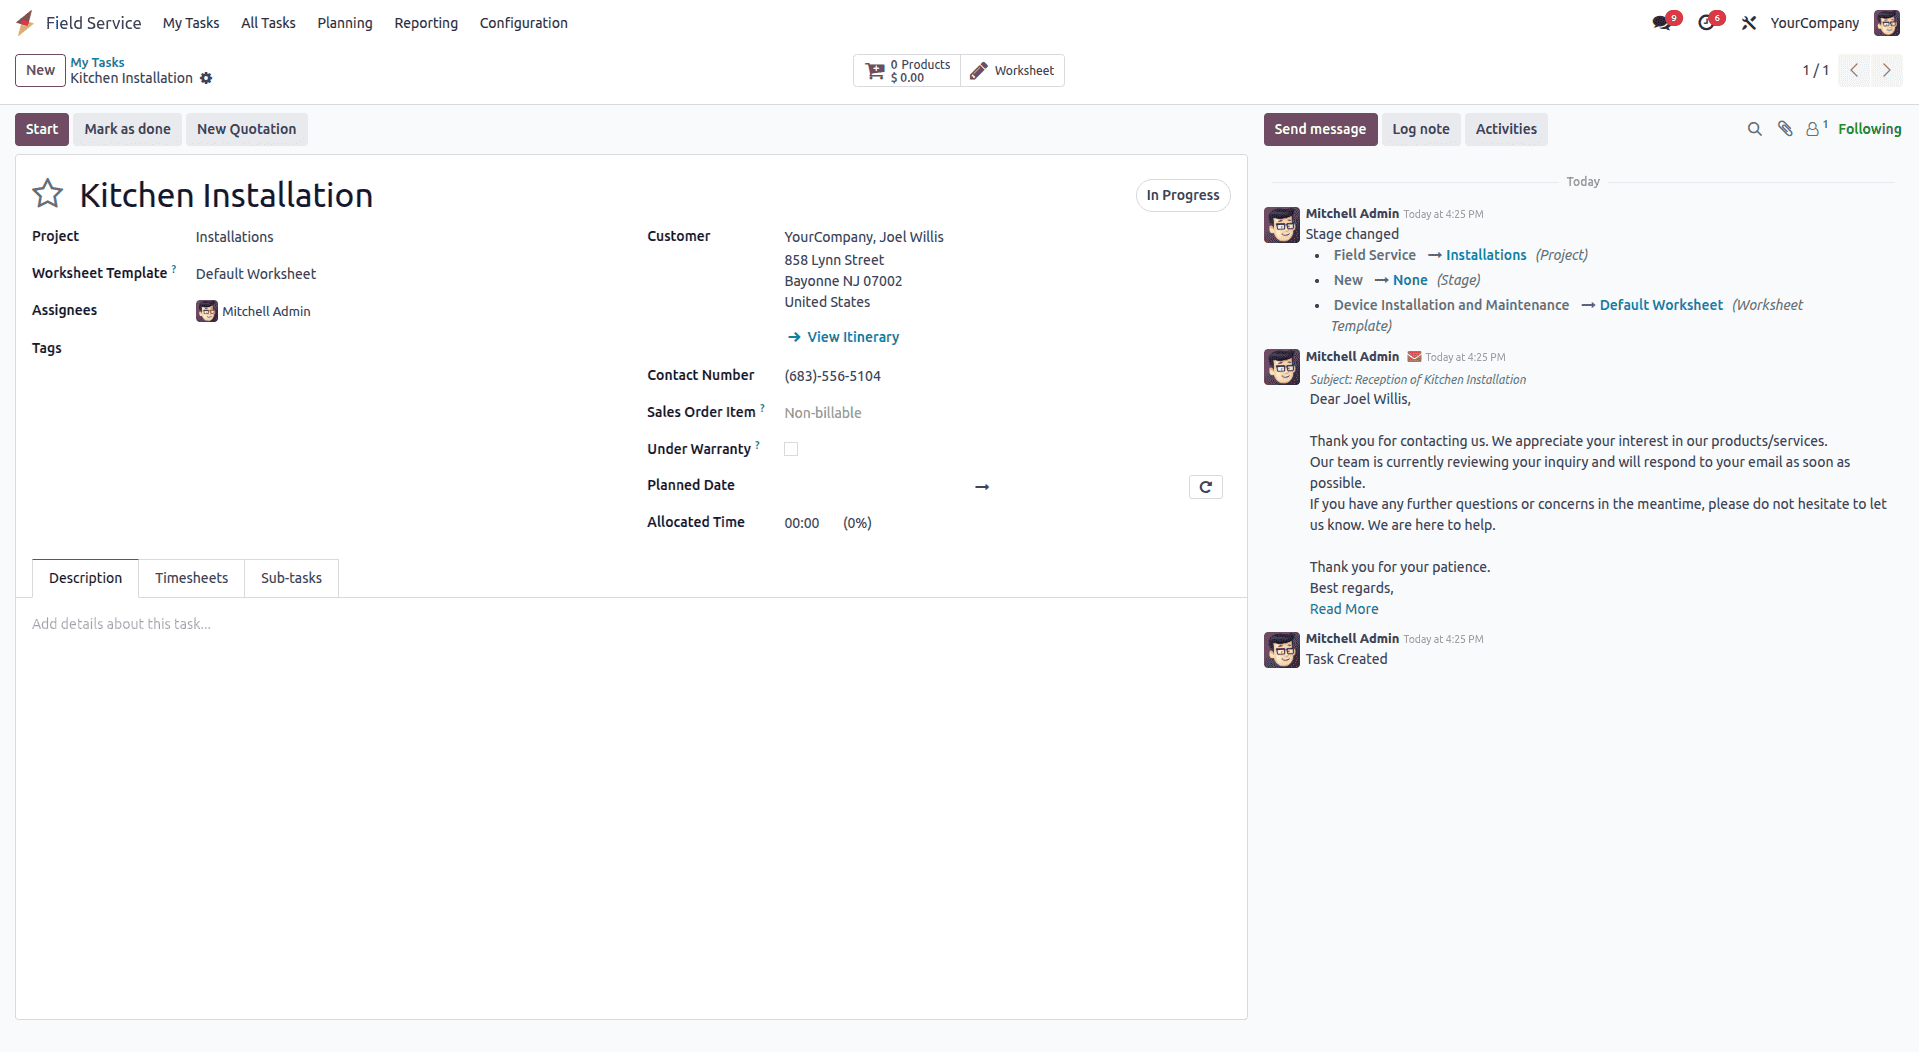
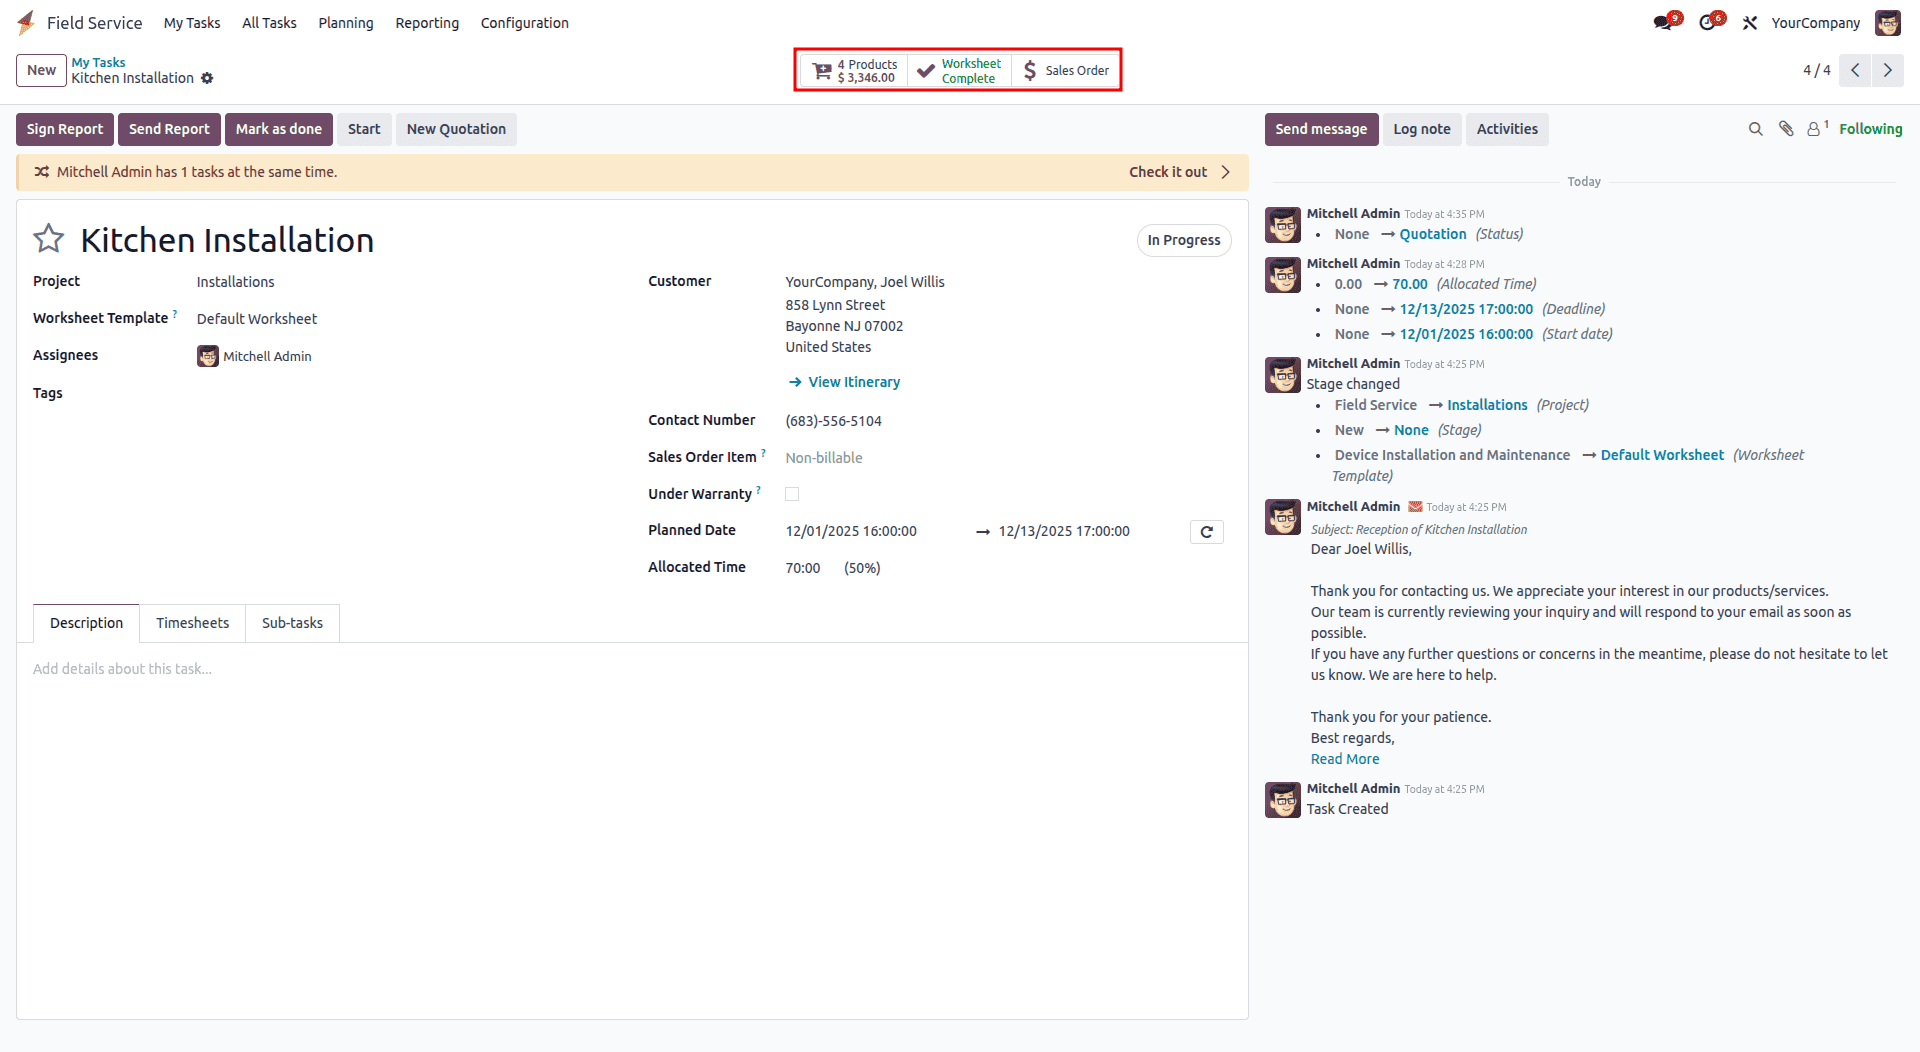
In the blank field at the top of the form, you can enter the task name and choose the Project it belongs to. When you select the newly created project, details such as Worksheet Template, Milestone, Assignees, Customer, and Phone will automatically fill in based on the project’s configuration.
Use the Tag field to add any labels that help categorize the task. If the work needs to be invoiced, you can link it to the correct Sales Order by selecting the appropriate order line. Depending on the type of service, you can also include any tools or products required by clicking + Add a Property.
Description Tab
This tab is meant for any notes or explanations related to the task. You can freely update or add important information here. Typing “/” brings up a formatting menu where you can insert bullet lists, numbered lists, checklists, templates, separators, and other useful layout elements.
Timesheets Tab
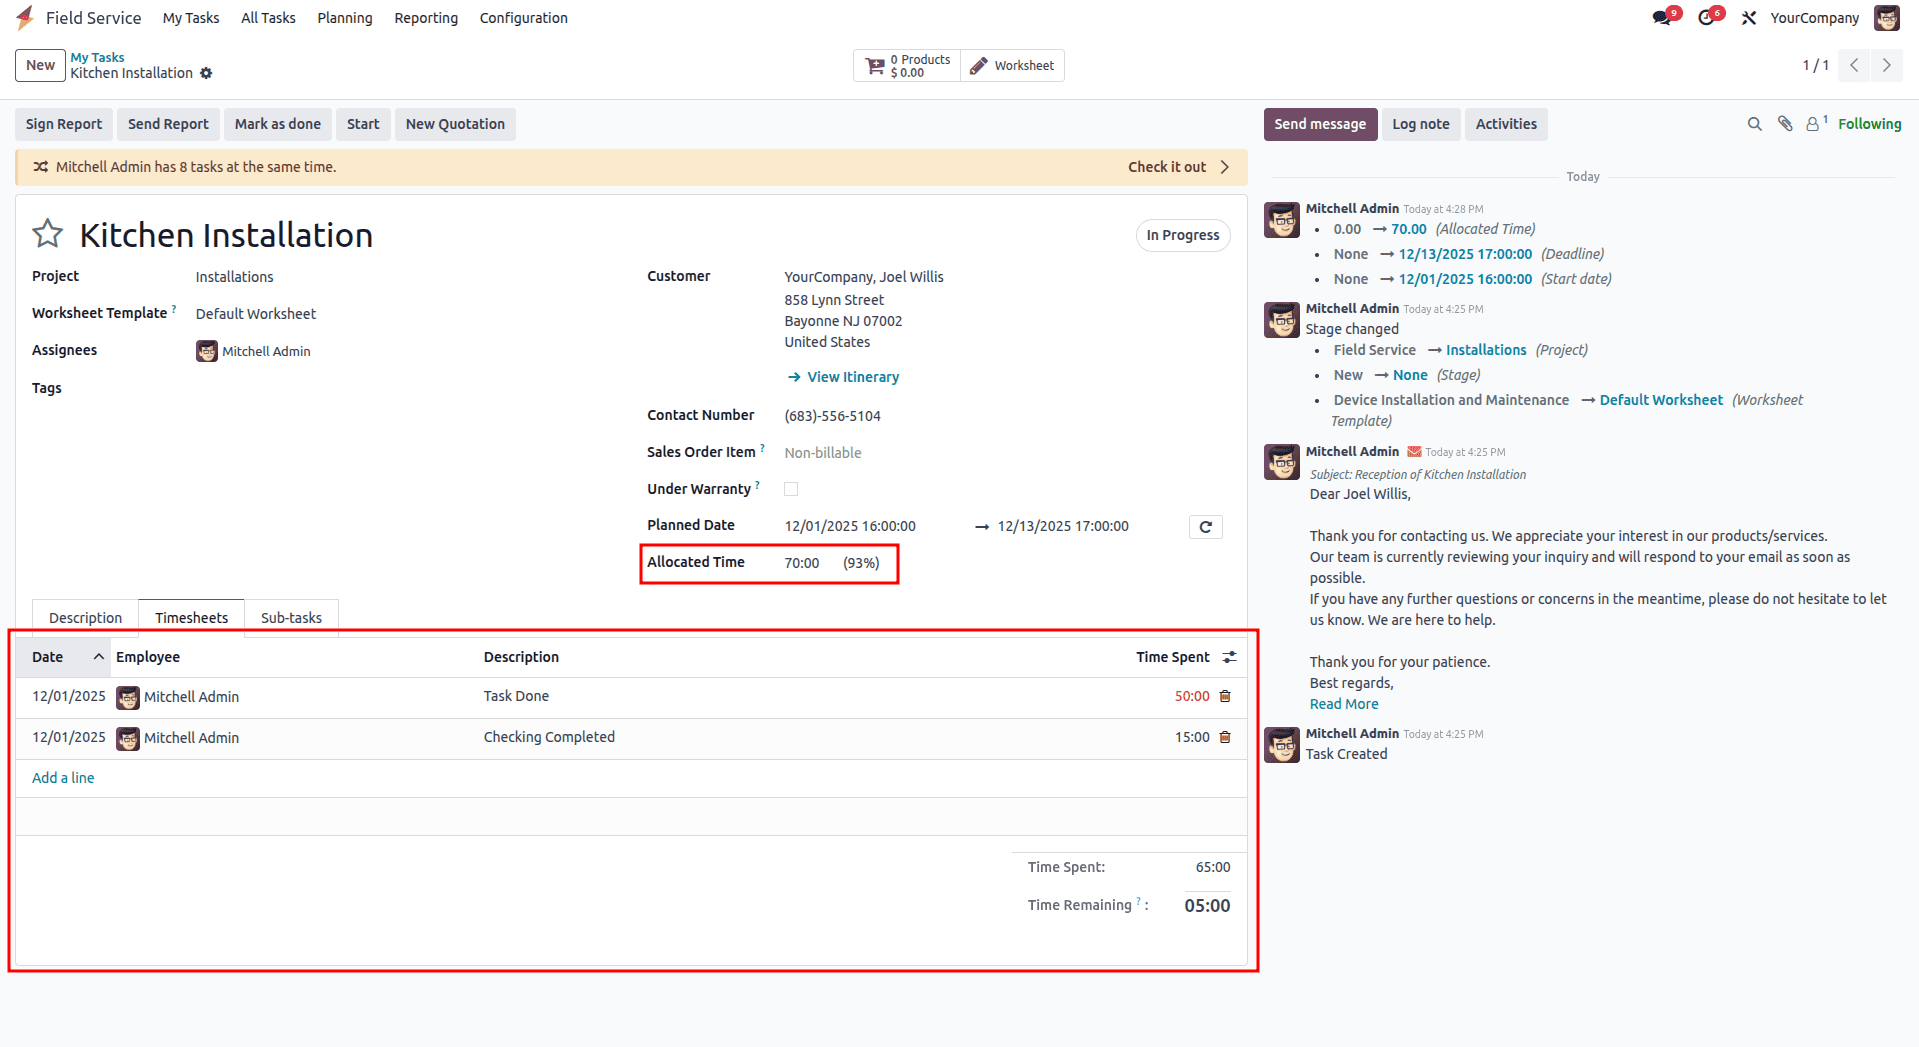
Here, the Allocated Hours field lets you specify how much time is expected for completing the task.
sub-tasks Tab
This Tab Refers to the sub tasks created under the current task. We can create sub task by clicking add a line option.
To record time spent, click Add a line. For each entry, you can fill in the Date, the Employee who worked on the task, a short Description, and the Hours Spent. All timesheet entries for the task can be added from this section using the same Add a line option.
Add Products
The Products smart button in the task form allows you to add any tools, materials, or device components needed while performing a task, service, or installation.
When you click this button, a Products window opens, as shown in the image, where you can review or add the required items.
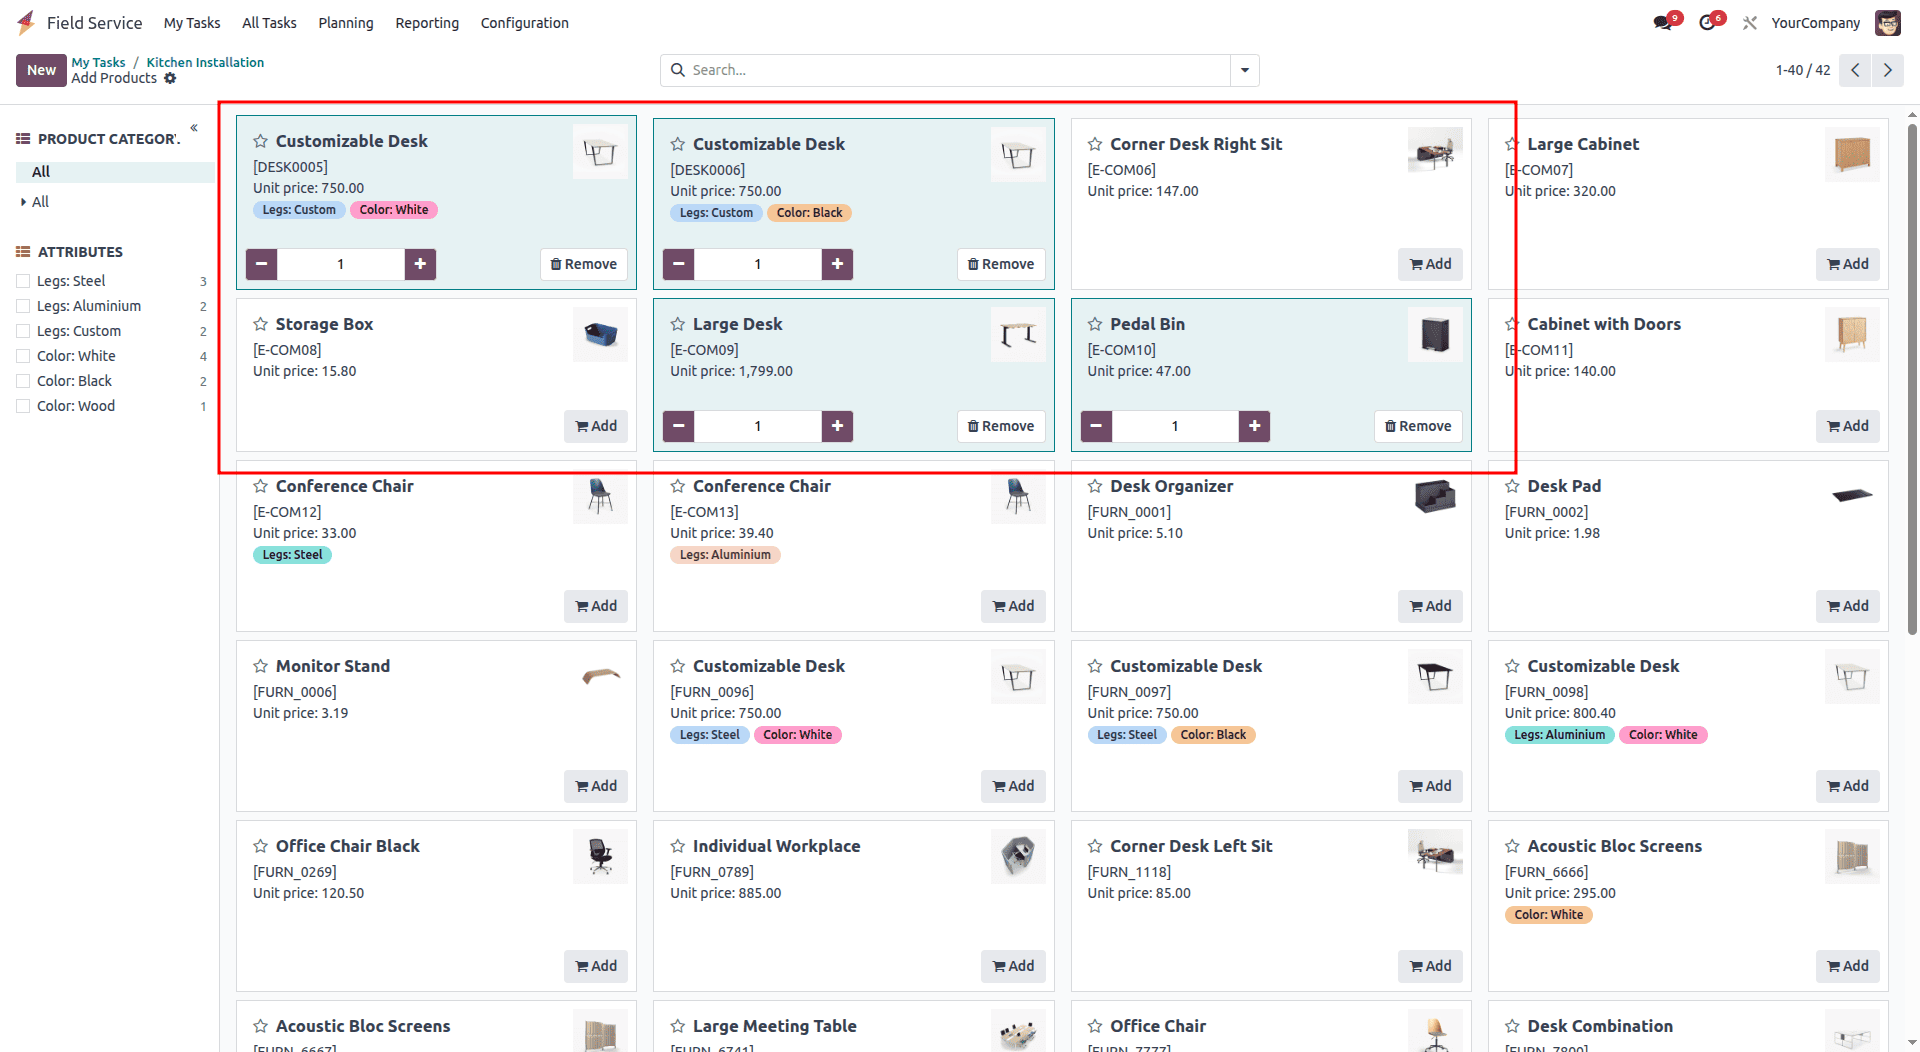
From this window, you’ll see a Kanban-style view showing all the products stored in the company’s warehouse. Select the items you want to include in the field service billing. For demonstration, a few sample products have been added here.
After selecting the items, return to the task form. The added products will now appear on the task, and the Products smart button will display the corresponding billing amount.
Billing
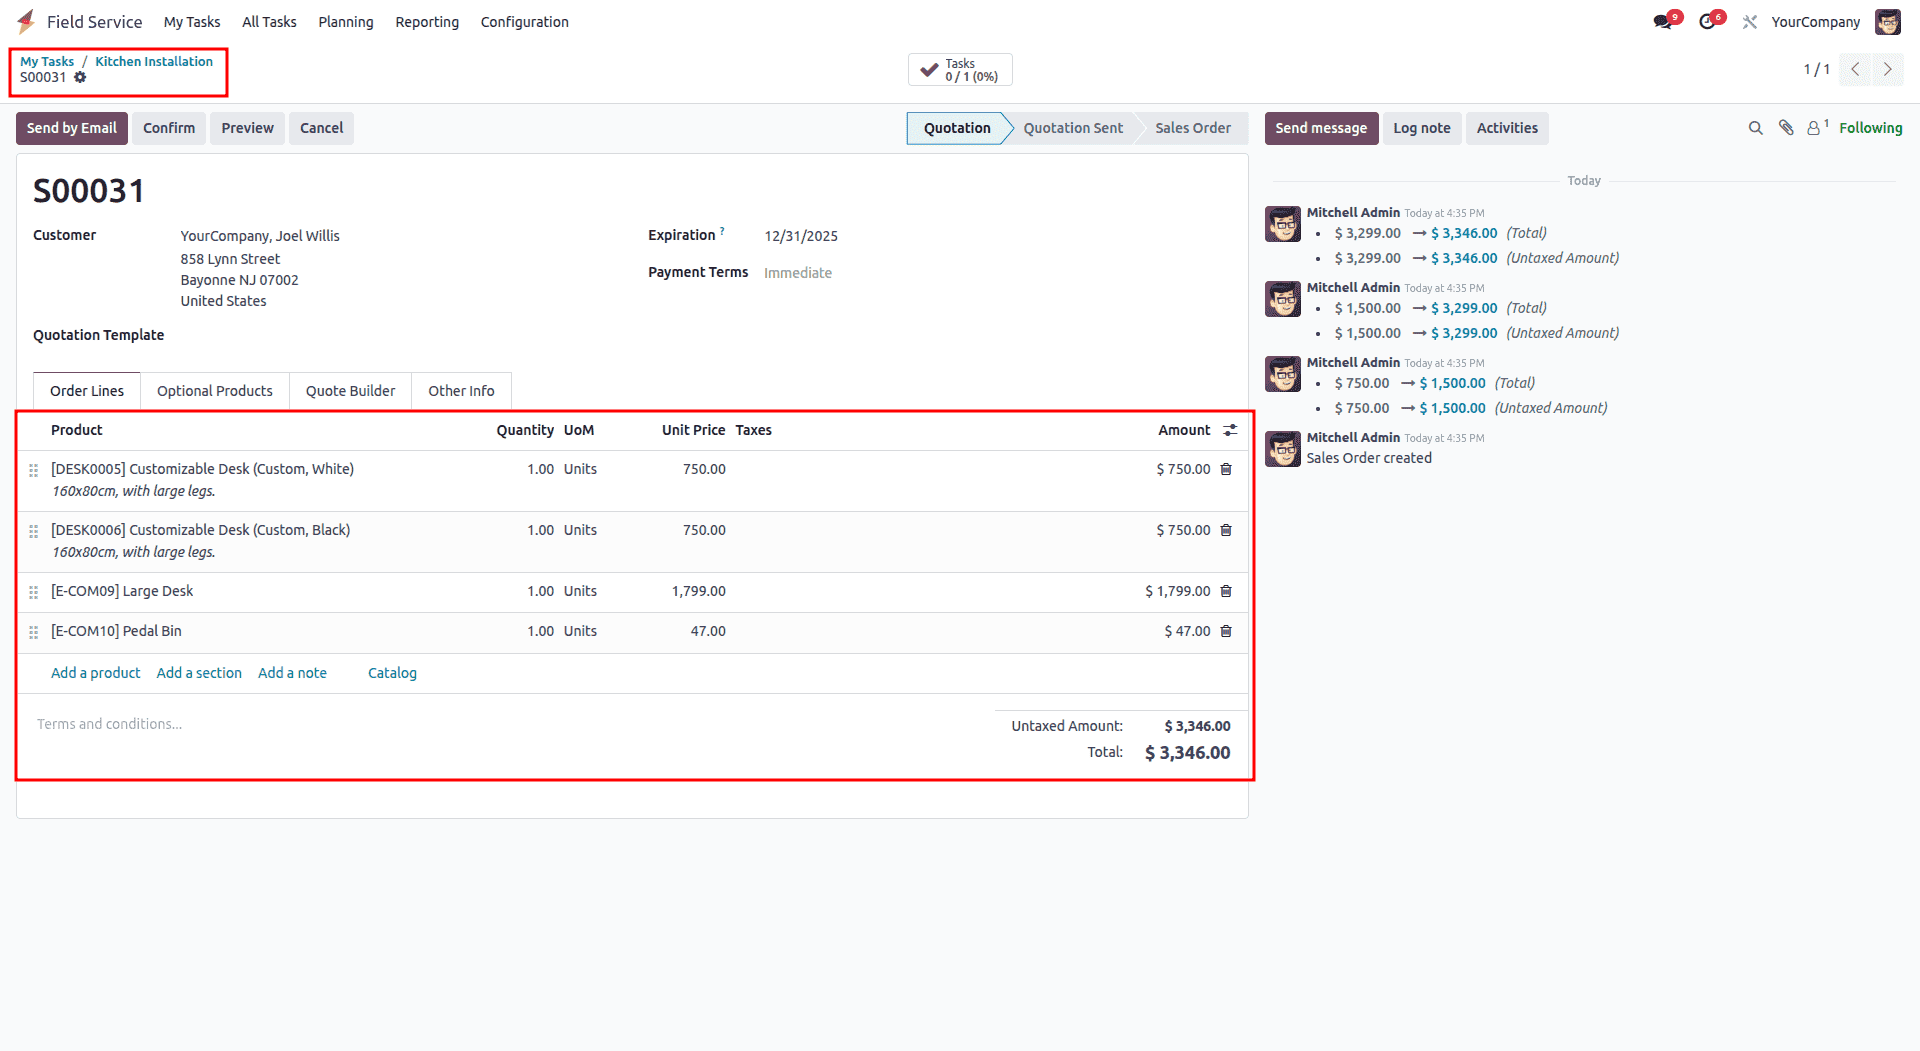
The Sales Order smart button lets you view all invoicing and billing details related to the task. When you click it, a new window opens showing the full breakdown of each item added, including product prices, taxes, and the final total. You can scroll through the page to review all the billing information.
You can add any products using the “Add a line” option available on the “Order Lines” tab of the billing form.
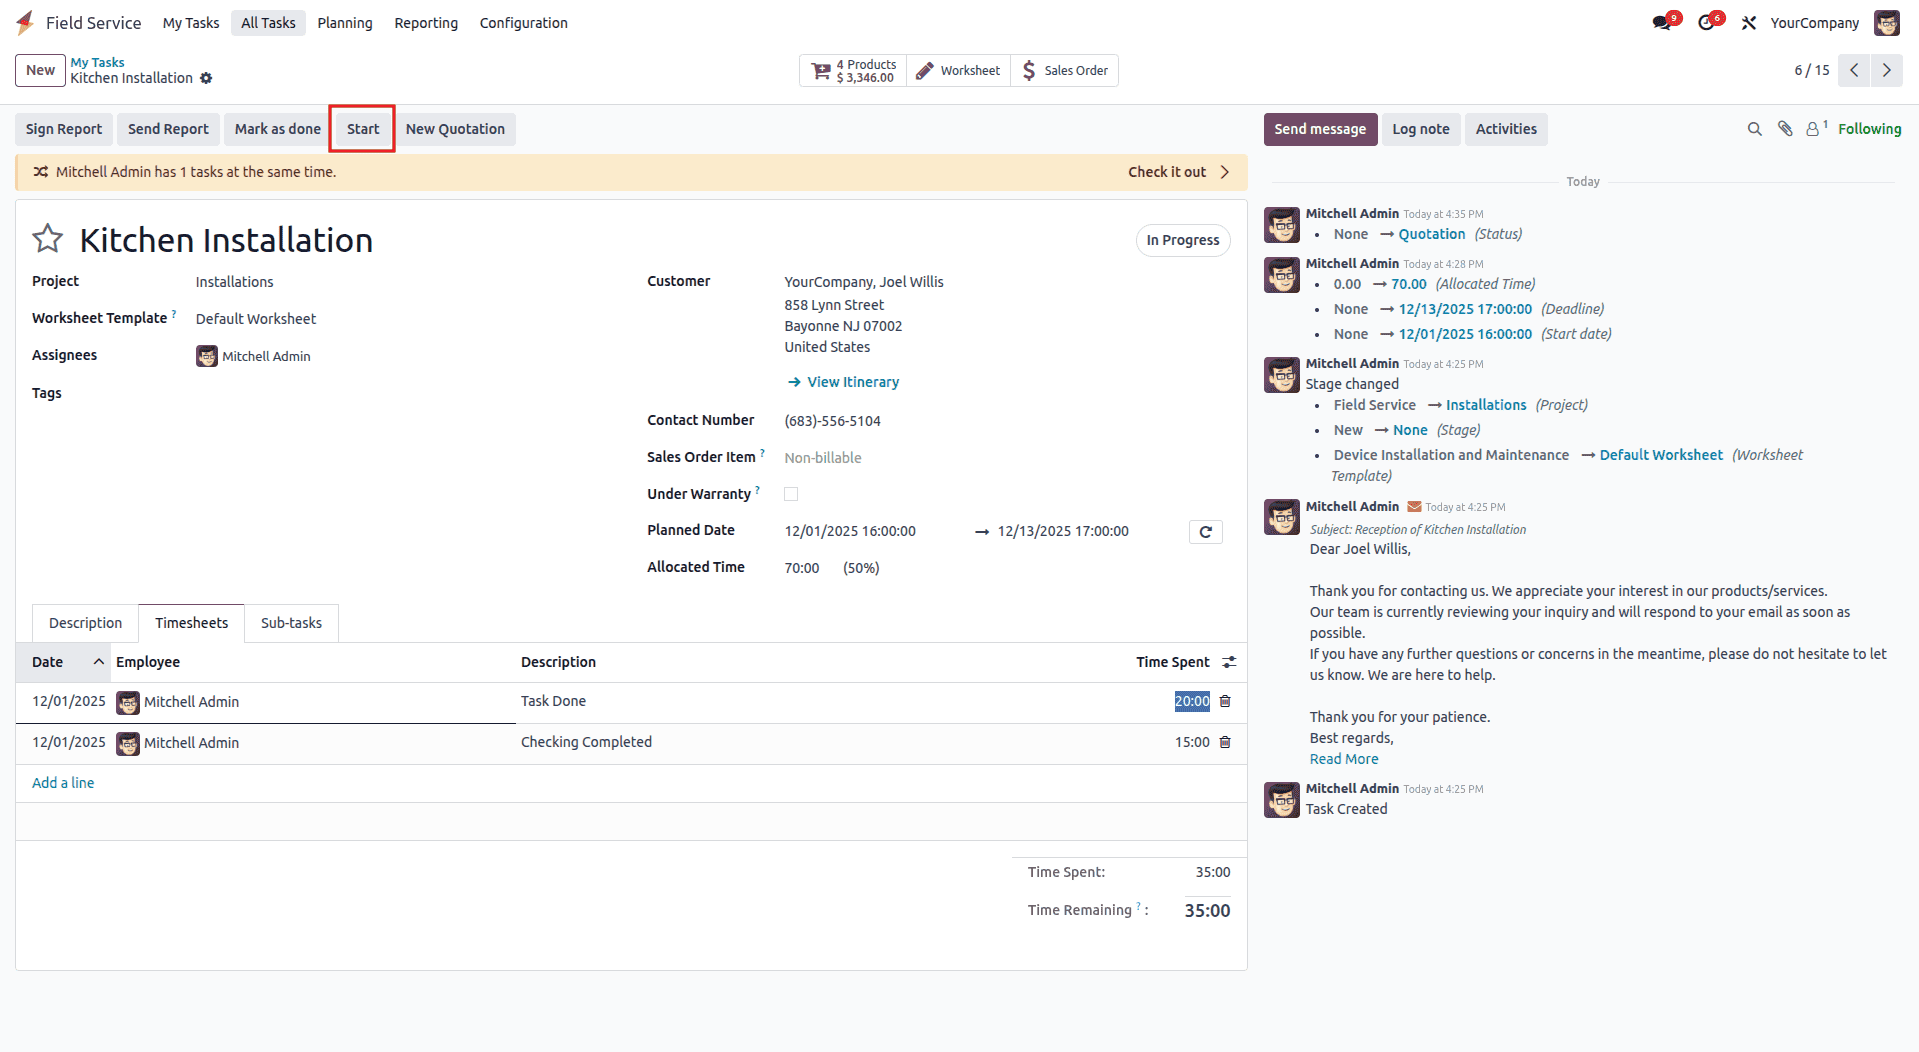
You can start tracking time on a task by clicking the Start button on the timer. Once the work is finished, use the Mark as Done button to complete the task. In this example, the task has been marked as completed using that option.
Worksheet
In Odoo 18, the Field Service module provides strong tools for managing and tracking employee timesheets. You can review and update worksheet details for each employee directly from the task form. To access this information, use the Worksheet smart button. When you click it, the worksheet form opens, as shown in the example below.

In the Field Service Worksheets section, you’ll see a sample worksheet template like the one shown above. You can update the Comments field with any notes related to the task and then save your changes. If you need additional or customized worksheet formats, you can create them through the Worksheet Templates option in the Configuration menu.
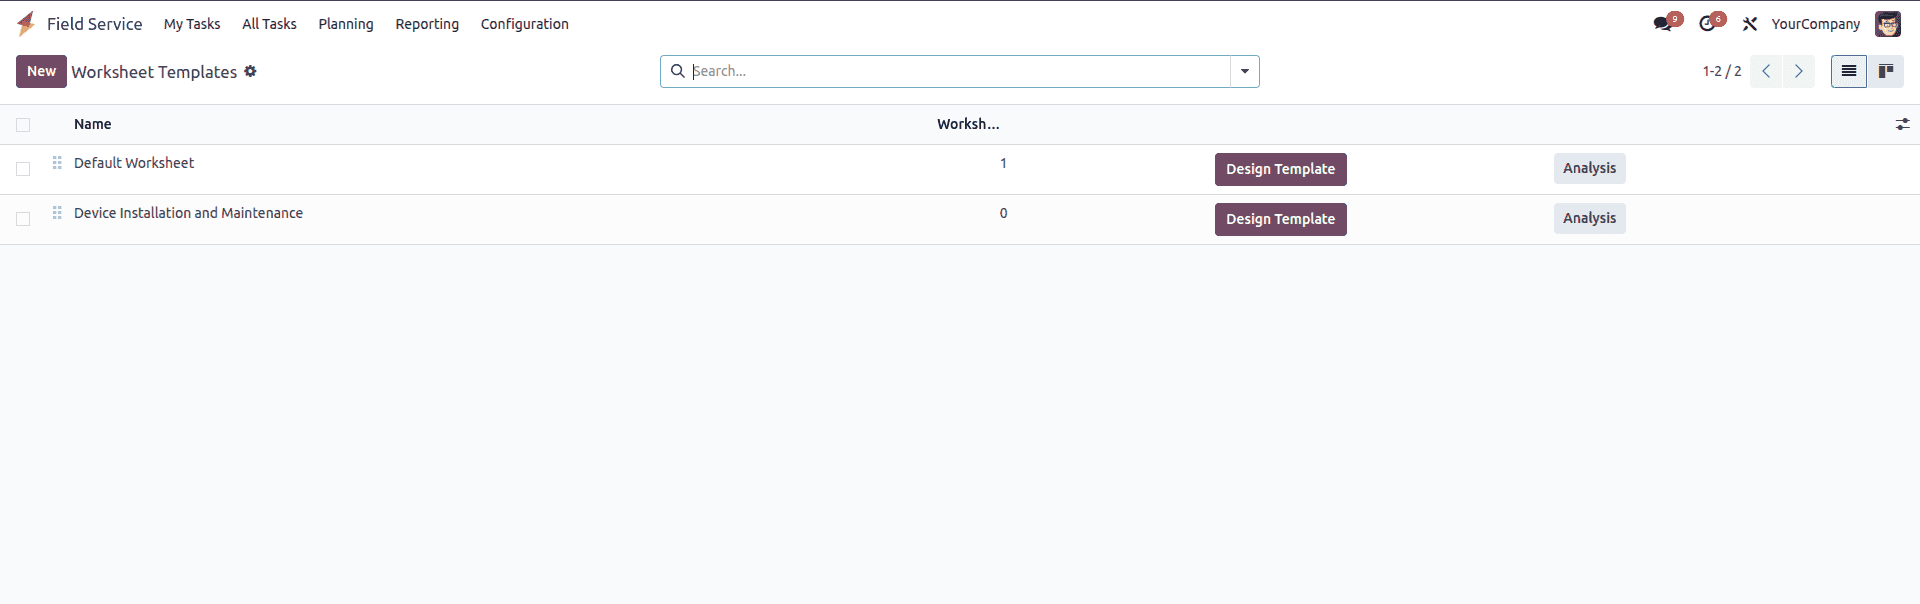
You can create your own worksheet layout by clicking the New button on the Worksheet Template dashboard. Once a worksheet is completed and saved, it will appear under the Worksheet smart button on the task, as shown in the example below.
Customer Preview and Signing Report
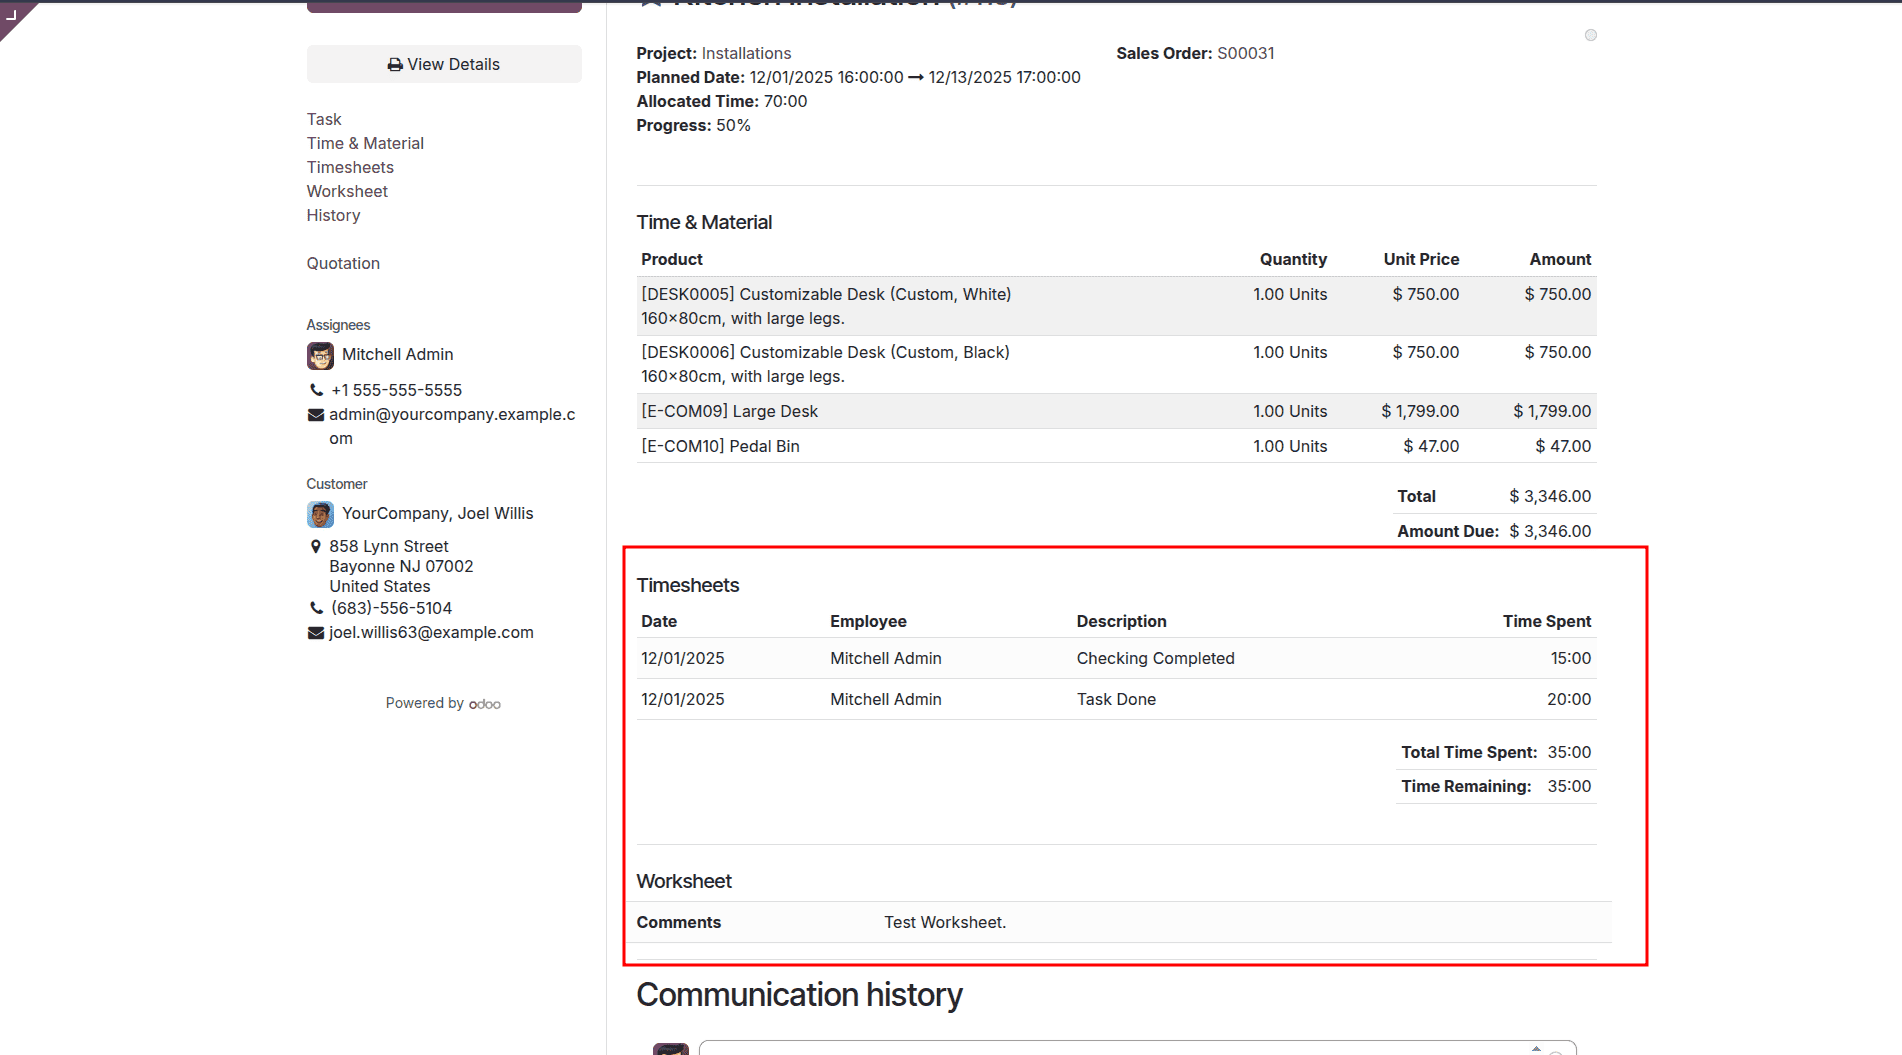
Once the task is finished, administrators can review the reports, worksheets, and timesheet details by using the Customer Preview smart button. Selecting this option opens the public-facing view of the information, as shown in the screenshot.

After confirming that all billing and invoicing details are included in the task, you can sign the report using the Sign button on the left side of the page. From this same window, you can also review sections like Time & Material, Timesheets, Task, Sales Orders, and other related information.
When you click Sign, a signature box appears where you can draw your signature, upload one from your device, or choose a style from the options suggested by Odoo.
Once the report has been reviewed and signed, you can proceed with invoicing the task. To do this, simply click the Create Invoice button.
Invoice Creation
After finishing the task, the Create Invoice button becomes visible beneath the task title on the configuration form.
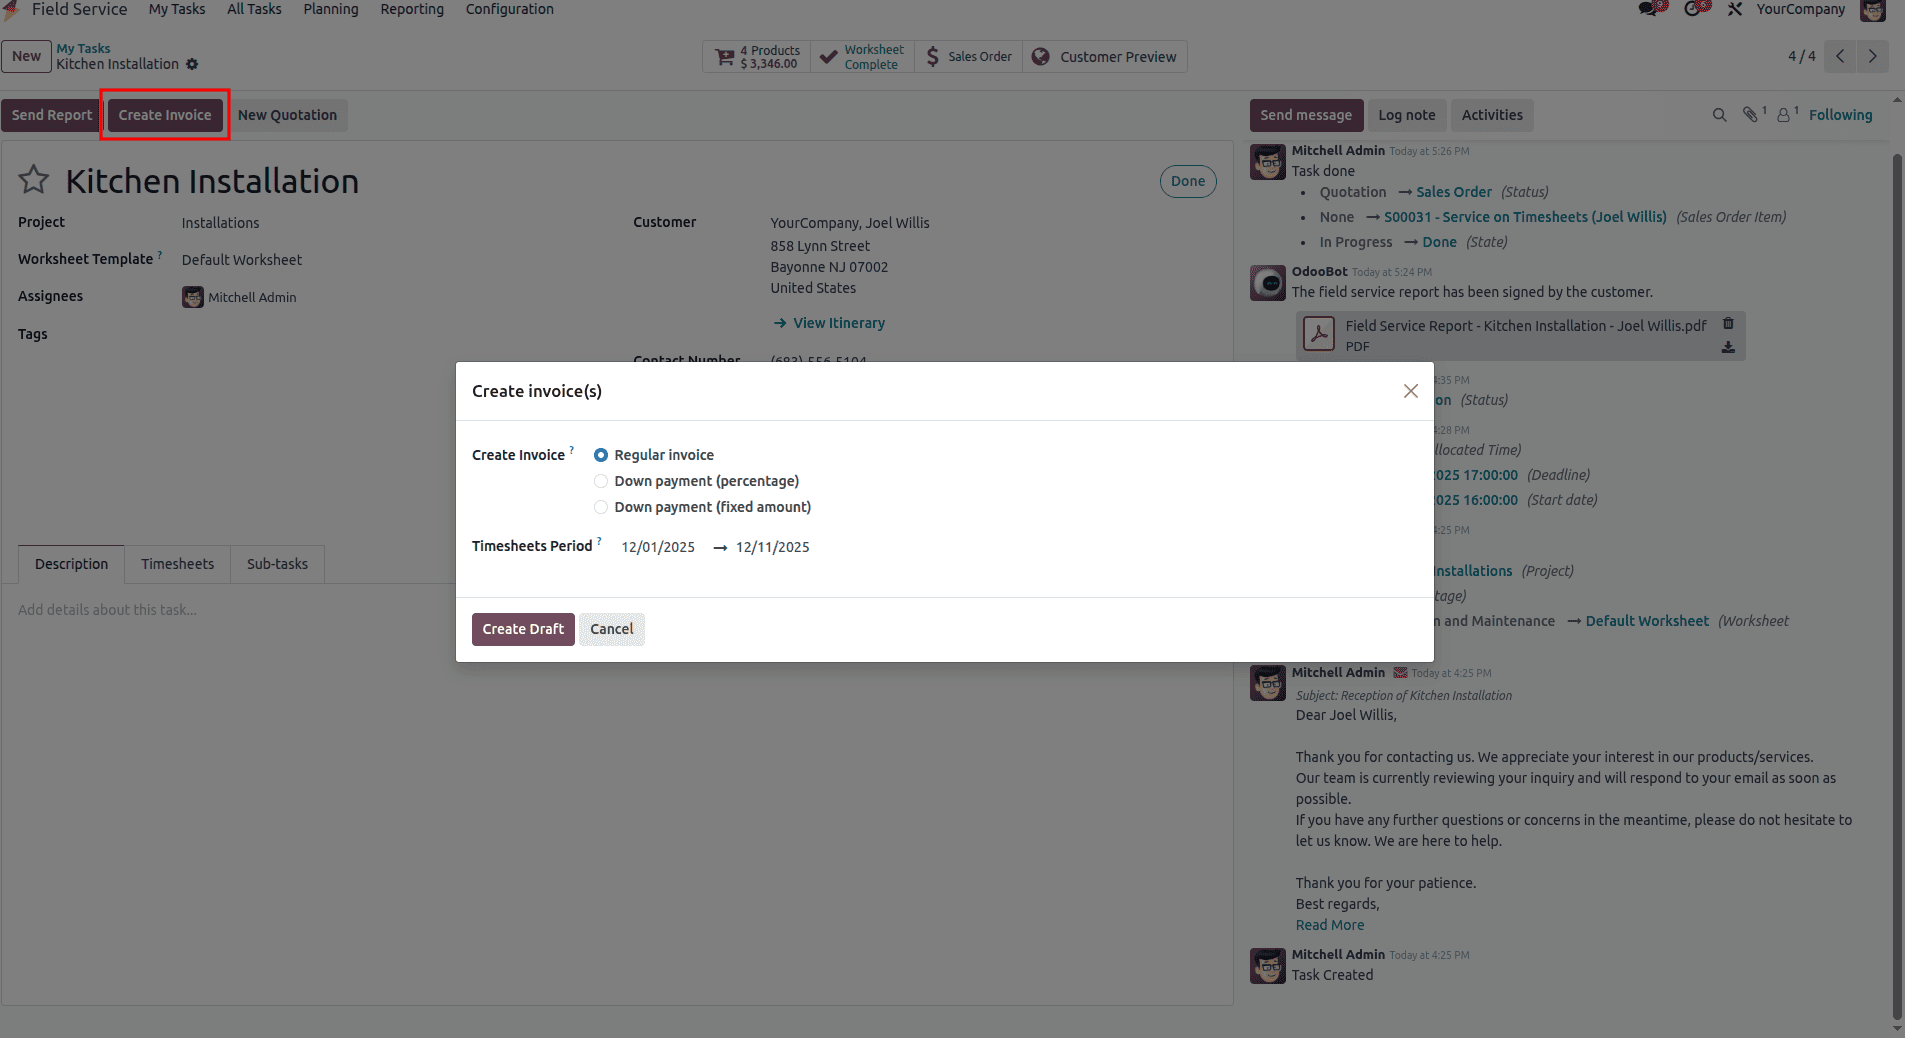
When you click the Create Invoice button, a dialog box appears where you can choose the type of invoice you want to generate and there is a timesheet period, when we choose the period the timesheet is done within the period will be calcilated.. After selecting the option, you can simply click Create Invoice to proceed.
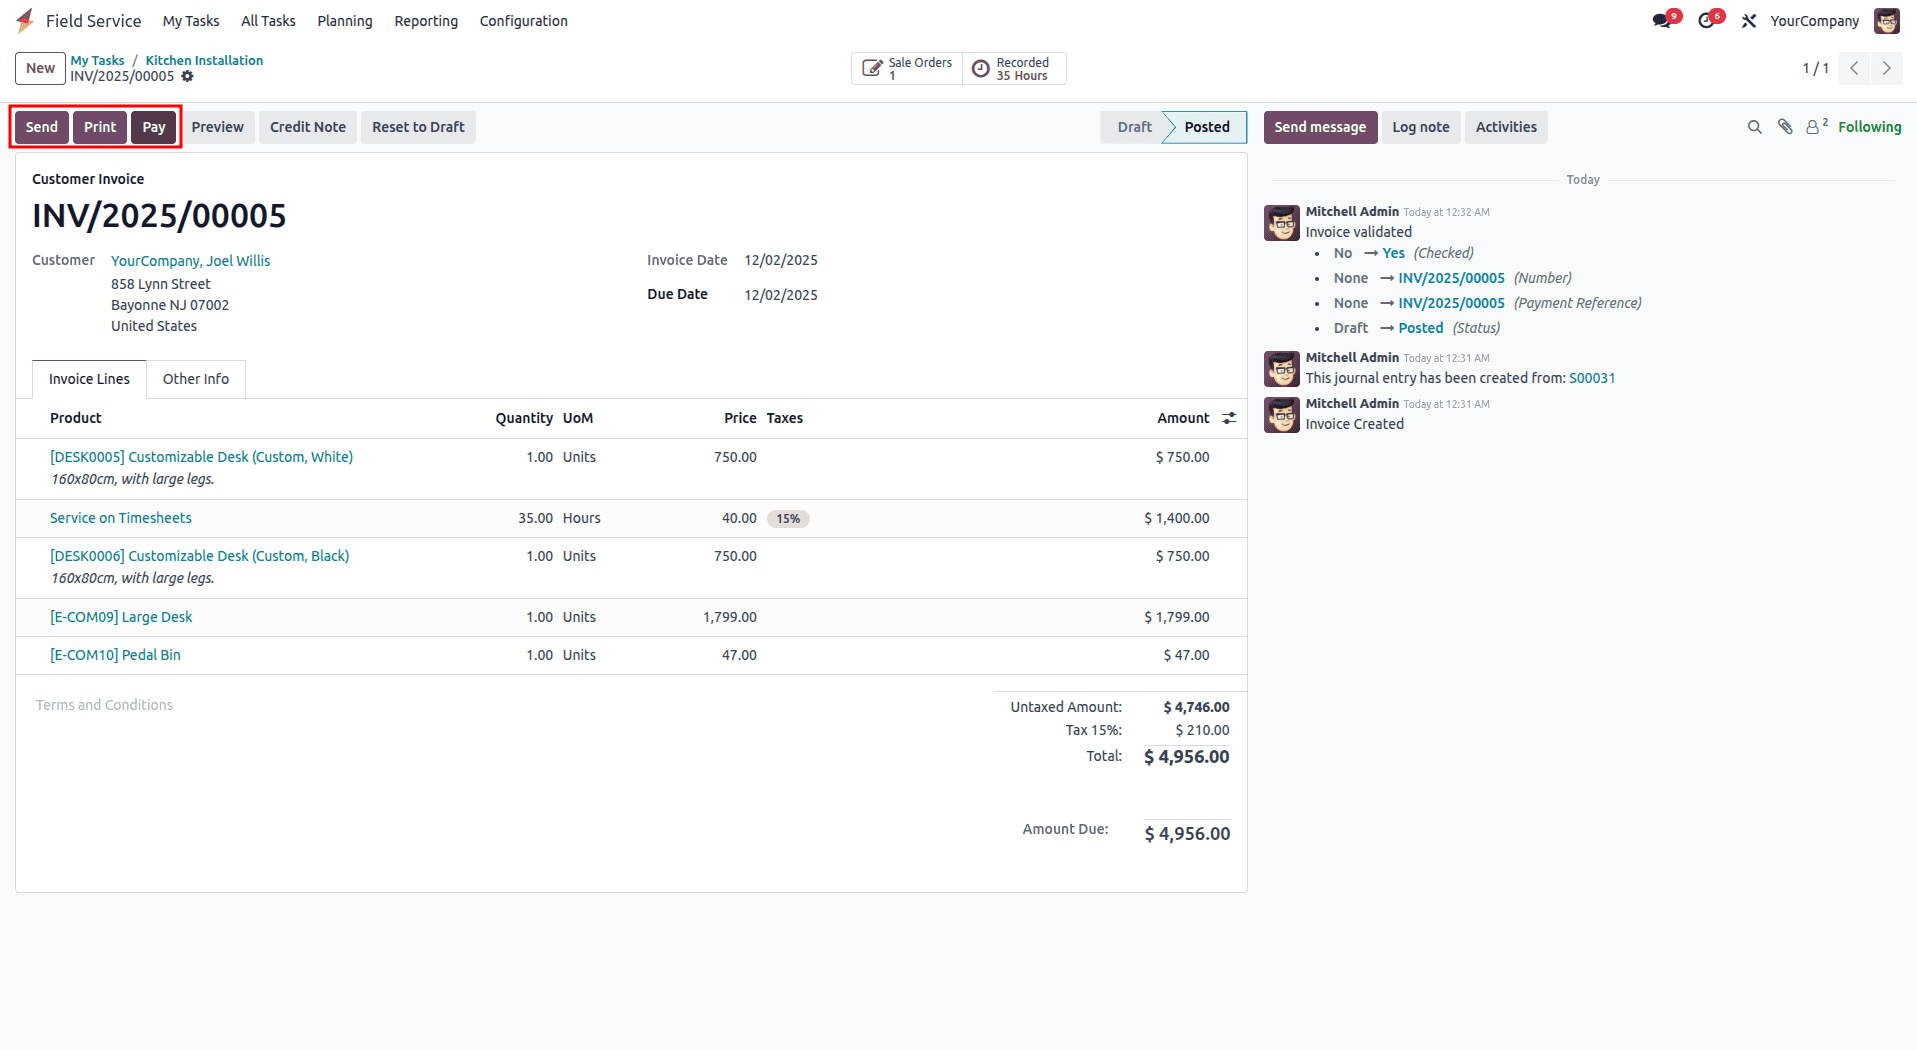
After the invoice is created, you’ll be taken to the invoice page. From here, you can send it to the customer, print it, record a payment, issue a credit note, preview the document, and perform other invoice-related actions using the available buttons such as Send, Print, Pay, Preview, and Credit Note.
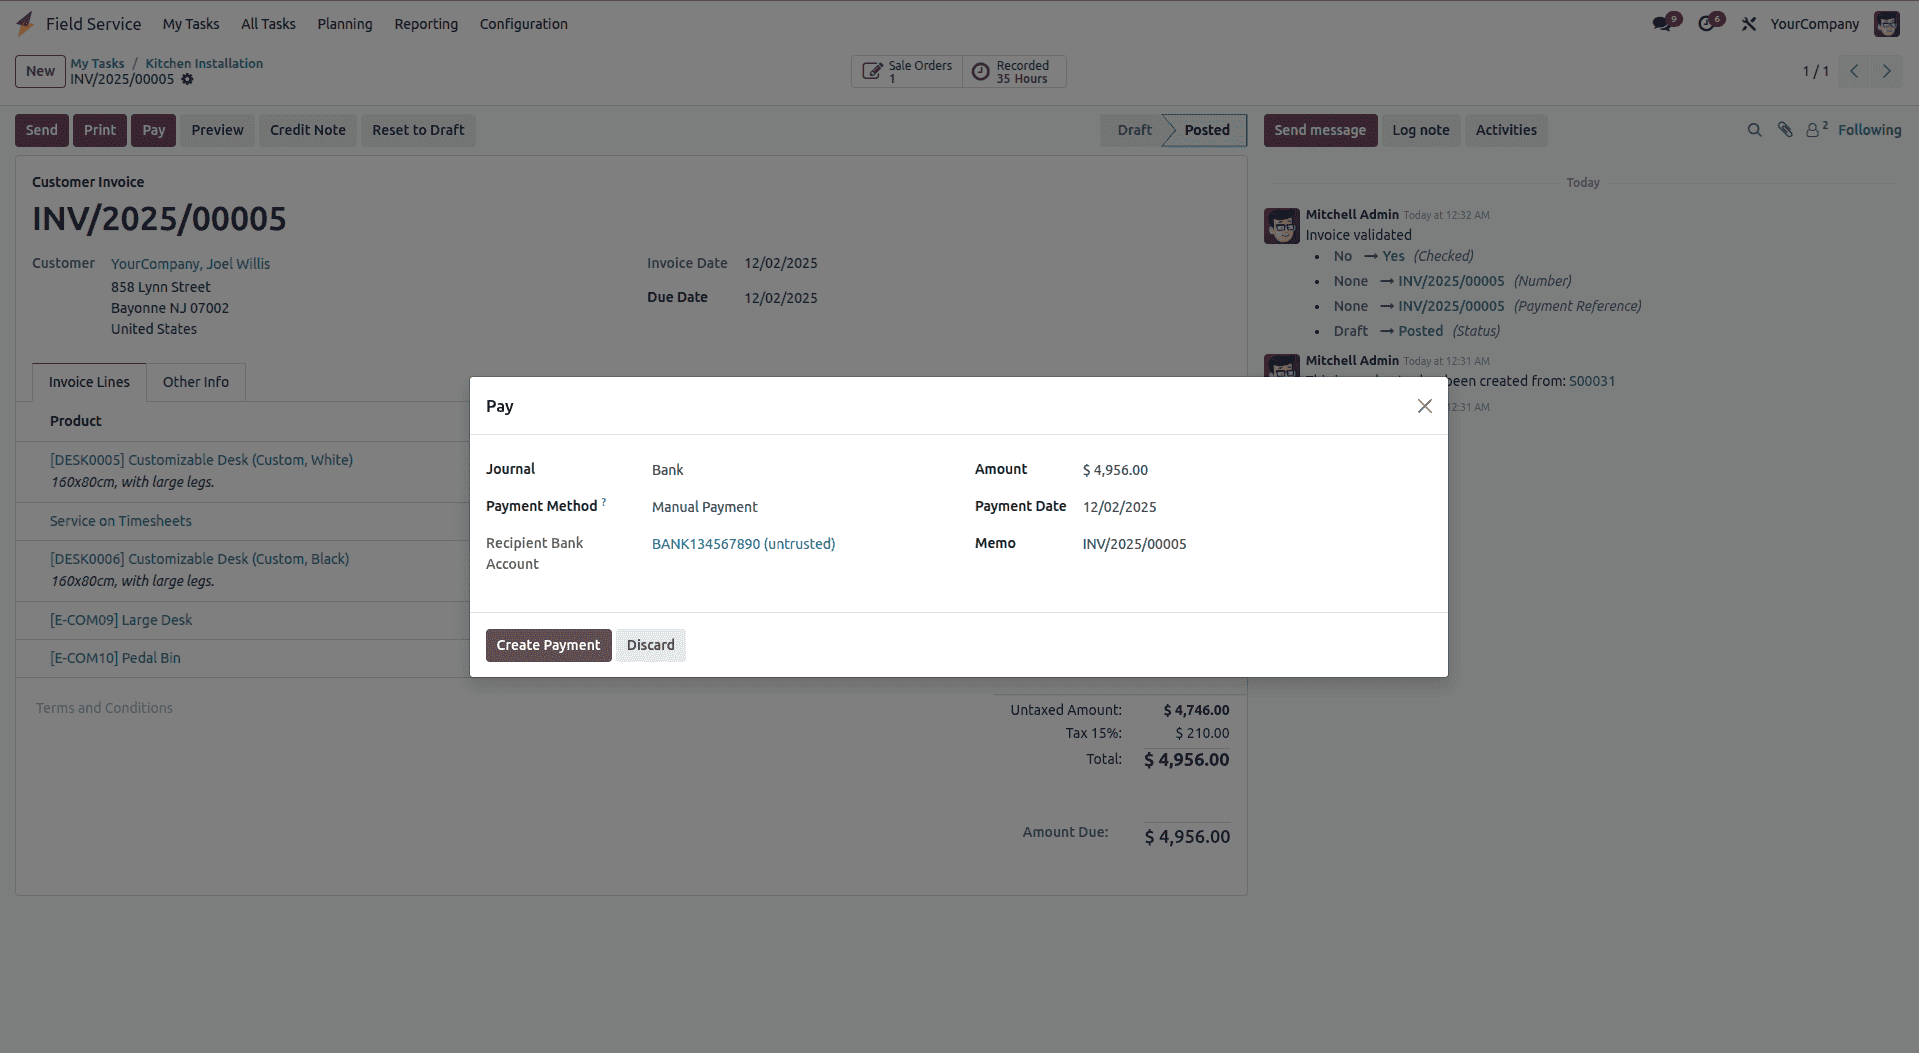
To begin the payment process, click Create Payment. A small pop-up window will appear where you can adjust details such as the Journal, Payment Method, Amount, Payment Date, and Memo, as shown in the example.
With the task completed and the payment recorded, you can send or print the invoice if needed by using the Send and Print buttons.
Thus, Odoo 18's Field Service module provides a comprehensive solution for managing on-site operations, from initial task creation to final invoicing. The system streamlines the entire workflow by integrating project configuration, task assignment, timesheet tracking, worksheet management, and customer billing into a unified platform. With features like customizable worksheets, electronic signatures, real-time time tracking, and automated invoice generation, field service teams can efficiently handle installations, maintenance, and repairs while maintaining clear documentation and accurate billing. This end-to-end functionality not only improves operational efficiency and first-visit resolution rates but also enhances customer satisfaction by ensuring transparency, accountability, and professional service delivery throughout the entire field service lifecycle.
To read more about How to Manage a Field Service Project in Odoo 18, refer to our blog How to Manage a Field Service Project in Odoo 18.