Efficient order picking and stock movement are critical for warehouses handling high volumes of products and customer orders. In Odoo 19 Inventory, Batch Transfers and Wave Transfers are powerful tools designed to optimize these operations by grouping multiple pickings into organized workflows. Instead of processing transfers one by one, warehouses can consolidate tasks, reduce travel time, improve picker productivity, and minimize errors. This blog explores how Batch and Wave Transfers work in Odoo 19 and how businesses can use them to streamline warehouse operations and enhance overall inventory efficiency.
Batch Transfers
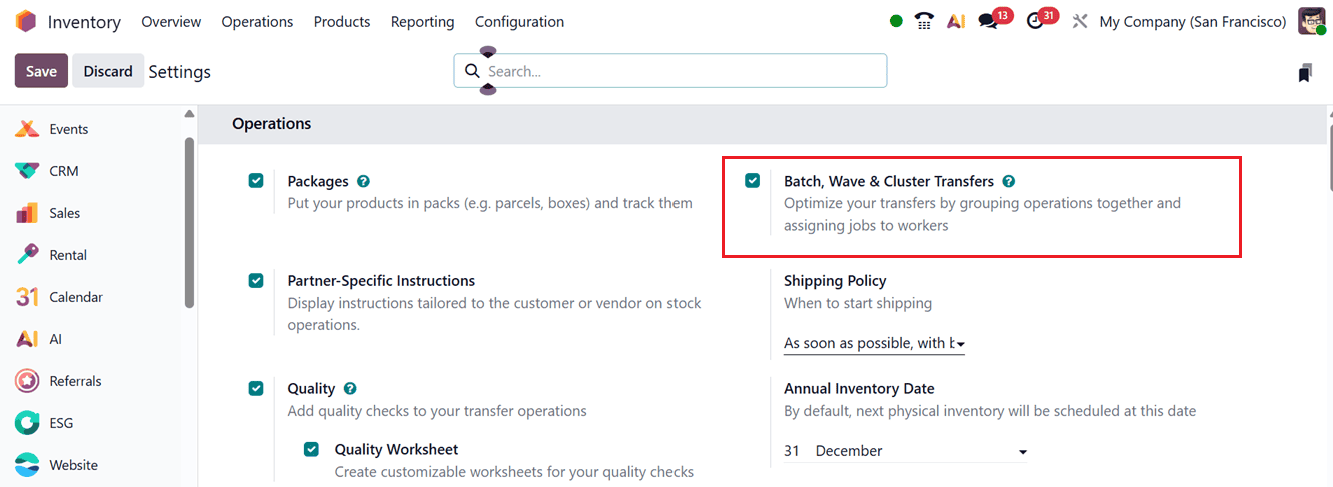
The ‘Batch Transfer’ feature in Odoo 19 allows users to handle multiple transfers at the same time, helping to save both time and manual effort. All transfers included within a batch are processed together, which helps reduce operational complexity when managing large volumes of stock movements. To enable this functionality, you can activate the ‘Batch, Wave & Cluster Transfers’ option from the ‘Operations’ tab in the Settings menu of the Inventory module, as illustrated in the screenshot below.

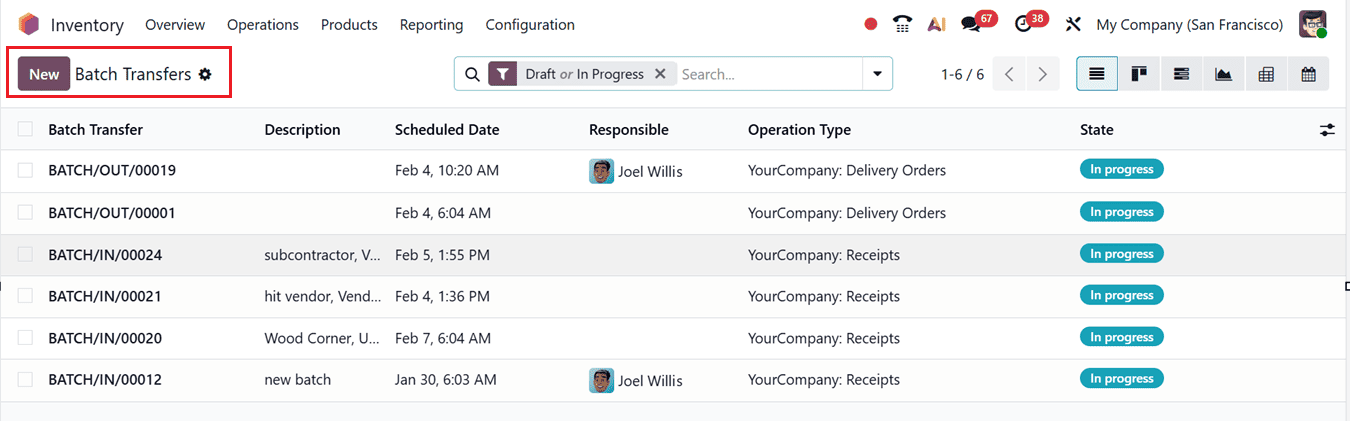
After enabling the option, click the Save button to apply and confirm the changes. Once activated, the Batch Transfers can be managed from the Operations menu. Then, you can see the Batch Transfers dashboard with the list of existing batch transfers along with details such as Batch Transfer reference, Description, Scheduled Date, Responsible user, Operation Type, and current Status, as shown in the screenshot below.
The display can also be switched between Kanban, Gantt, Graph, Pivot, and Calendar views for better visualization. To create a new batch transfer, click on the New button. Assign an employee in the Responsible field, select the Operation Type, and manually define the Scheduled Date if necessary. If the date is not set manually, Odoo 19 will automatically select the earliest scheduled date from the transfers included in the batch. You may also add notes or comments related to the batch transfer in the Description field, as shown in the screenshot below.
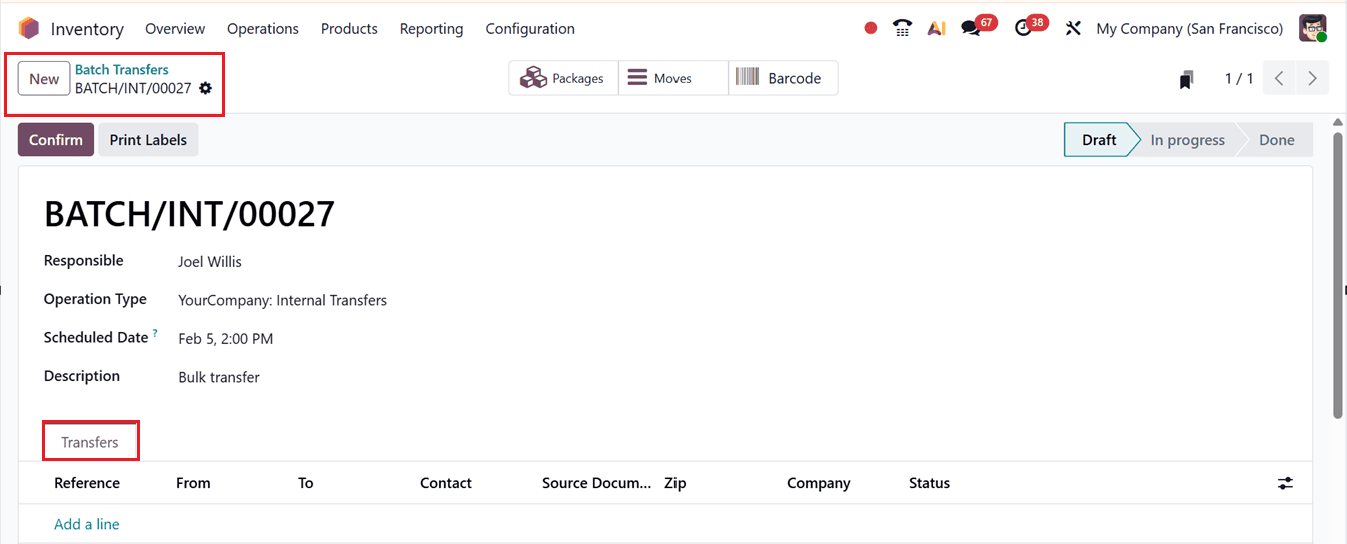
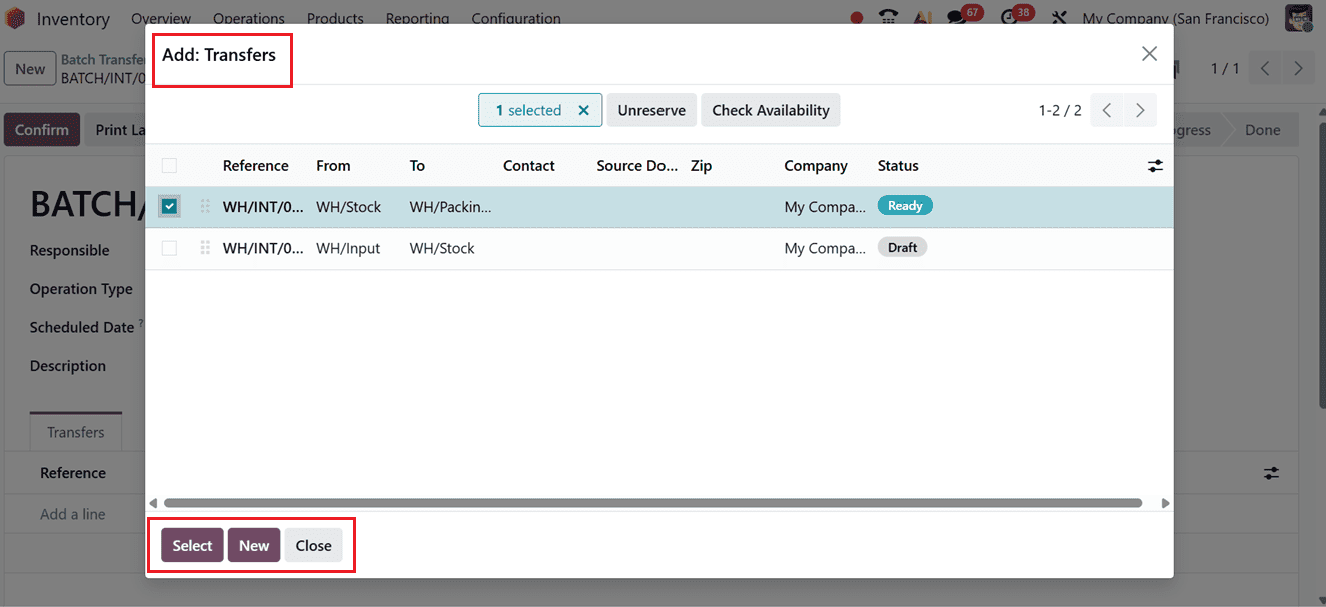
When the Dispatch Management System is enabled, it is also possible to specify the third-party service provider in the Vehicle and Vehicle Category fields. Next, transfers can be added to the batch individually using the Add a line link under the Transfers tab. This action opens a pop-up window displaying eligible transfers based on the selected operation type. From this list, choose the required transfers that share the same status (Waiting or Ready) and click the Select button to include them in the batch.
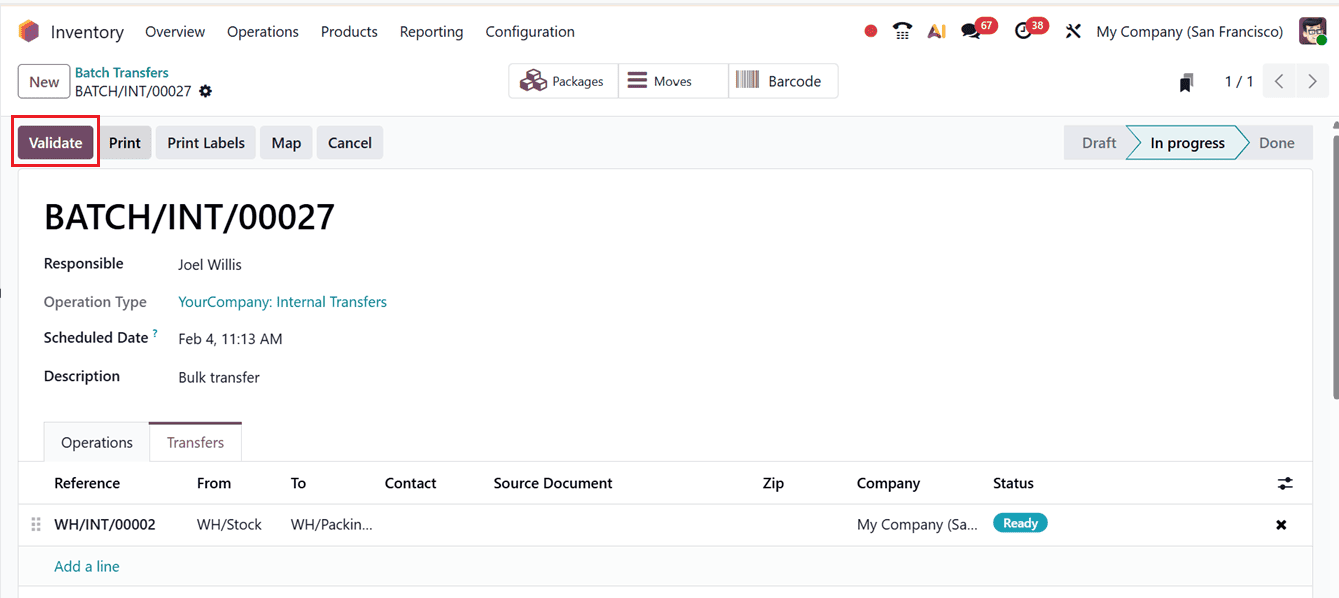
You can also generate new batches using the New button. All selected transfers will then be displayed in the batch list under the Transfers tab. After verifying availability, click on the Confirm button and then proceed to Validate the transfer to complete the batch transfer process.
During validation, if the SMS feature is enabled in the Inventory module, you must confirm the delivery order via SMS notification.
After completing this step, you can continue with the next operational procedures. Additionally, batch transfers can be created directly from the Transfers menu. To use this option, select existing transfers that have matching operation types and statuses from the dashboard. Then click on the Action button and choose the Add to batch option, as illustrated in the screenshot below.
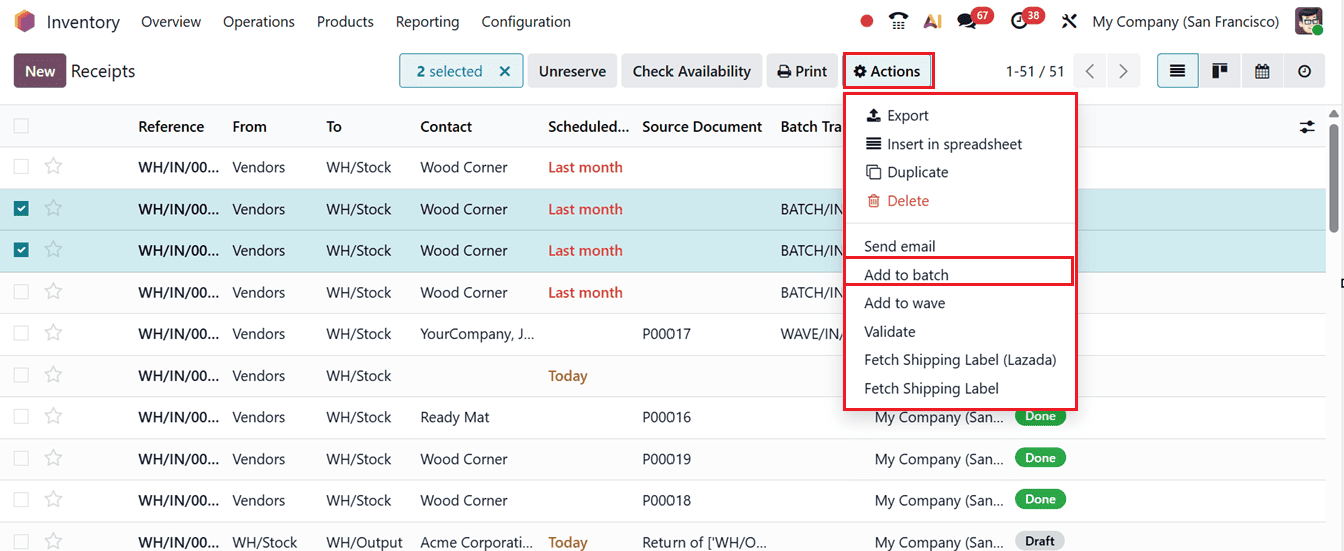
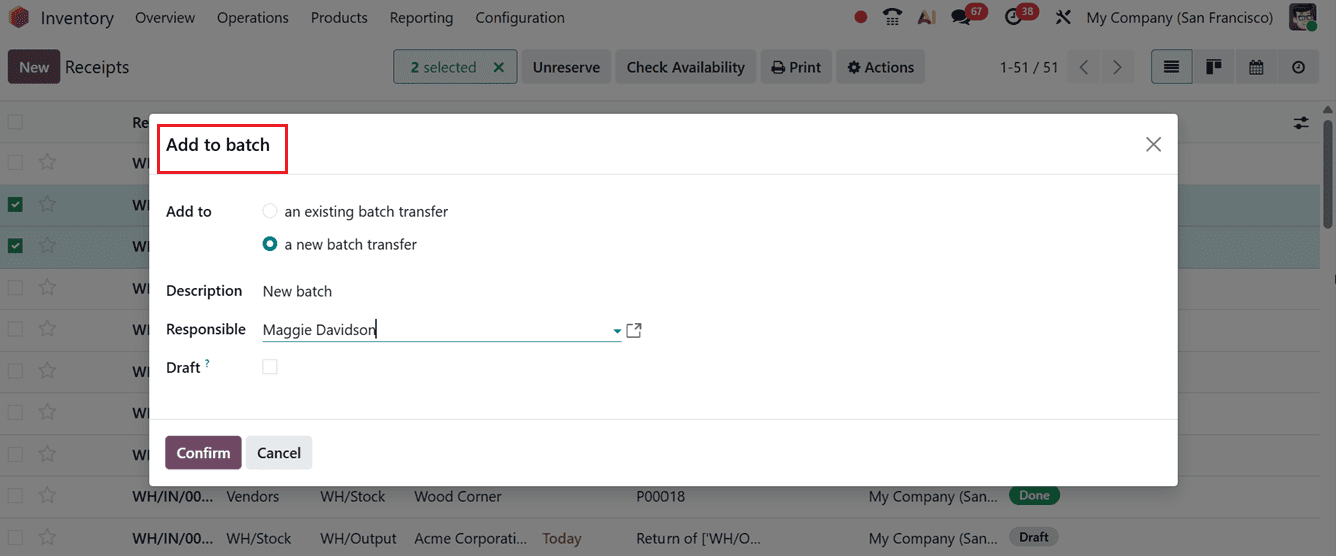
The selected transfers can either be added to ‘an existing batch transfer’ or set as ‘a new batch transfer’ by choosing the relevant option from the ‘Add to’ field. When creating a new batch, assign a Responsible Employee, Provide a relevant Description and enable the Draft option if you prefer to create it in the draft stage, as shown in the screenshot below.
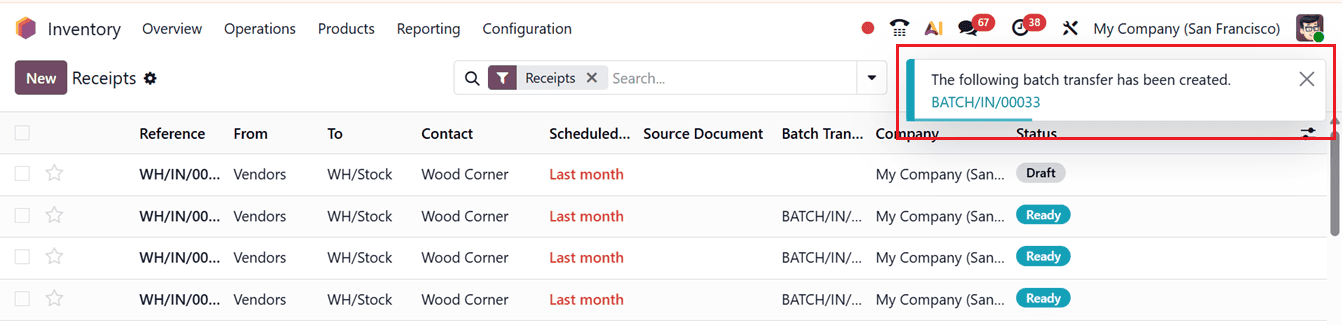
Once you click the Confirm button, a new batch transfer will be created in the Inventory module and Odoo will show a new batch creation notification, as highlighted in the screenshot below.
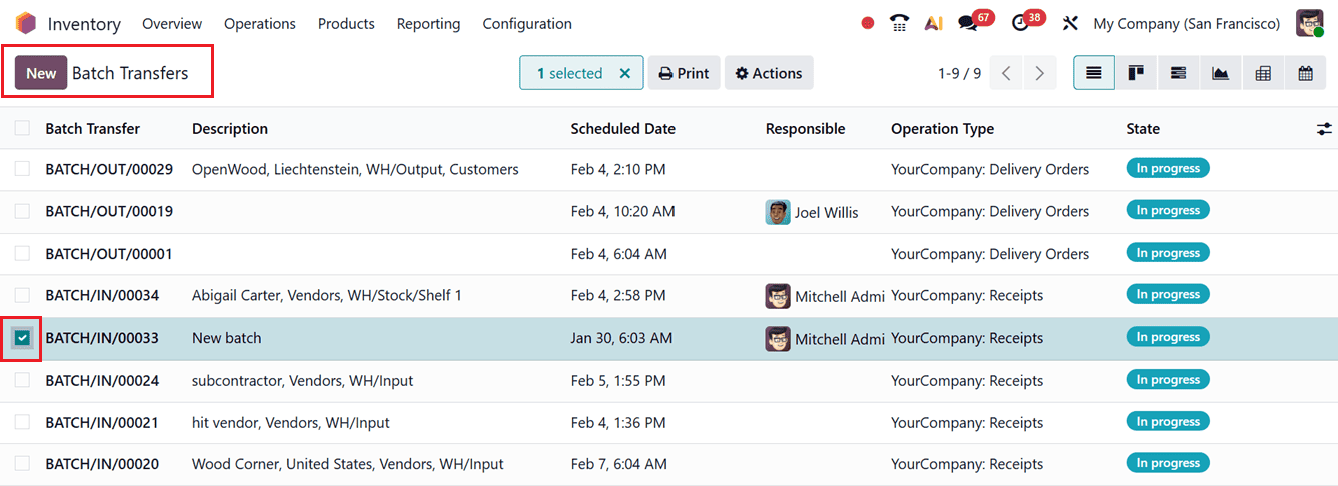
The newly created batch transfer will be available for tracking and management in the Batch Transfers window, as shown below.
3.7 Wave Transfers
The Wave Transfer feature operates in a similar manner to batch transfers but provides more advanced functionality. It allows bulk transfers of multiple products at once; however, transfers cannot be removed after they are added. To use this feature, ensure that the ‘Batch, Wave & Cluster Transfers’ option is enabled in the Settings menu of the Odoo 19 Inventory module.
Within the Wave Transfers window, you can view previously configured wave transfers in a dashboard format, displaying information such as Batch Transfer reference, Description, Scheduled Date, Responsible person, Operation Type, and State, as shown in the screenshot below.

In this view, you will find the Prepare Wave button, which is used for wave picking. This feature groups multiple pickings into a single wave, allowing warehouse staff to collect items for several orders in one optimized route instead of processing each order individually. Using this approach, Odoo organizes the wave based on product, location, and quantity, creating a wave transfer that can be assigned to a specific picker or team. This significantly reduces walking time, improves picking efficiency, and minimizes operational errors.
After clicking the Prepare Wave button, a transfers dashboard window appears, allowing you to select and combine the required transfers to prepare a wave transfer, as shown in the screenshot below.
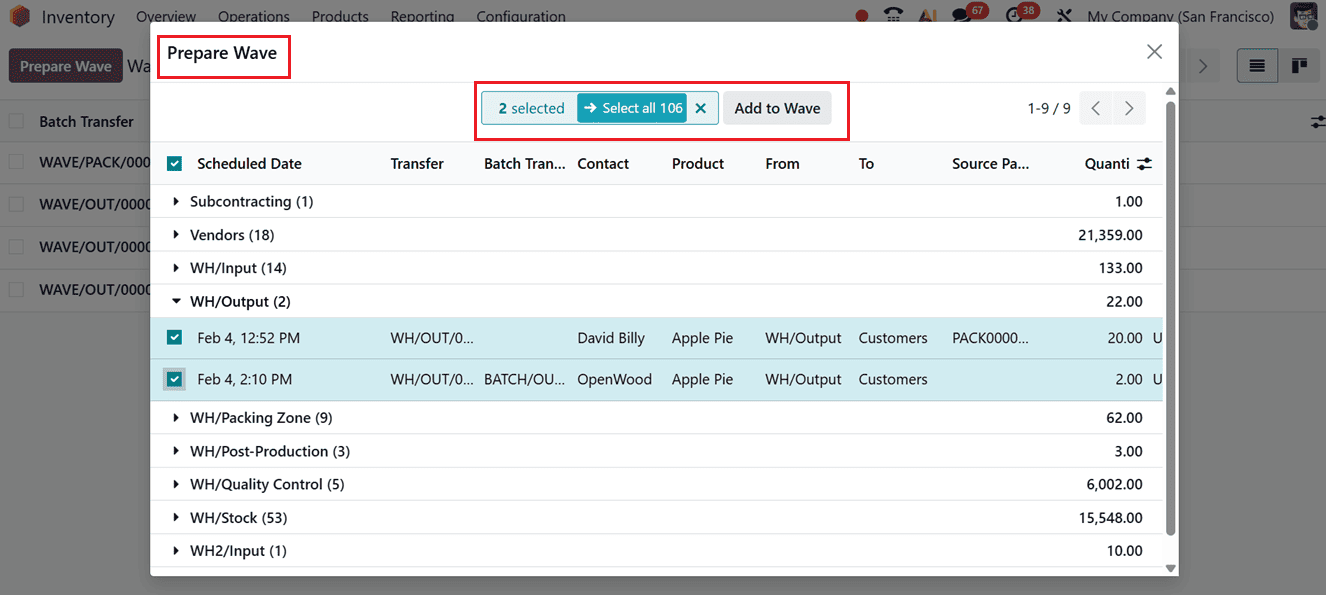
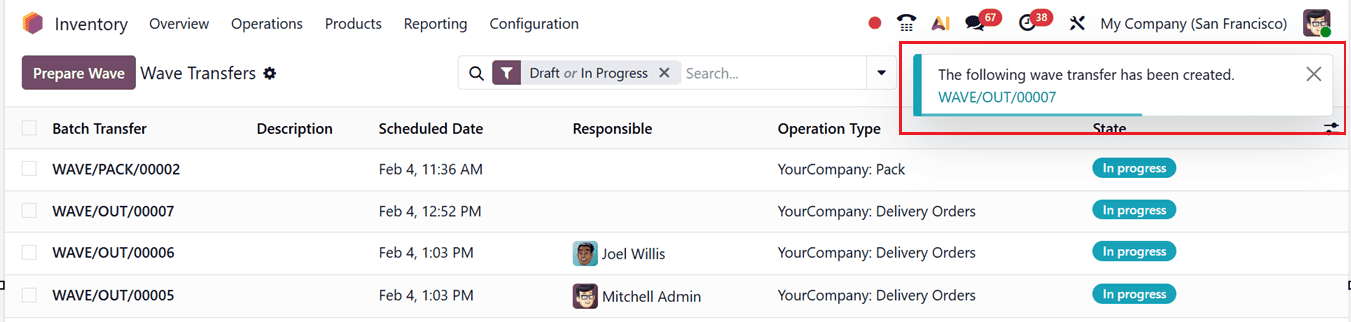
Once the transfer lines are selected, click on the Add to Wave button. This action creates a new wave transfer, and a confirmation notification will be displayed, as illustrated below.
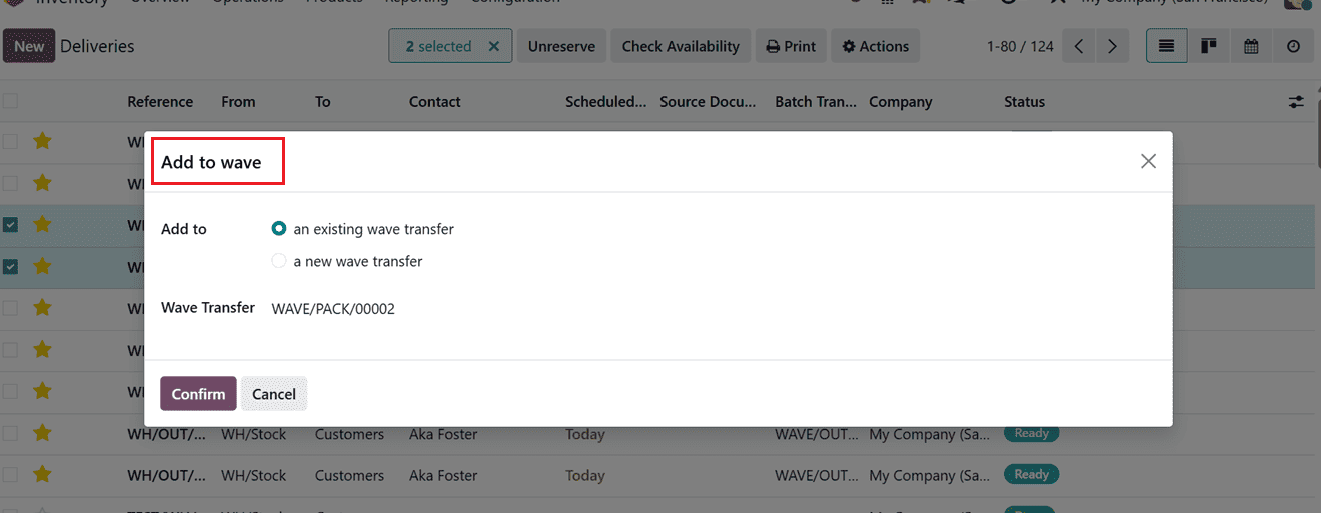
Alternatively, you can navigate to any Transfers window and select transfers that share the same Operation Type and Status. The Action button will then appear, allowing you to choose the Add to wave option.

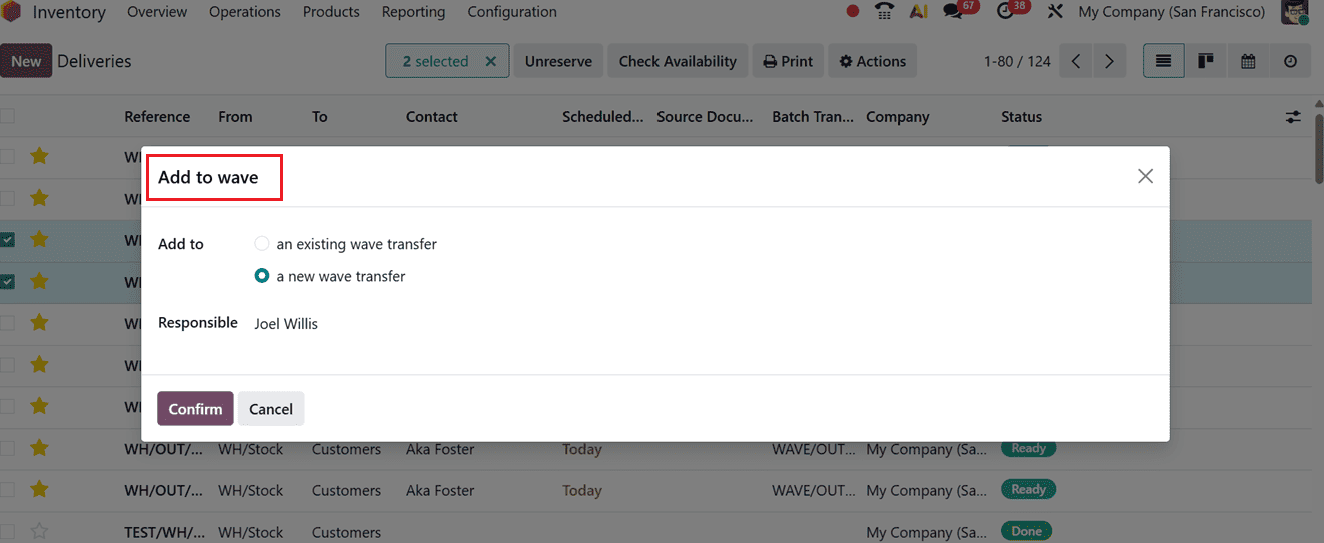
This action opens a pop-up window that allows you to add the selected transfers either to ‘an existing wave transfer’ or to create ‘a new wave transfer.’ If you choose to add them to an existing wave, select the appropriate option and specify the Wave Transfer reference number where the current transfers should be included, as shown in the screenshot below.
If you are creating a fresh new wave transfer, then, assign a Responsible employee and click the Confirm button, as shown in the screenshot below.
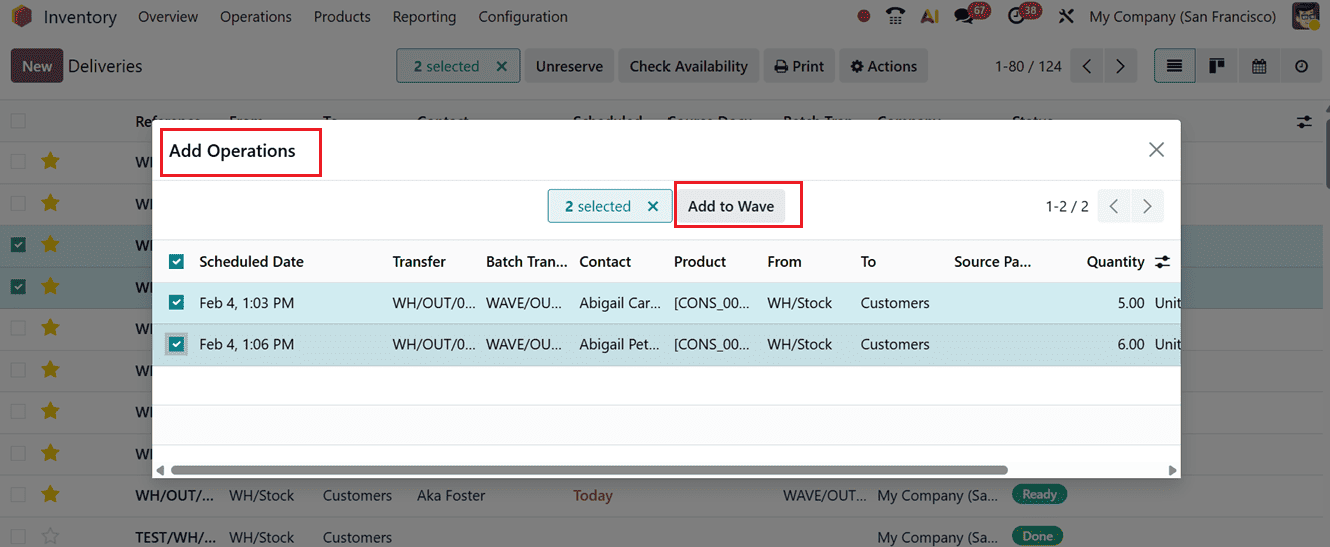
After confirming the relevant wave transfer option, all the available orders or operations will appear for inclusion in the wave in a pop-up window. So, you can then select the required ones and click the Add to Wave button from the Add Operations window, as shown in the screenshot below.
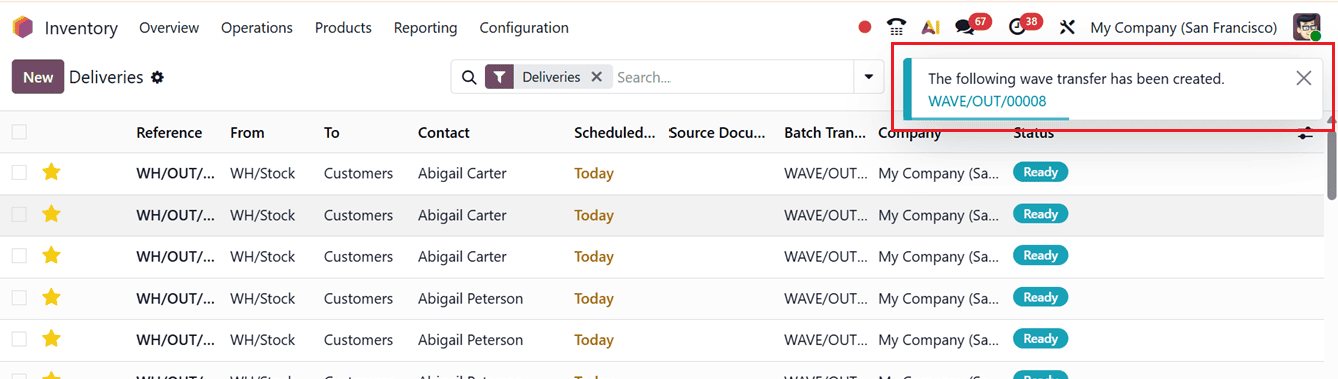
After adding the required operations to the new wave, you will get a notification regarding the newly created wave transfer along with its reference number, as shown in the screenshot below.
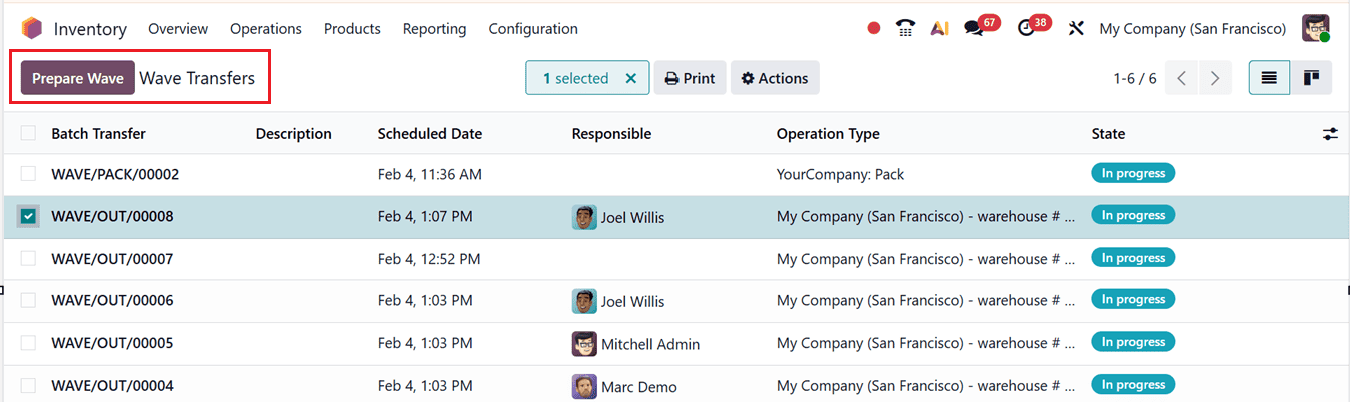
Then, you can see the newly created wave transfer from the Operations menu under the Wave Transfers section. Here, the details such as Batch Transfer reference, Description, Scheduled Date, Responsible person, Operation Type and current State are displayed, as shown in the screenshot below.
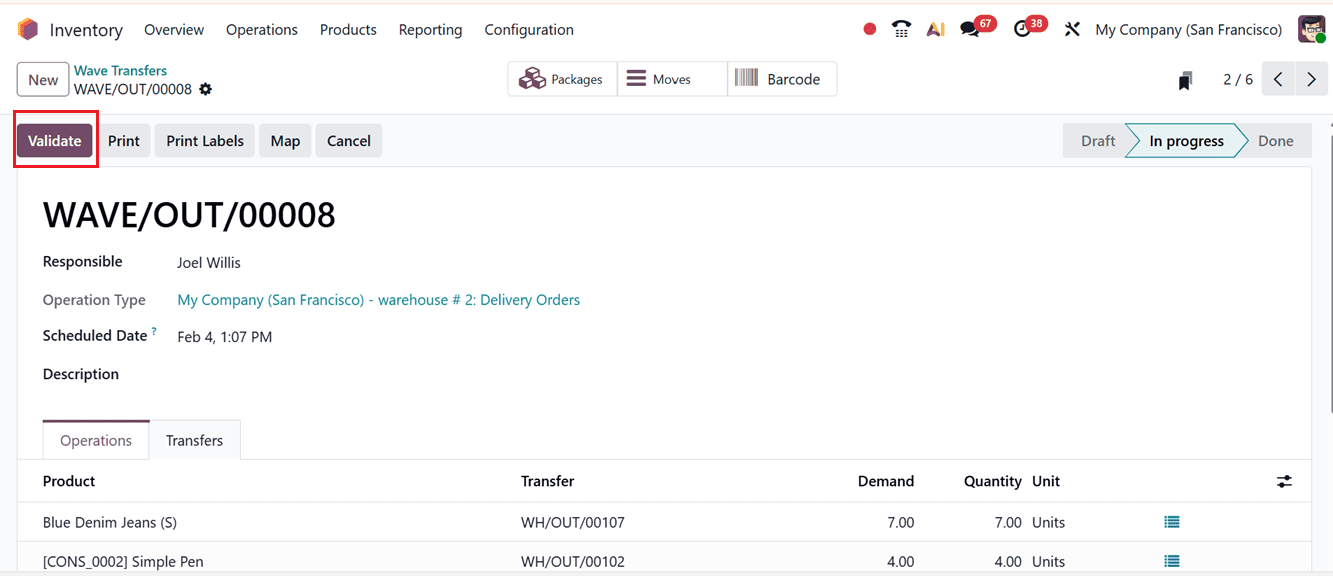
From the Wave Transfers window, open the relevant wave transfer record and click on the Validate button to complete the wave transfer process.
The Operation tab of the form will display the operations that took place in this particular wave transfer including the Product, Transfer Location, Demand and Quantity transferred.
The Transfers tab will show the detailed transfer details of this wave transfer along with their Reference number, From and To Location, Contact person, Source Document if any, Zip code, Company and current Status, as shown below.
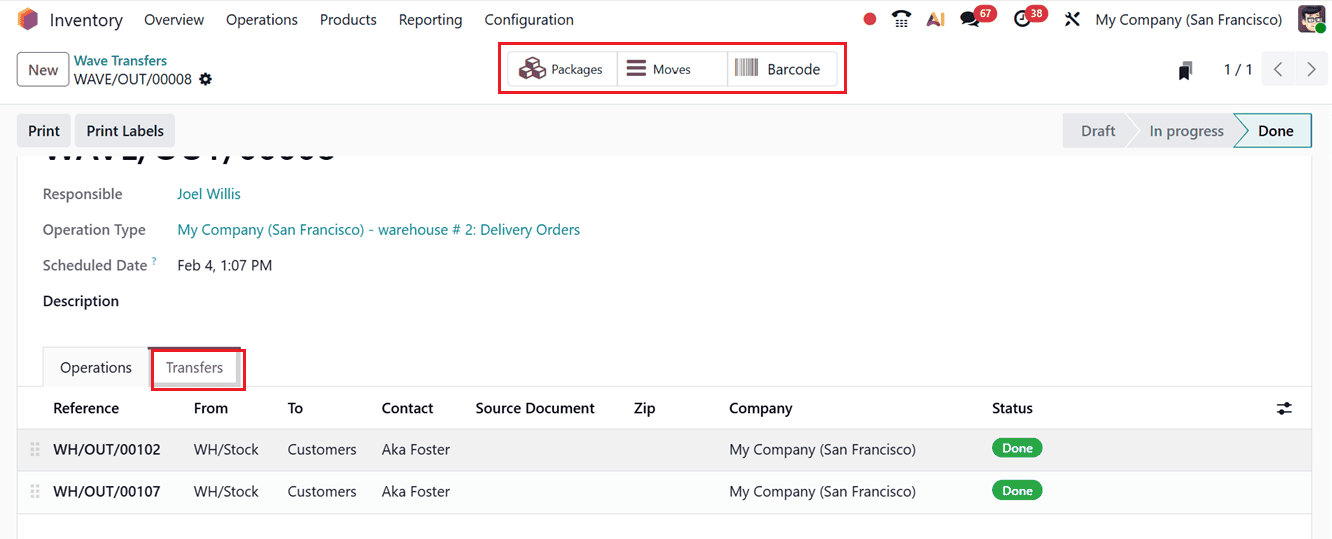
The Packages, Moves and Barcode smart buttons inside the wave transfer form will help you to manage different stages of wave picking and warehouse control.
The Packages button displays all packages created or used in the wave transfer. It helps track how products are packed, grouped, and prepared for delivery, ensuring accurate packing operations.

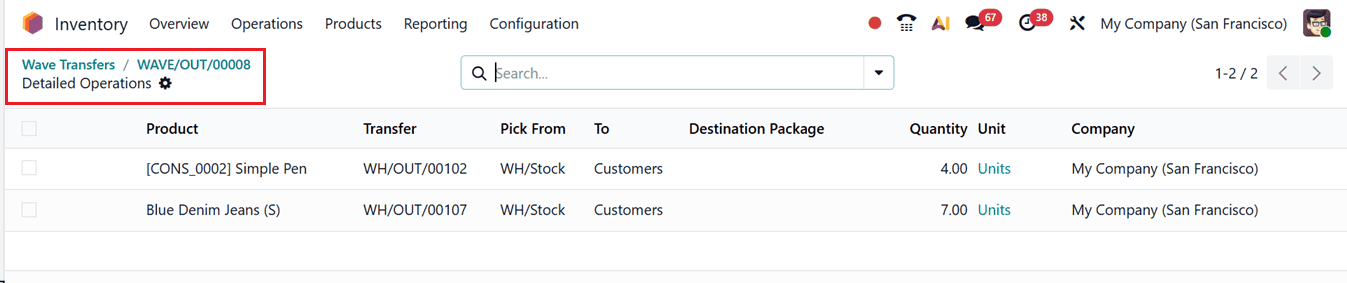
The Moves button shows all stock move lines linked to the wave. It provides clear visibility into the Products being moved, their Transfer references, Pick From and To locations, Destination Packages, Quantities, and Company details helping managers monitor progress and validate movements, as shown in the screenshot below.
The Barcode button opens the barcode interface for wave picking. It allows warehouse staff to scan products, locations, and packages, speeding up operations while reducing manual errors.
In addition, automatic batch and wave transfers can be enabled for an operation type while configuring new Operation Types. To activate wave transfers for a specific operation type, enable the Automatic Batches option under the BATCH & WAVE TRANSFERS tab section, as shown in the screenshot below.
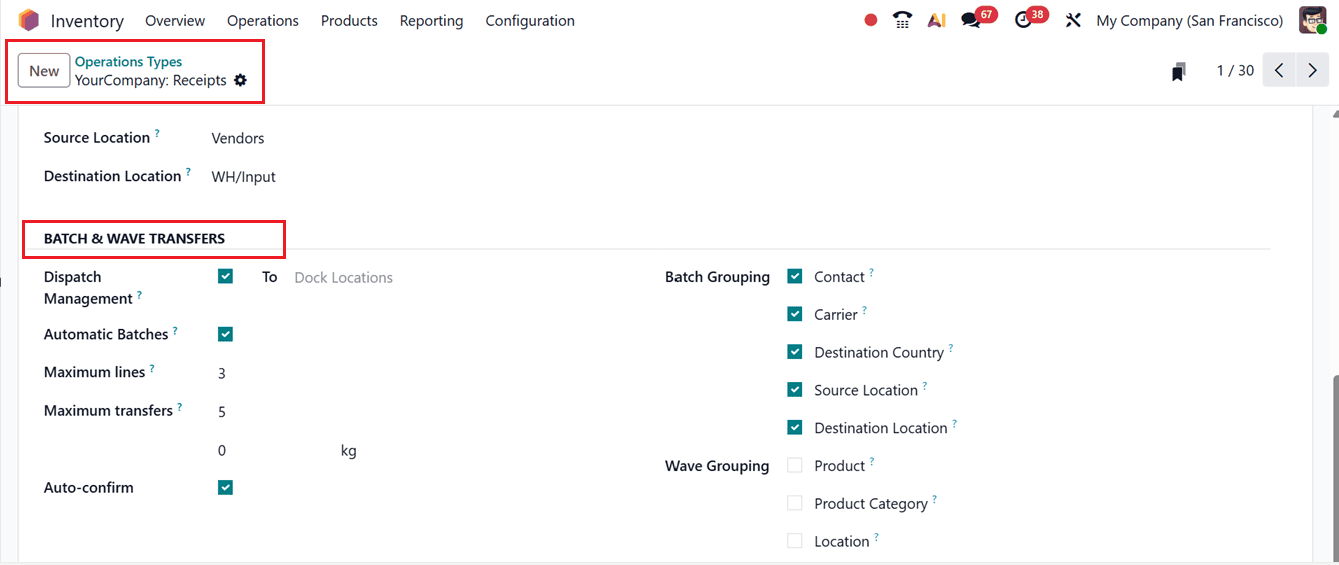
Once this feature is activated, configuration options such as Maximum Lines, Maximum Transfers, Auto Confirm, Batch Grouping, and Wave Grouping become available. These settings allow you to customize transfer behavior based on your operational requirements.
In summary, Batch and Wave Transfers in Odoo 19 Inventory streamline warehouse operations by grouping multiple pickings into efficient workflows. Batch Transfers simplify bulk processing, while Wave Transfers optimize picking by product, location, and quantity. Together, these features reduce handling time, minimize errors, boost productivity, and support a faster, more scalable warehouse operation.
To read more about Overview of Batch & Wave Transfers in Odoo 18 Inventory, refer to our blog Overview of Batch & Wave Transfers in Odoo 18 Inventory.