In Odoo 19, snippets allow users to customize the functionalities of the Website Builder by creating reusable and dynamic components. Since snippets make use of the Odoo Web Library, they provide a more enhanced user experience, as they can take advantage of JavaScript.
In this blog, we are going to learn how to create a product snippet for Odoo 19 using OWL components. We need to understand the concept that the product snippet created in this article will allow us to retrieve products' information from the database and display it on the website.
By the end of this tutorial, you will learn how to create a custom product snippet that allows communication between the Odoo back-end and the website front-end and render products' information using OWL components.
Prerequisites
Firstly, let's look at the prerequisites that need to be fulfilled before proceeding with implementation:
- Odoo 19 needs to be installed, configured, and up and running on your system.
- Having an idea of Odoo modules and their development.
- Knowledge of JavaScript, OWL, and XML.
- A custom Odoo module, such as your_module_name, where you will create the snippet.
In this tutorial, we will create a product snippet using your_module_name as the custom Odoo.
Step 1: Module Structure
Set up your custom module with the required files and directories for the snippet implementation. A basic structure is shown below:
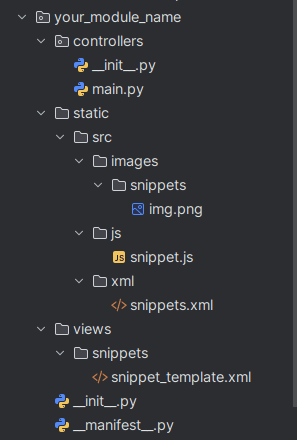
Module Components
Every file has a particular function:
- Controllers/main.py: This file handles the backend code for fetching product details.
- Static/src/js/snippet.js: This file contains the OWL component along with the frontend code.
- Views/snippet_views.xml: This file contains the definition of the snippet template and includes the same in the Website Builder module.
- Finally, modify the __manifest__.py file to specify the dependencies and assets:
# -*- coding: utf-8 -*-
{
    'name': 'Module Name',
    'version': '0.1',
    'license': 'LGPL-3',
    'depends': [
        'base', 'website',
    ],
    'data': [
            'views/snippets/snippet_template.xml'
    ],
    'assets': {
        'web.assets_frontend': [
            'your_module_name/static/src/js/*',
            'your_module_name/static/src/xml/*'
        ]
    },
}
Step 2: Creating the Controller
Create the controller responsible for handling the backend logic and fetching the product data needed by the snippet. The code is as follows:
controllers/main.py
# -*- coding: utf-8 -*-
from odoo import http
from odoo.http import request
class WebsiteSnippetOwl(http.Controller):
    @http.route('/get_product_details', type='jsonrpc', auth='public', methods=['POST'])
    def get_product_details(self):
        """ Function to get product details for the snippet"""
        return request.env['product.product'].sudo().search_read(
            ['|', ('image_variant_1920', '!=', False), ('product_tmpl_id.image_1920', '!=', False)],
            ['name', 'lst_price', 'default_code', 'image_1920'],
            limit=8,
        )
Explanation:
- @http.route sets the route for /get_product_details JSON-RPC method, which can be accessed by all through POST method.
- auth='public' makes the endpoint accessible to website visitors without user authentication.
- search_read() searches for up to 8 products that have product image or product-template image available.
- sudo() lets the controller retrieve product information irrespective of user’s permission level.
- Name, lst_price, default_code, and image_1920 fields are returned as these fields are used to display the product information in snippet.
Step 3: Creating OWL Part
Create an OWL part for front-end functionality for extracting information from the controller and displaying it on the website. The below code will be added in static/src/js/snippet.js:
/** @odoo-module **/
import { rpc } from "@web/core/network/rpc";
import { registry } from "@web/core/registry";
import { useState, Component, onWillStart } from "@odoo/owl";
export class WebOwlComponentSnippet extends Component {
    static template = "your_module_name.snippet_xml";
    setup() {
        this.state = useState({
            data: [],
        });
        onWillStart(async () => {
            this.state.data = await rpc("/get_product_details");
        });
    }
}
registry.category("public_components").add("your_module_name.snippet", WebOwlComponentSnippet);
Explanation:
- Imports: We need to import rpc to make backend requests, registry to register the component, and some OWL utilities like useState, Component, and onWillStart.
- Component: Our WebOwlComponentSnippet class is extended by Component and uses your_module_name.snippet_xml as a template.
- Setup: The setup function creates our reactive state and sets it with an empty data array. The onWillStart function fetches product details from the /get_product_details URL prior to the component rendering.
- Registry: The component is registered in the public_components category and thus can be used as a website component.
Step 4: Building the OWL Template
The OWL template provides the HTML markup to display the product information. Add the below code in static/src/xml/snippet.xml.
<?xml version="1.0" encoding="UTF-8"?>
<templates xml:space="preserve">
    <t t-name="your_module_name.snippet_xml">
        <div class="row body">
            <t t-foreach="state.data" t-as="each" t-key="each.id">
                <div class="col-lg-4">
                    <div class="card">
                        <div class="card-body">
                            <h5 class="card-title"><t t-esc="each.name"/></h5>
                            <div class="row">
                                <div class="col-6">
                                    <p class="card-text" t-if="each.default_code"><t t-esc="each.default_code"/></p>
                                </div>
                                <div class="col-6">
                                    <img class="card-img-top o_img_product_square o_img_product_cover h-auto"
                                         t-attf-src="data:image/jpeg;base64,{{each.image_1920}}"/>
                                </div>
                            </div>
                            <a href="#" class="btn btn-primary">Go somewhere</a>
                        </div>
                    </div>
                </div>
            </t>
        </div>
    </t>
</templates>
Explanation:
- Template: The attribute t-name specifies the template as your_module_name.snippet_xml and corresponds to the template name mentioned in the JavaScript part.
- Product Loop: The t-foreach loop is used to loop through state.data and render individual cards for each product. The attribute t-key gives each item a unique identifier.
- Product Details: The t-esc directive renders the product name and internal reference (default_code) in a safe way. The t-if directive is used to render the internal reference only if it exists.
- Product Image: The attribute t-attf-src is used to construct the image source from the base64 encoded product image_1920 data.
- Layout & Styling: Bootstrap classes like row, col-lg-4, card, and card-body are used to create a three column layout.
Step 5: Design the Snippet View
Design the snippet view that will incorporate the OWL widget into the Website Builder, enabling users to insert the snippet on the webpage using the drag-and-drop feature. Include the code below in the views/snippet_views.xml file:
<?xml version="1.0" encoding="utf-8"?>
<odoo>
    <template id="product_snippet_template" name="Product Snippet">
        <section class="product_section">
            <div class="container">
                <h1>Latest Products</h1>
                <owl-component name="your_module_name.snippet"/>
            </div>
        </section>
    </template>
    <template id="product_component_snippet" inherit_id="website.snippets" name="Category Highlight Snippet">
        <xpath expr="//snippets[@id='snippet_groups']" position="inside">
            <t snippet-group="product_snippet"
               t-snippet="website.s_snippet_group"
               string="Product Snippet"
               t-thumbnail="/your_module_name/static/src/images/snippets/img.png"/>
        </xpath>
        <xpath expr="//snippets[@id='snippet_structure']" position="inside">
            <t t-snippet="your_module_name.product_snippet_template"
               string="Product Snippet"
               group="product_snippet"/>
        </xpath>
    </template>
</odoo>
Explanation:
- Product Snippet Template: The product_snippet_template represents the layout of the custom product snippet with the OWL component included via the owl-component tag.
- OWL Component: The name attribute inside owl-component needs to be equal to the name of the component registered in the JS file.
- Snippet Group: The snippet-group creates a new category of Product Snippet in Website Builder, where t-thumbnail sets the thumbnail image of the snippet.
- Snippet Registration: The t-snippet property registers the custom product snippet in Website Builder in relation to the snippet group created above.
Note: Remember to replace your_module_name with your module name and make sure that the image is located in the right place.
Developing custom snippets using OWL in Odoo 19 offers an effective means of incorporating interactive elements into the Website Builder. By integrating a backend controller, OWL component, and snippet view, developers can create customizable website components like the product snippet explained in this tutorial. With OWL’s reactive framework and Odoo’s Website Builder, the snippets can easily be configured to fit the needs of websites.
To read more about How to Create Website Snippets using OWL Components in Odoo 18, refer to our blog How to Create Website Snippets using OWL Components in Odoo 18.