Extensions have become an integral part of the Chrome ecosystem, allowing developers to customize, enhance, and extend the browser’s functionality to suit almost any use case imaginable.
If you’ve ever wanted to build your own Chrome OS extension—whether to automate a task, improve productivity, or create something completely new—this guide will walk you through the entire process from start to finish.
What Is a Chrome Extension?
A Chrome extension is a small software program that customizes the browsing experience. It’s built using standard HTML, CSS, and JavaScript, and it can interact with the Chrome browser via powerful APIs.
Extensions can:
- Modify the behavior of web pages.
- Add buttons and menus to the browser.
- Integrate with other services.
- Store and sync data using Chrome storage.
- Automate repetitive tasks.
Because Chrome OS runs the Chrome browser at its core, extensions built for Chrome work seamlessly on Chrome OS devices, this makes them a lightweight yet powerful way to create apps for Chrome OS users.
Why Develop Extensions for Chrome OS?
Chrome OS has gained massive popularity, especially in educational and enterprise environments. Here are a few reasons why developing extensions for Chrome OS is worth your time:
- Cross-platform compatibility: Your extension will work not only on Chrome OS but also on Windows, macOS, and Linux systems running the Chrome browser.
- Low development overhead: Extensions use web technologies—no need to learn a new language or framework.
- Access to Chrome APIs: You can tap into APIs for storage, identity, tabs, bookmarks, and more.
- Wide audience: Chrome Web Store offers a massive potential user base for your extension.
- Tight OS integration: On Chrome OS, extensions can work closely with browser-level features, making them more powerful than simple web apps.
Understand the Extension Structure
Every Chrome extension has a specific structure. At minimum, you need the following files:
chrome-extension/
¦
+-- manifest.json
+-- background.js
+-- popup.html
+-- popup.js
+-- icon.png
manifest.json: It contains metadata such as the name, version, permissions, and entry points.
background.js: Contains logic that runs in the background (e.g., listening for events, performing API calls).
popup.html: Defines the user interface that appears when the user clicks your extension’s icon.
popup.js: Optional script for UI logic.
icon.png: The icon that represents your extension in the toolbar and Chrome Web Store.
Building a Simple “Motivational Quotes” Extension
Let’s create a simple Chrome extension that shows a random motivational quote each time you click its icon.
This small project demonstrates all the key concepts of extension development: manifest creation, popup UI, background scripts, and JavaScript logic.
Step 1: Create the manifest.json
{
  "manifest_version": 3,
  "name": "Daily Motivation",
  "version": "1.0",
  "description": "Shows a random motivational quote every time you click!",
  "action": {
    "default_popup": "popup.html",
    "default_icon": "icon.png"
  },
  "permissions": ["storage"]
} - "manifest_version": 3 specifies that you’re using the latest Manifest V3 standard.
- The "action" field defines what happens when the user clicks the extension icon—here, it opens popup.html.
- "permissions": ["storage"] allows the extension to store data locally using Chrome’s storage API.
Step 2: Create the popup.html
<!DOCTYPE html>
<html>
<head>
  <meta charset="UTF-8">
  <title>Daily Motivation</title>
  <style>
    body {
      width: 250px;
      padding: 10px;
      font-family: Arial, sans-serif;
      text-align: center;
    }
    h1 {
      font-size: 18px;
      color: #333;
    }
    p {
      font-style: italic;
      color: #555;
      margin: 10px 0;
    }
    button {
      background-color: #4CAF50;
      color: white;
      border: none;
      padding: 8px 12px;
      cursor: pointer;
      border-radius: 4px;
    }
    button:hover {
      background-color: #45a049;
    }
  </style>
</head>
<body>
  <h1>Daily Motivation</h1>
  <p id="quote">Click the button for inspiration!</p>
  <button id="newQuote">New Quote</button>
  <script src="popup.js"></script>
</body>
</html>
Step 3: Add the popup.js
Now, we’ll add logic to display a random quote each time the button is clicked.
const quotes = [
  "Believe in yourself and all that you are.",
  "Success is not the key to happiness. Happiness is the key to success.",
  "Push yourself, because no one else is going to do it for you.",
  "Dream it. Wish it. Do it.",
  "Great things never come from comfort zones."
];
document.getElementById("newQuote").addEventListener("click", () => {
  const randomIndex = Math.floor(Math.random() * quotes.length);
  const randomQuote = quotes[randomIndex];
  document.getElementById("quote").textContent = randomQuote;
  // Save last shown quote to Chrome storage
  chrome.storage.local.set({ lastQuote: randomQuote });
});
// Load last quote on popup open
chrome.storage.local.get("lastQuote", (data) => {
  if (data.lastQuote) {
    document.getElementById("quote").textContent = data.lastQuote;
  }
});
This script selects a random quote, displays it, and stores it in Chrome’s local storage so that it persists even after the popup closes.
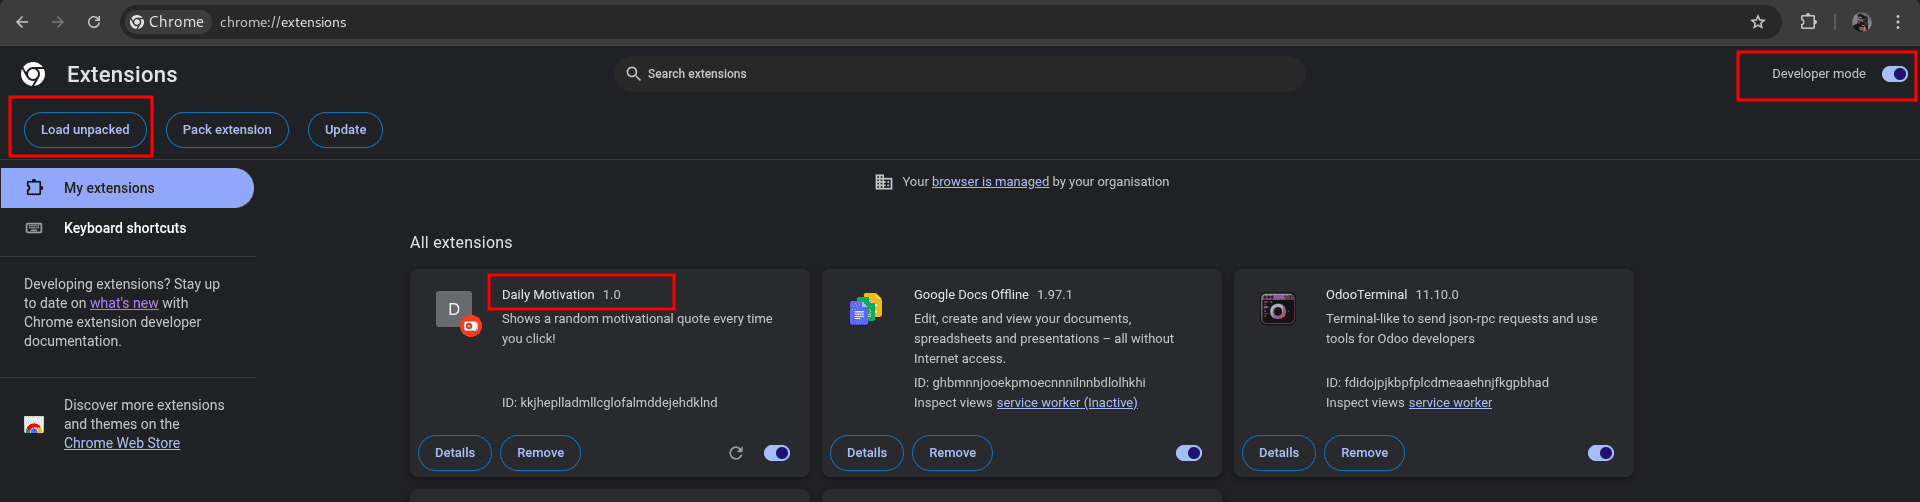
Step 4: Load Your Extension into Chrome
- Open Chrome and go to:
chrome://extensions/
- Enable Developer Mode (toggle at the top-right).
- Click “Load unpacked” and select your extension folder.
- Your extension icon should now appear on the toolbar!
Click it—and you’ll see your random motivational quote in action.
In this tutorial, we learned how to structure a Chrome extension, define its manifest, build a pop-up interface, and connect logic through pop-up scripts. You now have a working “Daily Motivation” extension that showcases the fundamental workflow of Chrome extension development.
In our next blog, we’ll dive deeper into the background.js worker functionality, exploring how it can handle continuous tasks like event listening, communication between pages, and even printing from websites on Chrome OS using extensions.
To read more about How to Create Graphs Using D3.js, refer to our blog How to Create Graphs Using D3.js.