Odoo 18 introduces several enhancements in user interface design, making it easier to create dynamic and interactive views. One such feature is opening a modal window when clicking on a specific field. This functionality can improve the user experience by allowing data entry, selection, or the display of additional information without navigating away from the current page.
In this blog, we will walk you through the process of triggering a modal pop-up when a field is clicked in Odoo 18. Whether you are a developer looking to enhance usability or a business user seeking a more streamlined workflow, this step-by-step approach will help you implement this feature effectively.
In Odoo 18, a modal is a user interface component commonly used in web applications. It appears as an overlay pop-up on the main content, enabling users to view details, input data, or complete tasks without navigating away from the current page.
Now, let’s go through the steps to implement this in Odoo 18.
First, we need to define the content of the modal using a QWeb template. Then, we’ll add the necessary JavaScript logic to control its behavior.
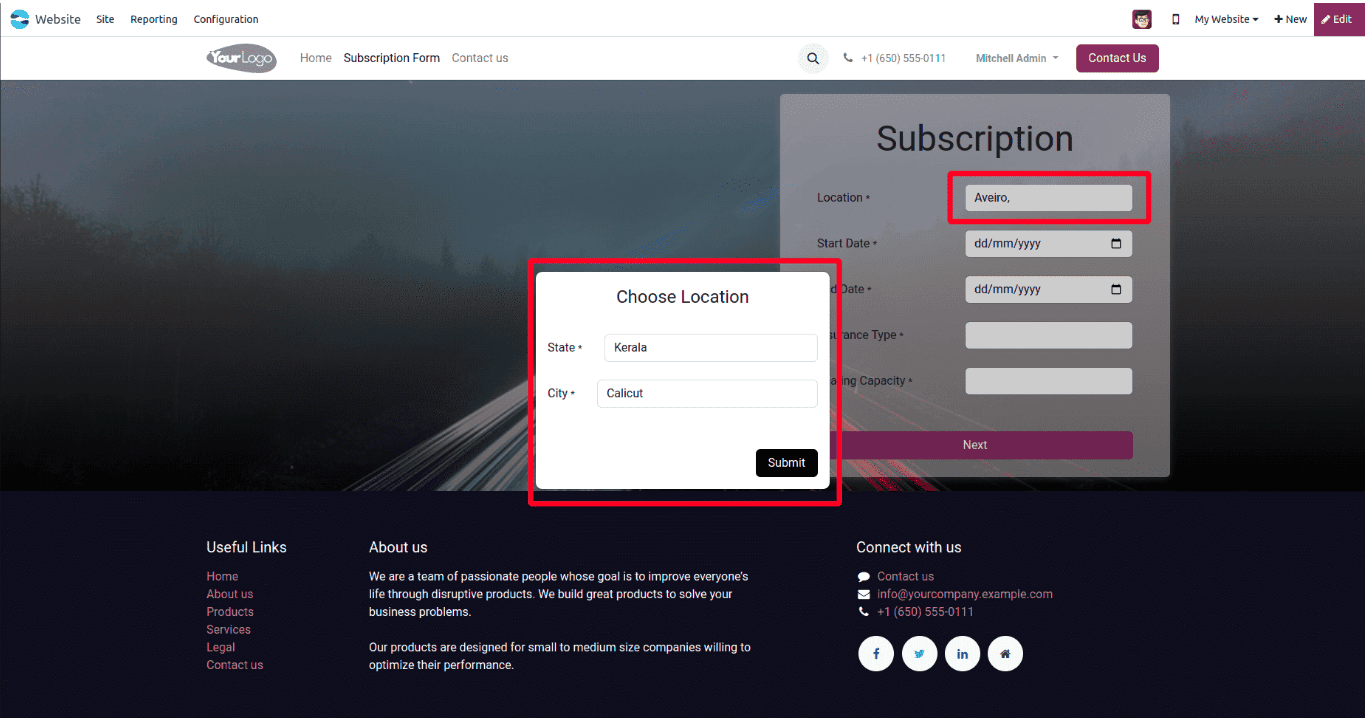
For example, when a user clicks on the Location field, a modal pop-up will appear, allowing them to enter details such as State and City. Once the modal is closed, the entered details will be displayed in the Location field where the modal was triggered.
Example Scenario:
Before Interaction: Clicking on the Location field opens a modal for data entry.
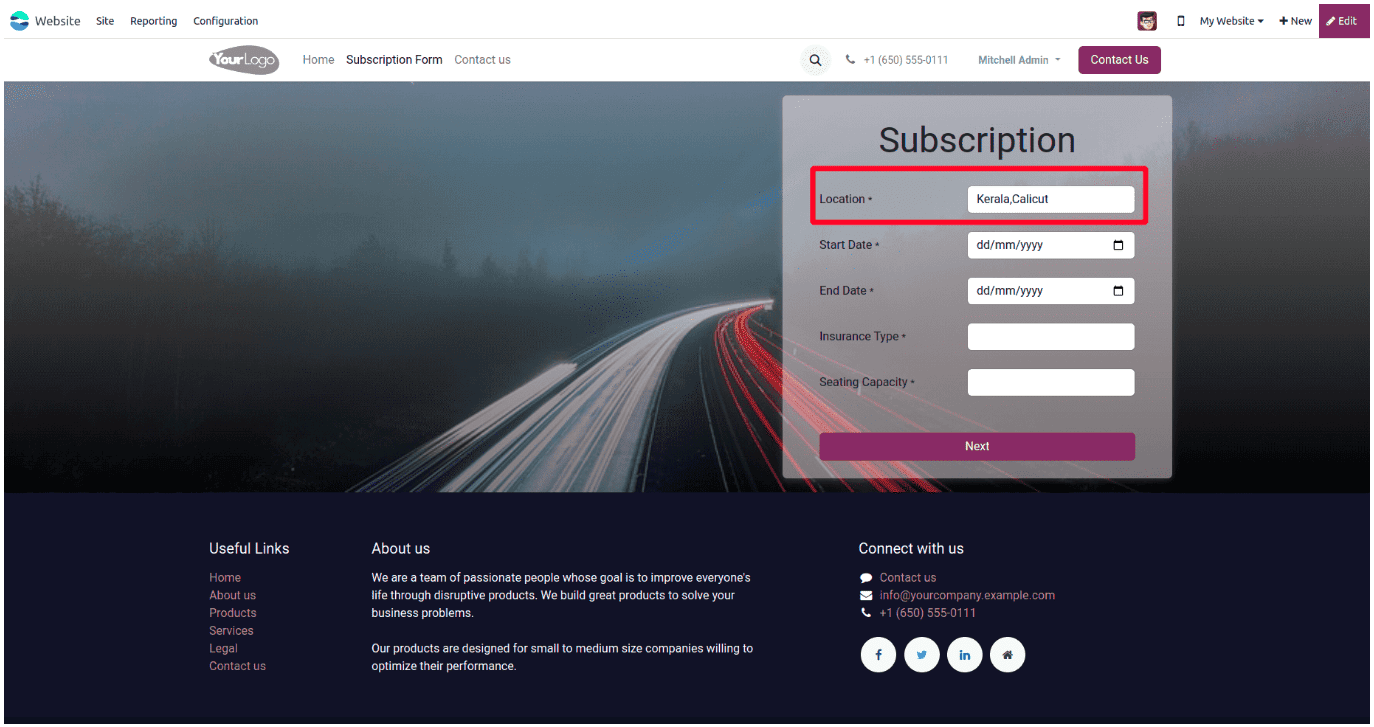
After Interaction: Once the submit button is clicked, the entered details appear in the Location field.
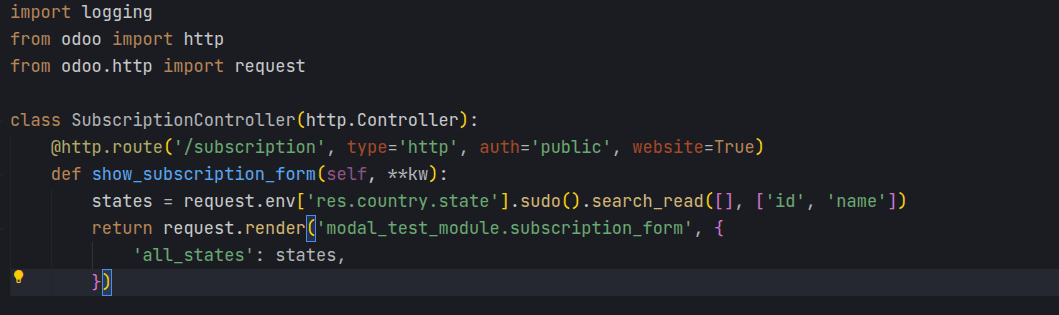
We can define a controller to pass state values to a modal by rendering a QWeb template and injecting the values into the context.
Now, let’s define the template required to open the modal.
<?xml version="1.0" encoding="UTF-8" ?>
<odoo>
<!--Template for Subscription-->
<template id="subscription_form" name="Subscription Form">
<t t-call="website.layout">
<div class="image_website_form" style="background-image: linear-gradient(to bottom, rgb(255 255 255 / 43%), rgb(0 0 0 / 50%)), url('https://cdn.pixabay.com/photo/2017/01/31/17/44/highway-2025863_960_720.jpg'); background-size: cover;background-position: center;">
<div class="online_vehicle_main_form" style="max-width: 1320px; margin: 0px auto;width: 100%;">
<div id="wrap" class="oe_structure oe_empty" style="display: flex; justify-content: flex-end;align-items: center; height: 60vh;">
<section class="s_website_form" data-vcss="001" data-snippet="s_website_form" style="padding: 50px 0px;">
<div class="container" style="padding: 8px 50px;border-radius: 6px;background-color: #fffafa75;box-shadow: 0 3px 10px rgb(255 255 255 / 17%);height: 519px;align-aloitems: center;align-content: center;">
<br/>
<h1 style="text-align: center;">Subscription
</h1>
<br/>
<form action="/online/subscription/next" method="post" enctype="multipart/form-data" class="o_mark_required" data-mark="*" data-model_name="" data-success-page="">
<input type="hidden" name="csrf_token" t-att-value="request.csrf_token()"/>
<div class="s_website_form_rows row s_col_no_bgcolor" id="whole_sub" t-ref="location">
<div class="form-group col-12 s_website_form_field s_website_form_required" data-type="char" data-name="Field">
<div class="form-group col-12 s_website_form_field s_website_form_required" data-type="char" data-name="Field">
<div class="row s_col_no_resize s_col_no_bgcolor">
<label class="col-form-label col-sm-auto s_website_form_label" style="width: 200px" for="studio1">
<span class="s_website_form_label_content">
Location
</span>
<span class="s_website_form_mark">
*
</span>
</label>
<div id="location_temp" style="display:none; position:absolute;">
<div class="location_modal_container" style="position: fixed;left: 0;height: 100%;width: 100%;background: rgba(0,0,0,0.2);top: 0;display: flex;align-items: center;justify-content: center;">
<div class="modal-dialog">
<div class="modal-content" style="width: 400px;">
<div class="modal-header" style="justify-content: center;">
<h4 class="modal-title">
Choose Location
</h4>
</div>
<div class="modal-body" id="loc_modal">
<div class="row s_col_no_resize s_col_no_bgcolor">
<label class="col-form-label col-sm-auto s_website_form_label" for="studio1">
<span class="s_website_form_label_content">
State
</span>
<span class="s_website_form_mark">
*
</span>
</label>
<div class="col-sm">
<select id="state_id" type="text" class="form-control s_website_form_input" name="state" required="1">
<t t-foreach="all_states" t-as="state">
<option t-att-value="state['id']" t-att-data-state-name="state['name']">
<t t-out="state['name']"/>
</option>
</t>
</select>
</div>
</div>
<br/>
<div class="row s_col_no_resize s_col_no_bgcolor">
<label class="col-form-label col-sm-auto s_website_form_label" for="studio1">
<span class="s_website_form_label_content">
City
</span>
<span class="s_website_form_mark">
*
</span>
</label>
<div class="col-sm">
<input id="city_id" type="text" class="form-control s_website_form_input" name="city_id" required="1"/>
</div>
</div>
<br/>
</div>
<div class="modal-footer">
<button type="button" style="background: black;color: white;" class="btn btn-default" id="dismiss" data-dismiss="modal">
Submit
</button>
</div>
</div>
</div>
</div>
</div>
<div class="col-sm" id="col-sm-location">
<input id="location_id" type="text" class="form-control s_website_form_input" data-toggle="modal" data-target="#location_temp">
</input>
</div>
</div>
</div>
<br/>
<div class="row s_col_no_resize s_col_no_bgcolor">
<label class="col-form-label col-sm-auto s_website_form_label" style="width: 200px" for="studio1">
<span class="s_website_form_label_content">
Start Date
</span>
<span class="s_website_form_mark">
*
</span>
</label>
<div class="col-sm">
<input id="start_date" type="Date" class="form-control s_website_form_input" name="start_date" required="1"/>
</div>
</div>
<br/>
<div class="row s_col_no_resize s_col_no_bgcolor">
<label class="col-form-label col-sm-auto s_website_form_label" style="width: 200px" for="studio1">
<span class="s_website_form_label_content">
End Date
</span>
<span class="s_website_form_mark">
*
</span>
</label>
<div class="col-sm">
<input id="end_date" type="Date" class="form-control s_website_form_input" name="end_date" required="1"/>
</div>
</div>
<br/>
<div class="row s_col_no_resize s_col_no_bgcolor">
<label class="col-form-label col-sm-auto s_website_form_label" style="width: 200px" for="studio1">
<span class="s_website_form_label_content">
Insurance Type
</span>
<span class="s_website_form_mark">
*
</span>
</label>
<div class="col-sm">
<select id="insurance_type" type="text" class="form-control s_website_form_input" name="insurance_type" required="1">
<option t-att-value=""/>
<t t-foreach="insurance_type or []" t-as="type">
<option t-att-value="type.id">
<t t-esc="type.name"/>
</option>
</t>
</select>
</div>
</div>
<br/>
<div class="row s_col_no_resize s_col_no_bgcolor">
<label class="col-form-label col-sm-auto s_website_form_label" style="width: 200px" for="studio1">
<span class="s_website_form_label_content">
Seating Capacity
</span>
<span class="s_website_form_mark">
*
</span>
</label>
<div class="col-sm">
<input id="seating_capacity" type="text" class="form-control s_website_form_input" name="seating_capacity" required="1"/>
</div>
</div>
<br/>
<br/>
<div class="form-group col-12 s_website_form_submit" data-name="Next Button">
<div style="width: 200px;" class="s_website_form_label"/>
<button type="submit" id="next" class="btn btn-primary" style="width: 100%;">
Next
</button>
</div>
</div>
</div>
<br/>
<br/>
</form>
</div>
</section>
</div>
</div>
</div>
</t>
</template>
</odoo>
The <div id="location_temp"> element defines a hidden modal that is triggered under specific conditions.
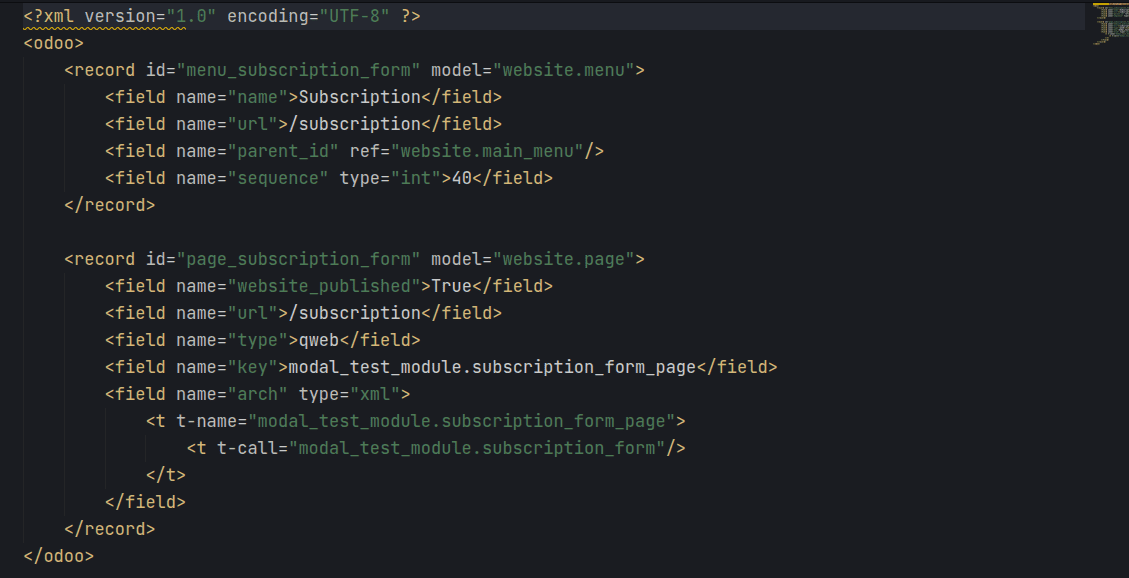
Now we need to add a menu option on the website to access the subscription form. To do that, create a menu XML file to define the menu item.
Modal Content:
Inside the modal, users can select their State and City using dropdown menus. The layout is structured using Bootstrap’s grid system, which organizes the form fields into columns for better alignment.
Input Field & Modal Trigger
- The <div class="col-sm" id="col-sm-location"> contains an input field (<input>) that is displayed on the main page.
- When a user clicks on this input field, the hidden modal appears.
- The attributes data-toggle="modal" and data-target="#location_temp" link the input field to the modal, ensuring that clicking the field opens the pop-up.
Summary:
This XML template defines a hidden modal that appears when a specific input field is clicked. It provides an intuitive and interactive way for users to enter location details by selecting a State and City from dropdown menus.
Next, we need to use JavaScript to control the modal's behavior when the Location field is clicked.
Handling Modal Opening
The _onLocationClick function is responsible for displaying the hidden modal. It targets the modal element with the ID location_temp and changes its display property to 'block', making it visible when the Location field is clicked.
/** @odoo-module **/
import publicWidget from "@web/legacy/js/public/public_widget";
import { Dialog } from "@web/core/dialog/dialog";
import { jsonrpc } from "@web/core/network/rpc_service";
import { useService } from "@web/core/utils/hooks";
publicWidget.registry.Location = publicWidget.Widget.extend({
  selector: '#whole_sub',
  events: {
      'click #location_id': '_onLocationClick',
      'click #dismiss':'_onCloseClick',
  },
  init() {
      this._super(...arguments);
      this.orm = this.bindService("orm");
  },
  setup() {
      super.setup();
      this.location = useService("location");
      },
     _onLocationClick(){
          var location = this.el.querySelector('#location_temp');
          location.style.display='block';
   },
})
Handling Modal Closing & Data Transfer
The _onCloseClick function manages what happens when the user closes the modal. It retrieves the selected State and City values, updates the input field with this information, and then hides the modal by setting its display property to 'none'.
_onCloseClick(ev){
   var location = this.el.querySelector('#location_temp');
   var city = this.el.querySelector('#city_id').value
   var state = this.el.querySelector("#state_id");
   this.el.querySelector('#location_id').value = state.selectedOptions[0].text +','+ city
   location.style.display='none';
},
This approach ensures that users can seamlessly enter their State and City within the modal, and the selected values are automatically reflected in the Location field upon closing the modal.
Implementing a modal in Odoo 18 enhances user interaction by allowing data entry without navigating away from the current page. By using a QWeb template for the modal structure and JavaScript for its functionality, we can efficiently trigger a pop-up when clicking on a field and update the input with selected values. This approach improves usability and streamlines workflows, making data collection more intuitive for users.
To read more about How to Open a Modal by Clicking a Field in Odoo 17, refer to our blog How to Open a Modal by Clicking a Field in Odoo 17.