Various views are available in Odoo 20 to help manage the business records effectively. Every view gives a record in a different format to make the process of accessing and managing the record easier depending upon the business requirements.
Activity View is one among these views, giving a single view of activities that have been scheduled for various records. Records are shown as rows, and activity types are shown as columns, making it easy for the user to find out scheduled, pending, and overdue activities.
The activity views can be used effectively in modules such as CRM, Sales, Projects, and other applications where users can schedule follow-up activities.
In this blog, we will explore how to create and configure an Activity View in Odoo 20 with the help of a custom module.
Module Structure
First, make your own module that has the following design:
activity_test/
+-- __init__.py
+-- __manifest__.py
+-- models/
¦   +-- __init__.py
¦   +-- activity_test.py
+-- views/
¦   +-- activity_test_views.xml
+-- security/
    +-- ir.access.csv
Step 1: Configure Module Dependencies
As Activity Views integrate with the activity management feature of Odoo, it is required that the mail module be added to the list of module dependencies.
The following module dependencies need to be added in the __manifest__.py file:
{
    'name': 'Activity View Test',
    'version': '20.0.1.0.0',
    'depends': ['base', 'mail'],
    'data': [
        'security/ir.access.csv',
        'views/activity_test_views.xml',
    ],
    'installable': True,
    'application': True,
}
The mail dependency gives the functionality needed for the activity.
Step 2: Define the Model
Now, build the model that will be rendered in the Activity View.
The model must extend from mail.activity.mixin. If you need to use the chatter functionality of Odoo, then you can extend from mail.thread as well.
Define the below model in models/activity_test.py:
from odoo import fields, models

class ActivityTest(models.Model):
    _name = 'activity.test'
    _inherit = ['mail.thread', 'mail.activity.mixin']
    _description = 'Activity Test Model'
    name = fields.Char(
        string='Title',
        required=True,
        tracking=True
    )
    description = fields.Text(
        string='Description',
        tracking=True
    )
    priority = fields.Selection([
        ('0', 'Low'),
        ('1', 'Normal'),
        ('2', 'High'),
        ('3', 'Very High'),
    ], string='Priority', default='1', tracking=True)
    state = fields.Selection([
        ('draft', 'Draft'),
        ('in_progress', 'In Progress'),
        ('done', 'Done'),
        ('cancelled', 'Cancelled'),
    ], string='Status', default='draft', required=True, tracking=True)
The key element in the Activity View feature is:
_inherit = ['mail.thread', 'mail.activity.mixin']
The activity is available within the mail.activity.mixin.
Odoo views architecture requires that Activity Views be used in case of inheriting mail.activity.mixin from models.
Step 3: Create the Activity View
Now, it’s time to generate the Activity View for the activity.test model.
The root tag for the Activity View is <activity>. Within the view, the activity-box template is responsible for rendering each record.
Include the below XML within views/activity_test_views.xml:
<?xml version="1.0" encoding="utf-8"?>
<odoo>
    <record id="view_activity_test_activity" model="ir.ui.view">
        <field name="name">activity.test.activity</field>
        <field name="model">activity.test</field>
        <field name="arch" type="xml">
            <activity string="Activity Tests">
                <templates>
                    <div t-name="activity-box">
                        <div>
                            <field name="name"
                                   display="full"
                                   class="o_text_block o_text_bold"/>
                            <field name="priority"/>
                            <field name="state"/>
                        </div>
                    </div>
                </templates>
            </activity>
        </field>
    </record>
</odoo>
In Here:
- activity refers to the Activity View
- string="Activity Tests" is the title.
- is the template for displaying each individual record.
- t-name="activity-box" refers to the primary activity record template.
- field tags define what information is to be displayed with each record.
The activity-box template is the primary template displayed for individual records in an Activity View.
Step 4: Define List and Form Views
While the Activity View will be helpful for keeping track of activities, there is also the need to create/edit records corresponding to such activities.
Therefore, List and Form Views can also be created for the same model.
List View
Insert the following List View:
<record id="view_activity_test_list" model="ir.ui.view">
    <field name="name">activity.test.list</field>
    <field name="model">activity.test</field>
    <field name="arch" type="xml">
        <list string="Activity Tests">
            <field name="name"/>
            <field name="priority"/>
            <field name="state"/>
            <field name="description"/>
        </list>
    </field>
</record>
The above view shows the test record activity in a typical list view.
Form View
Then, design a Form View:
<record id="view_activity_test_form" model="ir.ui.view">
    <field name="name">activity.test.form</field>
    <field name="model">activity.test</field>
    <field name="arch" type="xml">
        <form string="Activity Test">
                <header>
                    <field name="state"
                           widget="statusbar"
                           statusbar_visible="draft,in_progress,done"/>
                </header>
                <sheet>
                    <group>
                        <field name="name"/>
                        <field name="priority"/>
                        <field name="description"/>
                    </group>
                </sheet>
         </form>
    </field>
</record>
The Form View is useful to create and modify the records, and the Chatter can be helpful in communication and managing activities.
Step 5: Configure the Window Action
The next thing is to make an action that will open the views of the model.
Here is the action:
<record id="action_activity_test" model="ir.actions.act_window">
    <field name="name">Activity Tests</field>
    <field name="res_model">activity.test</field>
    <field name="view_mode">list,form,activity</field>
</record>
Here, the critical point is:
<field name="view_mode">list,form,activity</field>
This is how Odoo gets to know that the action can be displayed through List, Form, and Activity views.
In Odoo’s standard modules, the activity is added to the view mode options of models having activity support.
Step 6: Add Menu Items
Next, create a menu item through which the users can access the model.
<menuitem id="menu_activity_test_root"
          name="Activity Test"/>
<menuitem id="menu_activity_test"
          name="Activity Tests"
          parent="menu_activity_test_root"
          action="action_activity_test"/>
Once the module is installed, the “Activity Tests” menu will be accessible through the “Activity Test” menu.
Step 7: Configure Access Rights
Thirdly, set up the permissions on the model.
Create security/ir.access.csv:
id,name,model_id,group_id/id,operation,domain
access_activity_test_user,activity_test_user,activity.test,base.group_user,crud,
It gives access to the internal users to read, create, update, and delete Activity Test records.
Step 8: Install and Test the Module
Following completion of the module:
- Start the Odoo server again.
- Update the custom module.
- Go to the Odoo Apps menu.
- Install the Activity Test module.
- Navigate to Activity Test > Activity Tests.
- Make some entries.
- Schedule activities against those entries.
- Change to the Activity view.
The entries shall be shown in the Activity view, where the activity types appear in different columns.
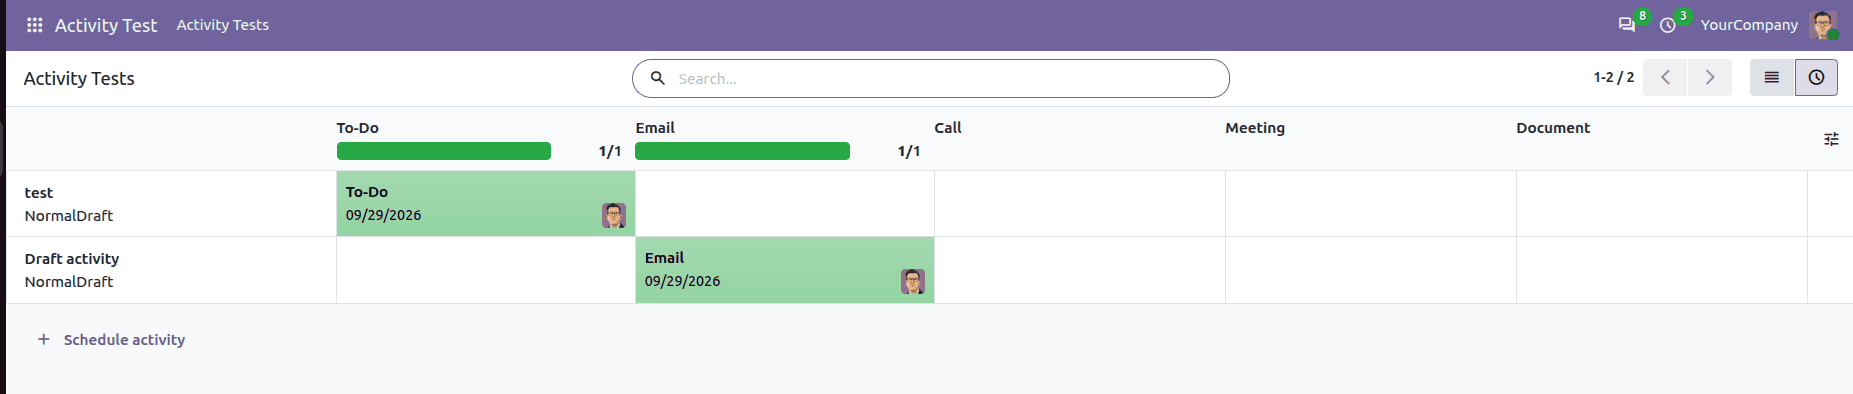
The Odoo Activity view is created to show a matrix layout in which records are shown horizontally and activities are shown vertically.
Odoo 20 introduces the concept of Activity Views for managing activities related to business objects. Developers can integrate the mail.activity.mixin class with a custom view in order to develop activity-focused views for business models of their own.
Such views can also be further customized through the use of templates for displaying the record's data, including its status, priority, assigned users, customers, and many other fields. Activity Views are suitable for applications that require quick access to scheduled activities of the user.
To read more about How to Create an Activity View in Odoo 19, refer to our blog, How to Create an Activity View in Odoo 19.