Almost every website form has a select field that depends on another field. Pick a country, and the state list should change. Pick a department, and the service types should change. Hardcoding these lists in QWeb works until the data changes, and then someone has to edit the template.
In this blog, we will build a reusable dynamic selection field for the Odoo 19 website. The options are fetched from the backend when the parent field changes, and the whole thing is driven by data attributes, so the same component can be reused for different models without rewriting the JavaScript.
We'll use the Interaction class that Odoo 19 introduced for website frontend behaviour and a jsonrpc controller to serve the options. For the demo we'll use Country > State, since both models exist in every database.
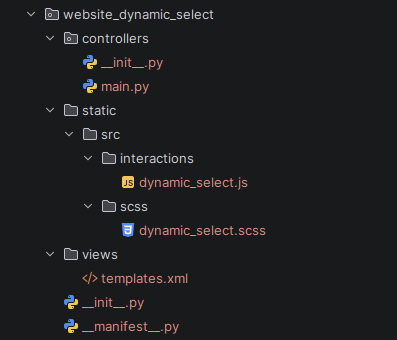
Module Structure
Create a module named website_dynamic_select with this layout:
Step 1: The Manifest
The JavaScript and SCSS go into web.assets_frontend, because this code runs on the public website and not in the backend.
Python
{
    'name': 'Website Dynamic Select',
    'version': '19.0.1.0.0',
    'category': 'Website',
    'summary': 'Reusable dynamic selection field for website forms',
    'depends': ['website'],
    'data': [
        'views/templates.xml',
    ],
    'assets': {
        'web.assets_frontend': [
            'website_dynamic_select/static/src/interactions/dynamic_select.js',
            'website_dynamic_select/static/src/scss/dynamic_select.scss',
        ],
    },
    'license': 'LGPL-3',
}
Step 2: The Controller
The controller does two things. It renders a demo page, and returns the options for a given parent record.
There is one decision that needs to be made. The browser should never inform the server which model it should retrieve. In case the browser would send the name of the model, and the controller would accept this value, every user would have access to any model using the public endpoint.
Python
from odoo import http
from odoo.http import request
DYNAMIC_SOURCES = {
    'states': {
        'model': 'res.country.state',
        'parent_field': 'country_id',
        'label_field': 'name',
        'order': 'name',
        'limit': 200,
    },
}

class DynamicSelectController(http.Controller):
    @http.route('/dynamic-select-demo', type='http', auth='public', website=True)
    def demo_page(self):
        countries = request.env['res.country'].sudo().search([])
        return request.render(
            'website_dynamic_select.demo_page', {'countries': countries}
        )
    @http.route('/dynamic_select/options', type='jsonrpc', auth='public')
    def get_options(self, source, parent_id=None):
        config = DYNAMIC_SOURCES.get(source)
        if not config:
            return []
        try:
            parent_id = int(parent_id)
        except (TypeError, ValueError):
            return []
        records = request.env[config['model']].sudo().search_read(
            [(config['parent_field'], '=', parent_id)],
            ['id', config['label_field']],
            order=config['order'],
            limit=config['limit'],
        )
        return [
            {'id': rec['id'], 'label': rec[config['label_field']]}
            for rec in records
        ]
Here are some important points. In Odoo 19 the type of route is jsonrpc. The old type="json" is now obsolete, and if you continue to use it, the data will not reach the controller from the JavaScript code. Sudo() is used simply because the model is whitelisted, and only id and name are returned.
Step 3: The QWeb Template
The field itself is a small reusable template. Everything the JavaScript needs comes through data- attributes, which source to load and which element to watch.
Xml
<odoo>
    <template id="dynamic_select_field" name="Dynamic Select Field">
        <div class="mb-3 s_dynamic_select"
             t-att-data-source="source"
             t-att-data-parent="parent_selector"
             t-att-data-placeholder="placeholder or 'Select an option'">
            <label class="form-label" t-att-for="name">
                <t t-out="label"/>
            </label>
            <select class="form-select" t-att-name="name" t-att-id="name" disabled="disabled">
                <option value="">
                    <t t-out="placeholder or 'Select an option'"/>
                </option>
            </select>
        </div>
    </template>
    <template id="demo_page" name="Dynamic Select Demo">
        <t t-call="website.layout">
            <div id="wrap">
                <section class="container py-5">
                    <h2 class="mb-4">Service Request</h2>
                    <form action="/your/submit/route" method="post" class="col-lg-6 px-0">
                        <input type="hidden" name="csrf_token" t-att-value="request.csrf_token()"/>
                        <div class="mb-3">
                            <label class="form-label" for="country_id">Country</label>
                            <select class="form-select" name="country_id" id="country_id">
                                <option value="">Select a country</option>
                                <t t-foreach="countries" t-as="country">
                                    <option t-att-value="country.id">
                                        <t t-out="country.name"/>
                                    </option>
                                </t>
                            </select>
                        </div>
                        <t t-call="website_dynamic_select.dynamic_select_field">
                            <t t-set="name" t-value="'state_id'"/>
                            <t t-set="label" t-value="'State / Province'"/>
                            <t t-set="source" t-value="'states'"/>
                            <t t-set="parent_selector" t-value="'#country_id'"/>
                            <t t-set="placeholder" t-value="'Select a state'"/>
                        </t>
                    </form>
                </section>
            </div>
        </t>
    </template>
</odoo>
Replace /your/submit/route with your own handler. The selected value goes out as a normal form value, so you read state_id from the request like any other select.
The dependent select starts disabled. There's nothing to choose until a parent value exists, and this stops users from submitting an empty list.
Step 4: The Interaction
This is the core of the component. In Odoo 19, website frontend behaviour is written as an Interaction, registered in the public.interactions registry. Odoo creates one instance for every element that matches the selector, and it cleans up the listeners when the element goes away.
Create static/src/interactions/dynamic_select.js:
Javascript
import { Interaction } from "@web/public/interaction";
import { registry } from "@web/core/registry";
import { rpc } from "@web/core/network/rpc";
export class DynamicSelect extends Interaction {
    static selector = ".s_dynamic_select";
    dynamicContent = {
        _root: {
            "t-att-class": () => ({
                "o_dynamic_select_loading": this.loading,
            }),
        },
    };
    setup() {
        this.select = this.el.querySelector("select");
        this.source = this.el.dataset.source;
        this.placeholder = this.el.dataset.placeholder;
        this.parentSelect = document.querySelector(this.el.dataset.parent);
        this.cache = new Map();
        this.requestId = 0;
        this.loading = false;
    }
    start() {
        if (!this.parentSelect) {
            return;
        }
        this.addListener(this.parentSelect, "change", (ev) =>
            this.onParentChange(ev)
        );
        // The parent may already have a value, for example after a
        // validation error or when the browser restores the form.
        if (this.parentSelect.value) {
            this.loadOptions(this.parentSelect.value);
        }
    }
    onParentChange(ev) {
        const parentId = ev.target.value;
        if (!parentId) {
            this.fillOptions([]);
            return;
        }
        this.loadOptions(parentId);
    }
    async loadOptions(parentId) {
        if (this.cache.has(parentId)) {
            this.fillOptions(this.cache.get(parentId));
            return;
        }
        const currentRequest = ++this.requestId;
        this.loading = true;
        this.updateContent();
        let options = [];
        try {
            options = await this.waitFor(
                rpc("/dynamic_select/options", {
                    source: this.source,
                    parent_id: parentId,
                })
            );
        } catch {
            options = [];
        }
        // Someone changed the parent again while we were waiting.
        // This response is stale, so we drop it.
        if (currentRequest !== this.requestId) {
            return;
        }
        this.cache.set(parentId, options);
        this.loading = false;
        this.updateContent();
        this.fillOptions(options);
    }
    fillOptions(options) {
        this.select.replaceChildren(new Option(this.placeholder, ""));
        for (const option of options) {
            this.select.append(new Option(option.label, option.id));
        }
        this.select.disabled = !options.length;
    }
}
registry
    .category("public.interactions")
    .add("website_dynamic_select.dynamic_select", DynamicSelect);
Here is what each part does.
- selector tells Odoo which elements this Interaction belongs to. Every .s_dynamic_select on the page gets its own instance, so you can put several dependent fields on one page without them interfering.
- dynamicContent is the declarative part. The _root key refers to the element itself, and t-att-class toggles the loading class based on this.loading. After changing this.loading, we call this.updateContent() so Odoo re-applies it.
- addListener is used in start() because the parent select lives outside our element, so we can't declare it in dynamicContent. Odoo removes the listener when the Interaction is destroyed.
- waitFor wraps the RPC call, so if the element is removed from the page mid-request, the code after the await never runs against a dead element.
- requestId solves a real problem. If a user switches countries quickly, two requests are in flight, and the slower one can overwrite the correct list. Comparing the id before filling the options avoids this.
- new Option(label, id) creates options as DOM nodes and not as an HTML string, so a record name containing < or quotes can't break the markup.
The cache map means going back to a country you already picked doesn't hit the server again.
Step 5: A Little Styling
A small visual hint while the options load. Create static/src/scss/dynamic_select.scss:
Scss
.s_dynamic_select {
    &.o_dynamic_select_loading select {
        opacity: 0.6;
        cursor: progress;
    }
}
Testing the Component
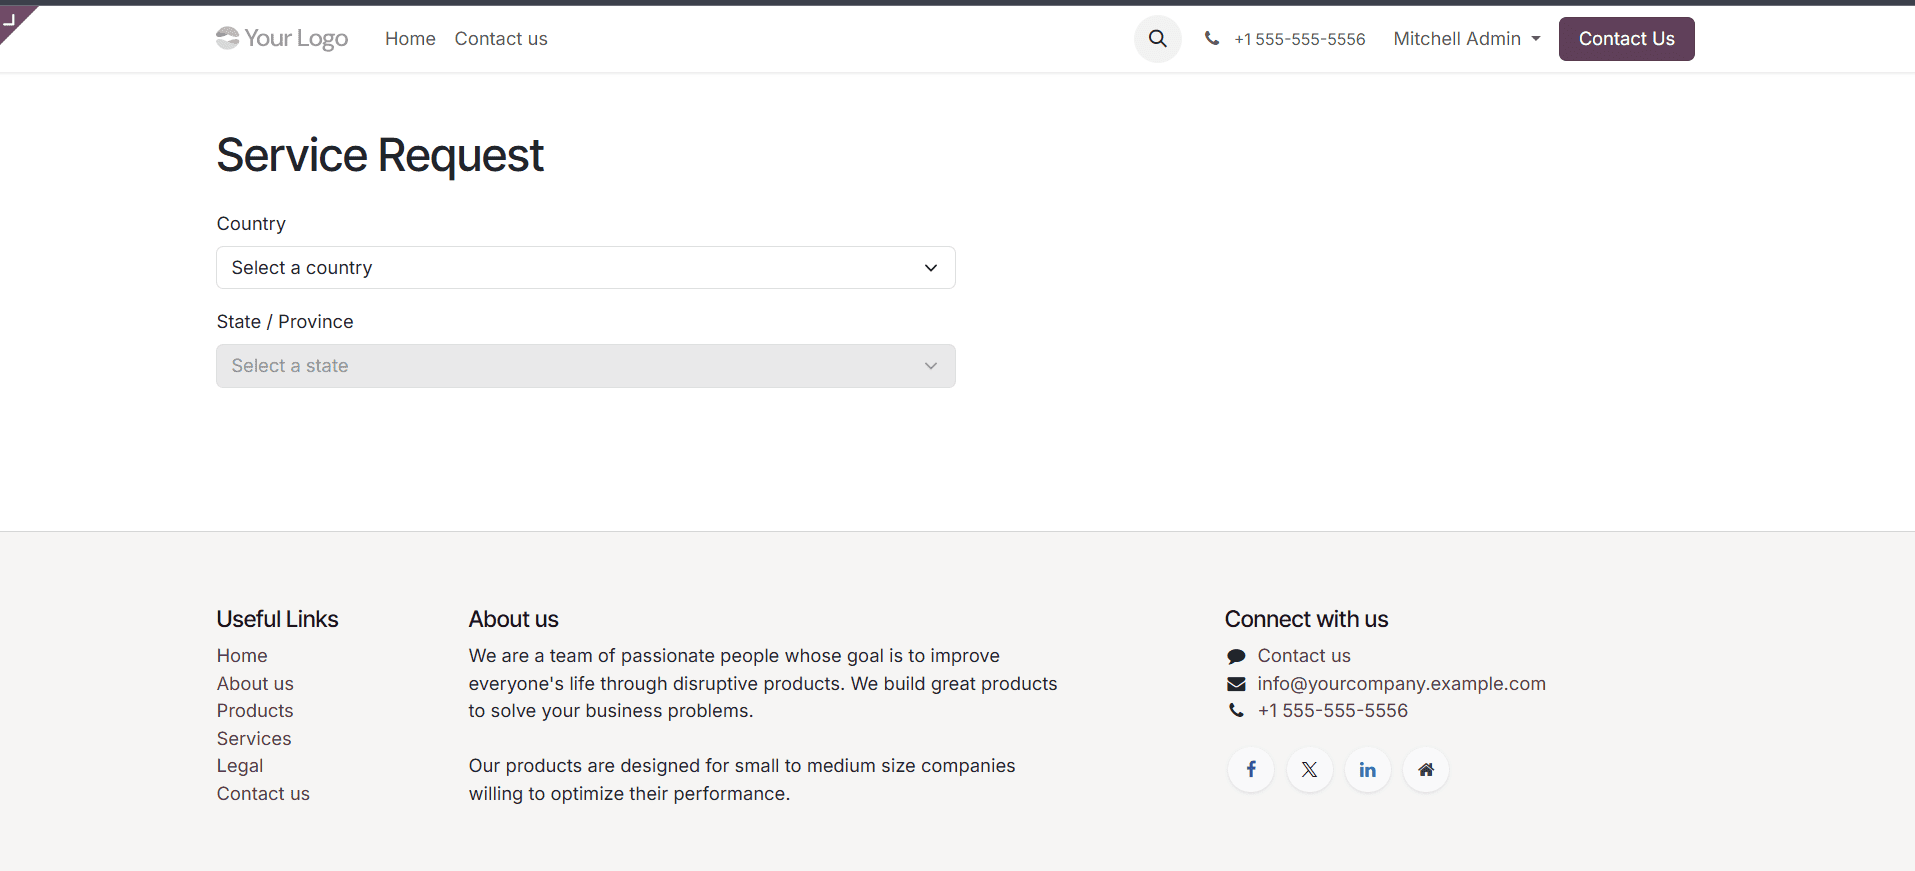
Install the module and open /dynamic-select-demo. The State field starts disabled. Pick a country, and the field unlocks with that country's states. Change the country, and the list is replaced. Choose "Select a country" again, and the field resets and locks.
Using It for Another Model
Adding a new dependent field doesn't need any JavaScript change. Add an entry to DYNAMIC_SOURCES, for example:
Python
'cities': {
    'model': 'res.city',
    'parent_field': 'state_id',
    'label_field': 'name',
    'order': 'name',
    'limit': 200,
},
Then, call the field template with source set to 'cities' and parent_selector pointing to your state select. Keep in mind that res.city comes from the base_address_extended module, so check your model is available before whitelisting it.
The pattern is small: a whitelisted controller that returns options, a template that carries its configuration in data- attributes, and an Interaction that connects the two. Because nothing is hardcoded, the same component covers any parent-child selection on the website. For anything beyond a two-level dependency, you can chain fields the same way, with each one pointing at the previous select.
To read more about How to Build a Custom Dynamic Selection Field Component for Odoo 18 Website, refer to our blog How to Build a Custom Dynamic Selection Field Component for Odoo 18 Website.