In Odoo, fields normally appear as text boxes, dropdowns, or checkboxes. However, some business cases require a more interactive input option. A slider is a good example, especially when users need to select a value within a range—such as weight, quantity, rating, or percentage.
This blog explains how to create a custom slider widget in Odoo 19 and display it on a form view. The slider value will be stored in a normal Float field, but the user will interact with it using a smooth slider instead of typing manually.
Start by creating a new module named range_slider. This module will contain the Python model, form view, JavaScript widget, and QWeb template required for the slider.
The module folder should look like this:
range_slider/
¦
+-- __init__.py
+-- __manifest__.py
+-- models/
¦   +-- __init__.py
¦   +-- product_product.py
+-- views/
¦   +-- product_product_views.xml
+-- static/
   +-- src/
       +-- js/
       ¦   +-- range_slider.js
       +-- xml/
           +-- range_slider.xml
The presence of both __init__.py files ensures that Odoo loads the models correctly when the module starts.
The manifest file defines the module information and tells Odoo which files to load. It includes module metadata, dependencies, views, and web assets for the JavaScript and XML template.
{
   'name': 'Slider widget',
   'version': '19.0.1.0.0',
   'summary': 'Module for add slider widget',
   'depends': ['base','product'],
   'assets': {
       'web.assets_backend': ['range_slider/static/src/xml/range_slider.xml',
                              'range_slider/static/src/js/range_slider.js', ],
   },
   'data': [
       'views/product_product_views.xml'
   ],
   'demo': ['Demo'],
   'installable': True,
   'auto_install': False
}
The web.assets_backend section ensures that the JavaScript and QWeb template are loaded into the Odoo backend, making the widget available in form views.
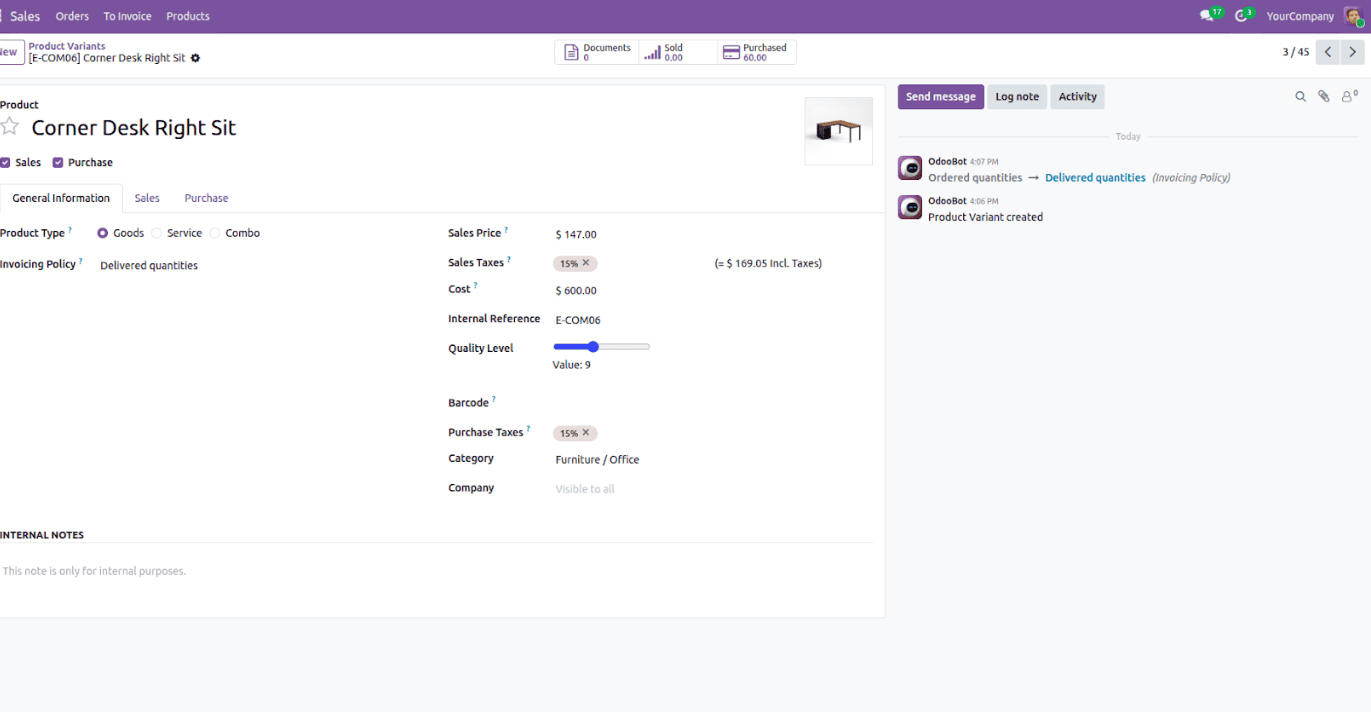
A new field named quality_level is added to the product.product model. This field stores a numeric value that will be controlled through the slider.
from odoo import fields, models,

class ProductProduct(models.Model):
   _inherit = 'product.product'
   quality_level = fields.Integer('Quality Level')
The form view displays the slider on the product form by applying the custom widget to the field.
<?xml version="1.0" encoding="utf-8" ?>
<odoo>
<record id="product_product_form" model="ir.ui.view">
  <field name="name">product_product.form.inherit</field>
  <field name="model">product.product</field>
  <field name="inherit_id" ref="product.product_normal_form_view"/>
  <field name="arch" type="xml">
      <field name="default_code" position="after">
          <field name='quality_level' widget='RangeSliderField' min='5' max='15'/>
      </field>
  </field>
</record>
</odoo>
The widget="RangeSliderField" attribute is the key that connects this field to the custom JavaScript widget.
The QWeb template defines the HTML structure of the slider. It creates an input of type range so that the widget looks and behaves like a slider.
<?xml version="1.0" encoding="utf-8" ?>
<templates>
  <t t-name="FieldRangeSlider" owl="1">
      <div class="slidecontainer" t-on-change="getValue">
          <input type="range" t-att-min="state.min or 1" t-att-max="state.max or 10" value="state.value"/>
          <p>Value:
              <span>
                  <t t-esc="state.value"/>
              </span>
          </p>
      </div>
  </t>
</templates>
The JavaScript file makes the slider interactive. It updates the field value whenever the user moves the slider.
/** @odoo-module **/
import { Component } from "@odoo/owl";
import { useState } from "@odoo/owl";
import { registry } from "@web/core/registry";
export class RangeSliderField extends Component {
 static template = 'FieldRangeSlider';
 setup(){
      const {min,max} = this.__owl__.parent.props.fieldInfo.attrs
      this.state = useState({
          value : this.props.record.data[this.props.name],
          min : min,
          max : max,
      });
 }
 getValue(e) {
      const config = this.env.model.config
      this.state.value = e.srcElement.value
      this.env.model.orm.write(config.resModel,
                              [config.resId], {
                              [this.props.name]: this.state.value,
      });
 }
}
export const rangeSliderField = {
  component: RangeSliderField,
  displayName: "RangeSliderField",
  supportedTypes: ["integer"],
};
registry.category("fields").add("RangeSliderField", rangeSliderField);
Whenever the slider moves, the new value is written back to the Odoo field automatically.
Once the module is installed, the product variant form will show a slider instead of an Integer field. Users can smoothly drag the slider to set the weight, and the selected value will be saved just like any normal field in Odoo.
This customization shows how a regular Integer field can be enhanced with a slider widget in Odoo 19. By combining a model field, a form view, a QWeb template, and a JavaScript component, we can create a more user-friendly input method. The same approach can be extended to other fields or business needs where visual input is more convenient than manual typing.
To read more about How to create a Slider widget in Odoo 18, refer to our blog How to create a Slider widget in Odoo 18.